Welcome to TNC FlipBook - PDF viewer for WordPress
First of all, thank you so much for choosing TNC FlipBook – PDF viewer for WordPress. This is the best PDF Embedder and Flipbook plugin since 2014. If you haven’t purchased TNC FlipBook – PDF viewer for WordPress yet, you can go ahead and get your copy now from CodeCanyon. Click here to visit the CodeCanyon product page.
Also, if you are using the free version of this plugin ( TNC PDF viewer ), you can find the ‘Get Premium’ button on the ‘Plugins’ page right below the name of the free plugin. Then you need to purchase and install the plugin on your Website. After activating the premium plugin, deactivate and then delete the free version of the plugin. Don’t worry, all your previous data will be saved and work finely with the premium version.
In the following sections of this documentation, we’re going to demonstrate how to use TNC FlipBook – PDF viewer for WordPress on your site to power up the visibility and performance of PDF files on your website.
Also, We’ve made a quick video to help you get started faster. You can follow this video and then go through all the other sections of documentation to understand every single detail of the plugin.
Installation
Installing TNC FlipBook – PDF viewer for WordPress is as simple as any other WordPress plugin. Here are the steps required to install the plugin on your WordPress Website.
Purchase and download TNC FlipBook – PDF viewer for WordPress from this link
Once downloaded the plugin, login to your website admin panel
Go to Plugins > Add New Menu
Click on the Upload Plugin button
Click on Choose File
Select the plugin zip file you’ve downloaded on step #1
Click on the ‘Install Now’ button
Once installed, click on Activate button to activate the plugin
That’s it. The plugin is now installed on your WordPress site.
Setup and Creating Your First FlipBook
From version Version 11.1.0 of TNC FlipBook – PDF viewer for WordPress, there are 2 different ways to create FlipBook.
Create FlipBook from TNC FlipBook > Add New Menu & then link or embed the viewers by using or not using shortcodes.
Setup to open or embed all ( .pdf ) links automatically with TNC FlipBook.
In this section, we’re going to walk you through the process of creating your first FlipBook using the first method mentioned above.
After installing and activating TNC FlipBook – PDF viewer for WordPress, Navigate to TNC FlipBook > Add New Menu
Put a title for your Flipbook, Keep it relevant to your PDF file as it will be used as the FlipBook title and while embedding using shortcodes.
In the next section under FlipBook Settings > Basic Settings Upload the PDF file you want to use
Select Page Mode. The default will be fine in most cases.
Default will open Default PDF viewer
Thumbnails will open with displaying page thumbnails on the left side
Bookmarks will open by displaying Bookmarks on the left side
Attachments will open by displaying attachments on the left side
Default Zoom: You can set your preferred default zoom level for this FlipBook on this input
Default Scrolling Mode: You can set your default scrolling mode here. Vertical, horizontal, wrapped or Flip.
Default Spread: Set your preferred default spread here.
Viewer Language: Select your preferred viewer language here.
Jump to page: Enter a page number here if you want to open/jump to a specific page.
Now, go to Toolbar Elements Tab
The first option here is to Use Global options, It’s enabled by default. If you need to hide any specific toolbar elements like download, print and others, you can disable this option and a list of toolbar elements will appear to enable or disable. I am not going through all the toolbar items here as all those are self-explanatory.
The next tab is the Appearance
We have a use global setting option here as well. Disable the global option only if you want to have a different theme/color setting for this specific viewer. Not going through the details here as well, you’ll understand by titles easily.
The next Tab is Privacy/Security
You don’t have to do anything on this tab. If you purchase WP File Access Manager, you’ll be able to manage the restriction settings from Media > File Access Manager Menu.
Once you’re done with all the settings, click on Publish button on the right sidebar
Now, you can share the link to this viewer with anyone.
Method NO : 2
If you already have a lot of PDF links on your website and don’t want to go through each pdf to create a FlipBook individually, this section is for you!
You can enable Automatic iFrame or Automatic Link options to automatically convert all your links ending in .pdf to open with TNC FlipBook – PDF viewer for WordPress.
Please note that the pdf url’s href parameter must end in (.pdf ) and the file must be hosted under the same domain for this function to work.
So, let’s get started,
Navigate to FlipBook > Global Settings > Automatic Display Menu on your wp-admin
On the first field on this page, you’ll see 2 options to select from
Selecting the Automatic iFrame/Embed option will replace all the .pdf links with an embedded FlipBook in the same place where the link was.
If you select Automatic iFrame, 2 more fields will appear in the bottom section for setting iframe width and height. Set those fields and click on the save button to save the changes.
Selecting the Automatic Link option will replace all the .pdf links to open with a FlipBook. This option just changes the links, and anchor text, and everything else remains the same.
If you select the Automatic Link option, another field will appear below for setting Link Target. Set the Link target and hit save to save the changes.
Once the settings are saved, go to any page that contains a .pdf link & you should see the result there!
Inserting FlipBook into WordPress Posts/Pages
In the last chapter, you’ve created your first FlipBook, Now it’s time to insert the FlipBook on any of your posts or pages on your WordPress Website. This chapter is useful only if you’re using the default WordPress Gutenberg Block Editor or Classic Editor.
If you’re using any page builders like Elementor or WPBakery Page Builder, we have addons for those page builders. Please check the Add-ons and integrations section in that case.
Go to Add or Edit any page or posts
If you’re using Gutenberg Block Editor, click on Add Block icon
Search for TNC FlipBook Block
Click on Add FlipBook Button
Select Embed a FlipBook if you want to embed a FlipBook using iFrame on the page you’re editing.
On Select Embed a FlipBook, Search & select by the title of the FlipBook you’ve created and want to embed on this page.
Set width, and height, jump to page & iframe_title parameters of your choice & click on insert FlipBook.
All these settings are for the iframe that will be embedded on the page.
Now, Publish or update the page & then view the page to see the FlipBook embed there.
Select Link to a FlipBook if you want to insert a link on the page that will open the FlipBook when clicked.
On Select Link to a FlipBook, Search & select by the title of the FlipBook you’ve created and want to link from this page.
Set Link Text, Target, jump to page and CSS class of your choice & click on Insert FlipBook
Now, Publish or update the page & then view the page to see the FlipBook link there.
If you’re using Classic Editor, Click on ADD FlipBook button just above the editor
Select Embed a FlipBook if you want to embed a FlipBook using iFrame on the page you’re editing.
On Select Embed a FlipBook, Search & select by the title of the FlipBook you’ve created and want to embed on this page.
Set width, and height, jump to page & iframe_title parameters of your choice & click on insert FlipBook.
All these settings are for the iframe that will be embedded on the page.
Now, Publish or update the page & then view the page to see the FlipBook embed there.
Select Link to a FlipBook if you want to insert a link on the page that will open the FlipBook when clicked.
On Select Link to a FlipBook, Search & select by the title of the FlipBook you’ve created and want to link from this page.
Set Link Text, Target, jump to page and CSS class of your choice & click on Insert FlipBook
Now, Publish or update the page & then view the page to see the Link to a FlipBook there.
Global Settings
You can set options in the Global settings page after activating TNC FlipBook – PDF viewer for WordPress. Navigate to TNC FlipBook > Global Settings Menu to get started.
1.Automatic Display
In this section You can set options here to have all of your current .pdf links to either open or embed as a FlipBook
Automatic Display: If you want to convert all current .pdf links to open as a FlipBook, select any of the options. All links ending in .pdf will be replaced with Embedded FlipBook automatically
Automatic IFrame/Embed
Automatic Link
Automatic iFrame Width: Here you can select your preferred width of your automatic iframe
Automatic iFrame Height: Here you can select your preferred Height of your automatic iframe
2. General Settings
There are a few settings on the General Settings tab of Global Settings. Navigate to the General Settings tab.
Logo: This logo will be used on the top right side of the viewer. You can control logo visibility in the toolbar setting section globally or in each viewer section as well. The recommended maximum height for this logo is 20px
Favicon: This is the shortcut icon/favicon that will be used on the viewer pages.
Fullscreen Link Text: When you use [pvfw-embed] shortcode or use automatic iframe options, a link on top of the viewer appears with a link to open the specific viewer on fullscreen mode. This text will be used as anchor text for that link.
Return to Site Link Text: When you’re on the fullscreen view of any viewer, there’s a button appears in the bottom right corner to return to the previous page. This text will be used as anchor text for that link.
Google Analytics ID: If you want to track your users using Google Analytics, you can add the analytics ID for the site in this field. This code will be used on viewer pages only.
Mobile iFrame Height (Under 800px screen size): This option for customizing height of iFrame on smaller screens.
iFrame Responsive Fix: This option adds a simple line of CSS on the front end to resize the iframe width based on device size.
3. Appearance Settings
Disable Flip Sound: You can enable or disable Flip sound from here.
Do you want to use a Theme or use custom colors? You can select your custom colour or theme from here.
Select Theme: This option on the appearance page is to select whether you want to use one of the built-in themes. Here is a list of predefined themes: Aqua White, Material Blue, Midnight Calm, Smart Red, Louis Purple, Sea Green .
Use Background Image: You can enable or disable background image from here
Choose icon Size: You can choose your preferred icon size ( Small, Medium, Large )
Select Toolbar Style: There are various type of toolbar style available like Top Full Width, Bottom Full Width, Top Center, Bottom Center. Select your preferred one.
4. Toolbar Settings
Default Scroll: If you want to use Flipbook mode by default, you can choose the FLIP option on this setting. Other available settings are vertical, horizontal and wrapped scrolling.
Default Spread: This setting controls the spread of pages. You can choose from No Spreads, Even Spreads and Odd Spread.
Default Zoom: You can select various zooming options like page fit, page width, page height or you can select it Automatic.
FlipBook Language: There are more than 100 languages available for the viewer, you can select your preferred viewer language on this setting.
Page Mode: Three types of page modes are available: Bookmarks, Thumbnails, Attachments. You can select it as per your needs.
Toolbar Elements Visibility: This section lists all the toolbar elements and lets you either display or hide the specific toolbar elements globally. You can overwrite this for specific viewers as well.
5. Advanced Settings
ThemeNcode PDF viewer Page: PDF viewer for WordPress creates 2 pages when activated. This setting should have ThemeNcode PDF viewer [Do not Delete] page selected here. Do not change it to any other page as it will break the viewers, especially the viewers that are created using old shortcodes or automatic options will stop working.
ThemeNcode PDF viewer SC Page: PDF viewer for WordPress creates 2 pages when activated. This setting should have ThemeNcode PDF viewer SC [Do not Delete] page selected here. Do not change it to any other page as it will break the viewers, especially the viewers that are created using old shortcodes that will stop working.
Context Menu/Right Click on Viewer Pages: This setting allows you to disable right clicks on viewer pages.
Text Copying (ctrl+c) keyboard shortcut: This setting allows you to prevent the use of ctrl+c or cmd + c on viewer pages. If you want to protect PDF content from copying, this setting is for you.
Oxygen Builder Integration:
6. Custom CSS/JS
Custom CSS: You can use custom CSS code here. The CSS you provide here will be used only on viewer pages. start writing custom CSS right away.
Custom JS: You can use custom JS code here. The JS you provide here will be used only on viewer pages. start writing custom JS right away. you don’t have to add any script tags. just write the javascript here.
7. Export/Import
This page allows you to import and export the settings of the Global Settings page. This is useful if you need to copy the settings to other sites.
Update
There are 3 ways to update TNC FlipBook – PDF viewer for WordPress. We’ll be demonstrating all of those ways here, Let’s start with the easier & efficient one.
Automatic Update
Go to the ‘Plugins’ page on your WordPress dashboard. Find ‘TNC FlipBook – PDF viewer for WordPress’ and you can see there is an option named ‘Enable Auto Update’. Click that and then when an update comes it will automatically update the plugin.
Update From Plugin Menu
TNC FlipBook – PDF viewer for WordPress comes with another automatic update option. What you need to do is, register your copy of the plugin on the TNC FlipBook > Activation & Updates page using your purchase code. You can get the purchase code on the support tab of the CodeCanyon product page. Click here to go to the support tab and find the purchase code.
Once the plugin is registered for updates, you’ll be able to update the plugin from the Plugins page and the Dashboard > Activation & Updates page.
* If your updates fail for some reason. please go to Dashboard > Updates page and click on the check again link. Then try to update the plugin again.
Manual Update (Not Recommended)
This is not a recommended way to update TNC FlipBook – PDF viewer for WordPress. Still, we’re leaving the details here if you need to do a manual update for any reason.
Download the latest version of the plugin from CodeCanyon
Login to your wp-admin and navigate to the Plugins page
Deactivate and Delete the copy of TNC FlipBook – PDF viewer for the WordPress plugin currently installed
Go to Plugins > Add New page
Click on the Upload plugin, choose the file you’ve downloaded, and click on the upload now button.
Once the plugin is installed, click on Activate button to activate the plugin.
That’s it. The plugin is now updated to the latest version.
Add-ons and Integrations
TNC FlipBook – PDF viewer for WordPress comes with a variety of Add-ons and integrations to make working even simpler. With these Add-ons, you can easily show PDF files on using different themes and page builders.
Add-ons:
1. Elementor – TNC FlipBook – PDF viewer for WordPress: This Add-on comes up with 6 widgets for Elementor. If you use Elementor as your page builder this Add-on will save a lot of time and effort for you. Just drag and drop the widgets and show or embed PDF just as you want. The 5 widgets are:
PDF viewer Link
PDF viewer Embed/iFrame
PDF viewer Image Link
Bookshelf – Display PDF viewer
List/Grid – Display PDF viewer
PDF viewer Navigative
2. Display – TNC FlipBook – PDF viewer for WordPress Addon: If you want to organize and display your PDF files or Ebooks as a bookshelf then this is the Add-on for you. It enhances the visual presentation and visitors can easily go through the PDF files also. This Add-on has 3 modes.
Bookshelf
List View
Grid View
3. Divi – TNC FlipBook – PDF viewer for WordPress Addon: Embed and show pdf files using your Divi page builder. This Add-on has six modules.
PDF viewer Link
PDF viewer Embed/iFrame
PDF viewer Image Link
PDF viewer Navigative
Bookshelf – Display PDF viewer
List/Grid – Display PDF viewer
4. WPBakery – TNC FlipBook – PDF viewer for WordPressAddon: Easily display PDF viewers by using WPBakery Page Builder. The purpose of this addon is to make the shortcode creation process of TNC FlipBook – PDF viewer for WordPress.
5. Navigative – TNC FlipBook – PDF viewer for WordPress addon: This is an addon for TNC FlipBook – PDF viewer for WordPress which allows you to display multiple pdf files on a single page with a navigation on the sidebar. This is useful, especially when you have a few pdf files which you want to display using the iframe shortcode but don’t want to create so many pages.
6. WP File Access Manager: WP File Access Manager is a WordPress plugin that allows you to control access for every single file you upload to your WordPress Media Library. It comes with the integration of WooCommerce & Paid Memberships Pro which lets you set up your eCommerce or membership site media restriction management a lot simpler.
Support
ThemeNcode provides support through the support portal. We’ve already organized many articles for you to find your solution, so please do a search with your issue first. Then if your issue is not answered anywhere, go ahead and create a support ticket using this link.
At our company, customer satisfaction is our top priority, and we take great pride in delivering high-quality products. To ensure that you have a smooth and hassle-free experience with us, we have meticulously crafted a comprehensive refund policy that safeguards your rights as a valued customer.
Before initiating a refund application, we kindly request that you carefully review and fully understand our refund policy. It contains essential information regarding the eligibility criteria, timeframes, and the process for requesting a refund. Familiarizing yourself with these terms will enable us to process your request efficiently and effectively.
Our dedicated support team is always ready and eager to assist you with any queries or concerns you may have. If you encounter any technical issues or require guidance with our products, we strongly encourage you to get in touch with our support team immediately. They are well-equipped with the knowledge and expertise to address your concerns promptly, ensuring that you can make the most of our products.
Remember, we are here to provide you with the best possible experience, and our support team is just a click or a call away. Whether you need help with installation, troubleshooting, or understanding the features of our products, do not hesitate to reach out to us. Your satisfaction is paramount, and we are committed to going above and beyond to ensure your needs are met.
Regular License: Use, by you or one client, in a single end product which end users are not charged for. The total price includes the item price and a buyer fee.
Extended License: Use, by you or one client, in a single end product which end users can be charged for. The total price includes the item price and a buyer fee.
FAQ
Failed to Fetch Error Message – An error occurred while loading the PDF
We’ve received many support requests with this error message and that’s why this article is here. It includes a video as well, so you can understand it easily.
This error comes up when you have a mismatch in your file URL & website URL structure.
For example, your site may use URLs like: http://www.example.com or https://www.example.com or https://example.com or http://example.com
There’s no issue with any format, you can use any structure of URL but what you need to make sure of is the file URL you provide while creating the shortcode must have the same URL structure. Don’t use a different URL structure. Here is a video tutorial for you.
404 error on viewer pages
PDF viewer for WordPress creates 2 pages called ThemeNcode PDF viewer and ThemeNcode PDF viewer SC when you install the plugin. You may get a 404 error if these pages are deleted somehow.
To solve this: Please go to your plugins page, Deactivate PDF viewer for the WordPress plugin and activate it again. That should solve the issue.
How Can I use pdf files from external websites/URLs?
How can I change/customize WP File Access Manager Error Message on PDF viewer?
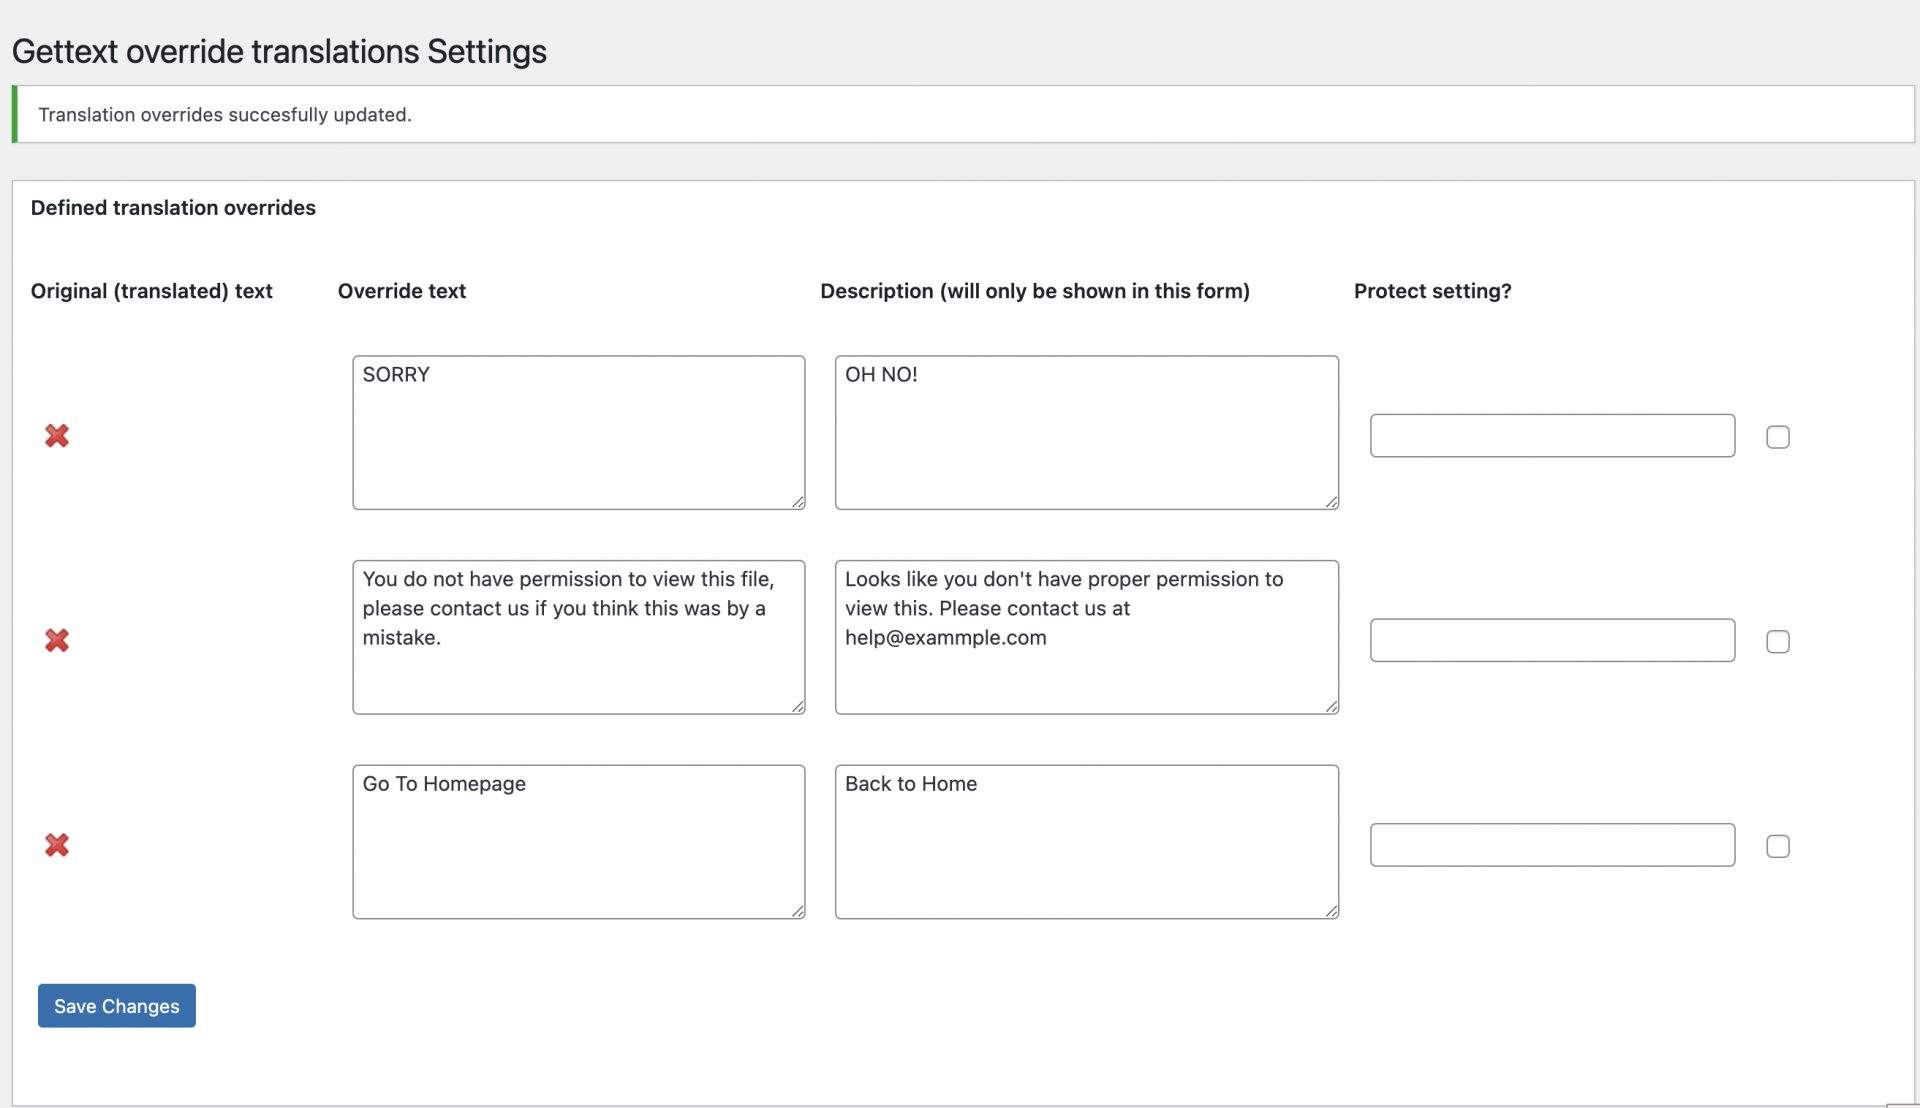
This question comes a lot about changing or customizing the error message when a user doesn’t have access to a specific PDF file. The default message Appears as:
SORRY
You do not have permission to view this file, please contact us if you think this was by a mistake.
Go To Homepage
I am going to show you a quick workaround for changing this text. You’ll need to install a free plugin for this. So, Here are the steps:
Search and install a plugin called Gettext to override translations & activate the plugin. Direct link here.
Go to Plugins > Gettext override translations
Add the text overrides on this page and save settings.
The image below provides more specific details on exactly which string you should use to replace.
This should change the text for you.
Here’s an example:
I hope it helps.
Previews/Next Navigation arrows are not showing on the left/right side of the PDF viewer
If you see the Previous & next icons on the left and right side of PDF viewer, it’s mostly caused by lazyload functionality. What you need to do is Disable Lazyload for viewer pages to get it displaying properly.
Rate us
If you are enjoying using the TNC FlipBook – PDF viewer for WordPress plugin, you can leave us a review. It helps us to improve the product even more. You can submit an additional feature request too.
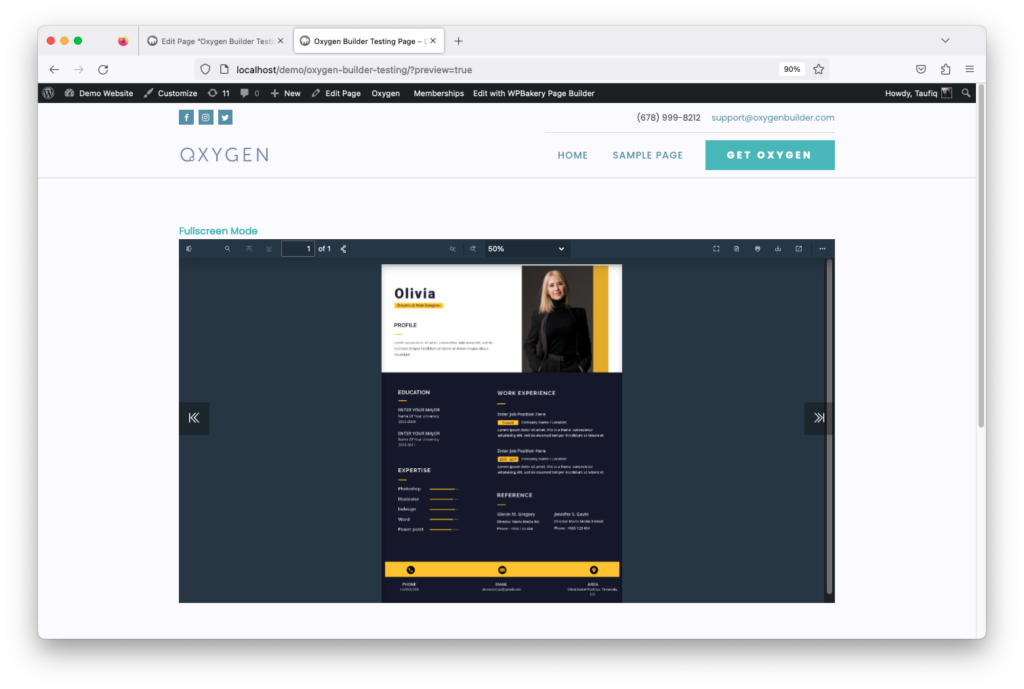
Using TNC FlipBook - PDF viewer for WordPress with Oxygen Builder
A few days ago, we introduced integration with Oxygen Builder which needed some work to set it up. From version 10.9.2 TNC FlipBook – PDF viewer for WordPress comes with a way better integration with Oxygen Builder. There are two different methods to work with Oxygen Builder.
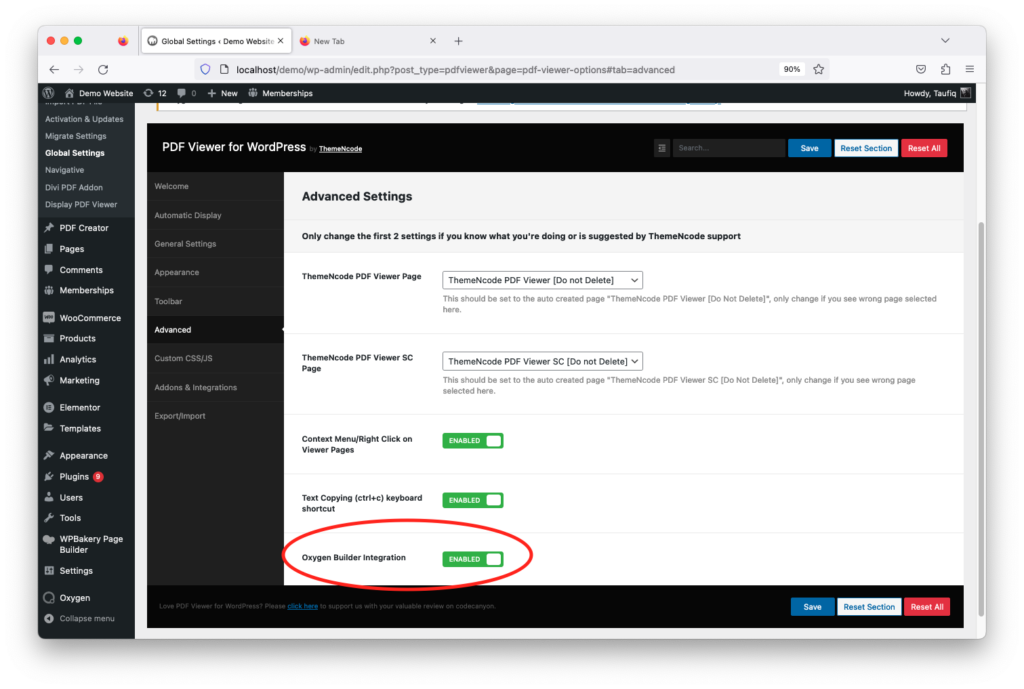
You can now use the default way of creating FlipBook (PDF viewer > Add New) with Oxygen Builder. To use the integration, you just need to enable the integration of Oxygen Builder from TNC FlipBook > Global Settings > Advanced Tab.
Once you enable Oxygen Builder Integration following the process above, you can start creating FlipBook from TNC FlipBook > Add New Menu. Once published, you can visit the viewer normally. This is the first method of creating a FlipBook using TNC FlipBook – PDF viewer for WordPress with Oxygen builder.
Method 2: Using Shortcodes
Additionally. you can still use the previous method of inserting shortcodes. here are shortcodes you can use.
TNC FlipBook – PDF viewer for WordPress 10.9.0 comes with 2 extra shortcodes to make it compatible with Oxygen Builder or any other builders that get rid of page templates. In this article, you’ll get the list of those 2 shortcodes with the parameters. You just need to copy the shortcodes, replace the file URL and paste them on any of your pages or posts to have the viewer display there.
file: This is where you’ll provide the URL to the pdf file that will be opened with FlipBook. Make sure you use the direct URL to the pdf file ending in .pdf, otherwise it will not work. Also, make sure the pdf files are hosted under the same domain.
class: You can use a custom CSS class for the generated link. Basically, this class is used for styling. for example, if you want the link to be a button and you’re using the bootstrap CSS framework, you can use the following in this field: btn btn-default
text: This is the text that will appear as a link. Please make sure to fill this field, as it will display nothing on the front end if you keep this field empty.
target: Link Target, Select how you want the link to open, in the same tab or in a new tab.
download: Select if you want to show the Download button in the toolbar.
print: Select if you want to show the Print button in the toolbar.
fullscreen: Select if you want to show the Fullscreen button in the toolbar.
Share: Select if you want to show the Share button in the toolbar.
zoom: Select if you want to show the Zoom option in the toolbar.
open: Select if you want to show the Open button in the toolbar.
logo: Select if you want to show the Logo button in the toolbar.
pagenav : Select if you want to show the Pagenav button in the toolbar.
find: Select if you want to show the Find button in the toolbar.
page: Enter the page number if you want to send the user to a specific page on opening of the file.
default_zoom: Select the Default Zoom here
pagemode : If you select Thumbs as pagemode, the left bar will be opened with page thumbnails and if you choose bookmarks, the left bar will be opened with the list of bookmarks. It is not recommended to use as it may not work smoothly on smaller screen sizes. We’ve added it just because it might be helpful for some users.
language: Select the language you want to use
current_view: Select if you want to show the Current View button in the toolbar.
rotate: Select if you want to show Rotate View button in the toolbar.
handtool: Select if you want to show the Hand Tool button in the toolbar.
doc_prop: Select if you want to show the Document Properties button in the toolbar.
toggle_menu: Select if you want to show the Toggle Menu button in the toolbar.
toggle_left: Select if you want to show the Toggle Left button in the toolbar.
scroll: Select if you want to show Scroll options in the toolbar.
spread: Select if you want to show Spread options in the toolbar.
default_scroll: Default Scroll Method, Use 1 for Vertical scrolling, Use 2 for Horizontal Scrolling, and use 3 for Flip Book
default_spread: Default Spread Mode, options: 1 for No Spread, 2 for Odd Spreads, 3 for Even Spreads
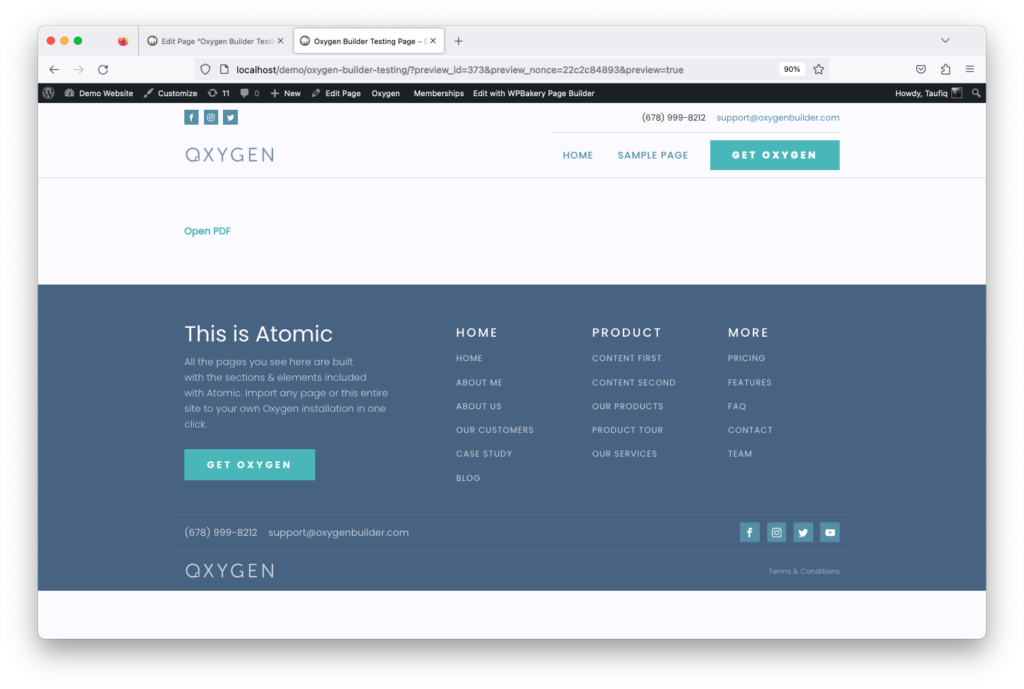
Output:
You can see there is a link with the text “Open PDF”. When someone clicks the link a PDF file will open. The text can be changed to anything from the shortcode.
file: This is where you’ll provide the URL to the pdf file that will be opened with FlipBook. Make sure you use the direct URL to the pdf file ending in .pdf, otherwise, it will not work. Also, make sure the pdf files are hosted under the same domain.
width: Specify the Width of iFrame in pixels here. For example, you can use 600
height: Specify the height of iFrame in Pixels here. For Example, you can use 800
download: Select if you want to show the Download button in the toolbar.
print: Select if you want to show the Print button in the toolbar.
fullscreen: Select if you want to show the Fullscreen button in the toolbar.
Share: Select if you want to show the Share button in the toolbar.
zoom: Select if you want to show the Zoom option in the toolbar.
open: Select if you want to show the Open button in the toolbar.
logo: Select if you want to show the Logo button in the toolbar. The logo will not be displayed if theiFrame width is small. But will display when users go to fullscreen mode.
pagenav: Select if you want to show the Pagenav button in the toolbar.
find: Select if you want to show the Find button in the toolbar.
page: Enter the page number if you want to send the user to a specific page on opening of the file.
default_zoom: Select the Default Zoom here
pagemode: If you select Thumbs as pagemode, the left bar will be opened with page thumbnails and if you choose bookmarks, the left bar will be opened with the list of bookmarks. It is not recommended to use as it may not work smoothly on smaller screen sizes. We’ve added it just because it might be helpful for some users.
language: Select the language you want to use
current_view: Select if you want to show the Current View button in the toolbar.
rotate: Select if you want to show Rotate View button in the toolbar.
handtool: Select if you want to show the Hand Tool button in the toolbar.
doc_prop: Select if you want to show the Document Properties button in the toolbar.
toggle_menu: Select if you want to show the Toggle Menu button in the toolbar.
toggle_left: Select if you want to show the Toggle Left button in the toolbar.
scroll: Select if you want to show Scroll options in the toolbar.
spread: Select if you want to show Spread options in the toolbar.
iframe_title: Title of the iFrame tag
default_scroll: Default Scroll Method, Use 1 for Vertical scrolling, Use 2 for Horizontal Scrolling and use 3 for Flip Book
default_spread: Default Spread Mode, options: 1 for No Spread, 2 for Odd Spreads, 3 for Even Spreads
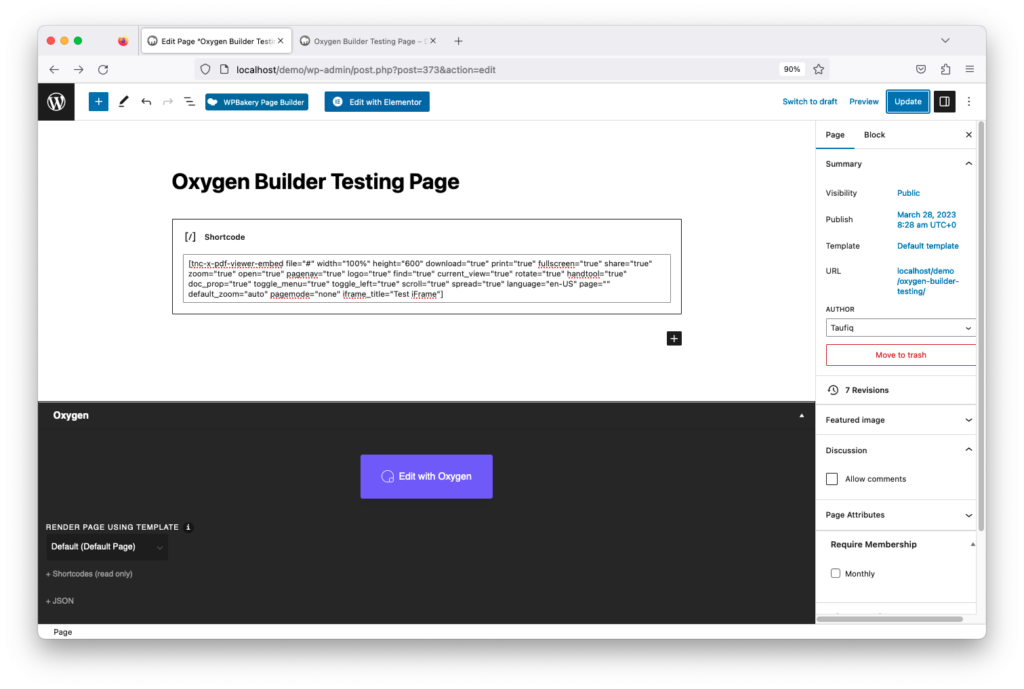
Output:
By using this shortcode, one can directly embed and show a PDF file with a FlipBook on a page or post. Change the shortcode as you need and the viewer will be changed according to it also.
Troubleshoot
TNC FlipBook – PDF viewer for WordPress – Flipbook Conflict with Divi Theme
Shortcodes included with TNC FlipBook - PDF viewer for WordPress version 11.1 and newer
We had a bunch of shortcodes included with older versions of TNC FlipBook – PDF viewer for WordPress. But we’ve streamlined the shortcodes and lowered the number of shortcodes to only 3 from version 11.1 .
However, the previously generated shortcodes will still work, but there’s no way to create those old shortcodes now.
Here are the new shortcodes that come with TNC FlipBook – PDF Viewer for WordPress version 11.1 :
1. [pvfw-embed]
This shortcode allows you to embed already created FlipBook (Using TNC FlipBook > Add New menu) on any post or page. It comes with a few parameters.
viewer_id: This is the id of the viewer you want to embed.
width: This is the width of the iframe that will be embedded on the page.
height: This is the height of the iframe that will be embedded on the page.
[pvfw-link] shortcode allows you to insert a link to an already created FlipBook (Using TNC FlipBook > Add New menu). It comes with a few parameters.
viewer_id: This is the id of the viewer you want to link to.
text: The anchor text that will be used as a link.
class: you can add a CSS class here to the link.
target: Defines the target of the link. Put _blank if you want to open the link in a new tab or use _parent if you want to open the link on the same tab.
[pvfw-image-link] shortcode allows you to insert a link to an already created FlipBook (TNC FlipBook > Add New menu) with an image. It comes with a few parameters.
viewer_id: This is the id of the viewer you want to link to.
upload Image: The anchor text that will be used as a link.
alt_text: You can set ALT Text from here.
link target: defines the target of the link. Put _blank if you want to open the link in a new tab or use _parent if you want to open the link on the same tab.
width: Image width
height: Image Height.
css class: you can add a CSS class here to the link.
image alignment: Image alignment (values: inherit, left, center, right)
From version 10 TNC FlipBook – PDF Viewer for WordPress comes with a whole new system of creating PDF viewers which made us introduce a new set of shortcodes and discontinue the previous set of shortcodes.
However, Those old shortcodes are not completely removed from the plugin. If you’ve generated those shortcodes previously, these shortcodes will work fine. But we’ve removed the ability to create those discontinued shortcodes from version 10.
Here’s a list of shortcodes you should not use anymore and replaced them with new shortcodes if possible.