Welcome to TNC INFINITY, a powerful and versatile WordPress theme designed to help you create stunning websites with ease. This guide will walk you through the installation process and provide an overview of the theme’s key features, allowing you to quickly get up and running.
Display - TNC FlipBook - PDF viewer for WordPress Addon
Welcome to ThemeNcode. “Display – TNC FlipBook – PDF Viewer for WordPress Addon” is a great extension for TNC FlipBook – PDF Viewer for WordPress plugin. This add-on extends the functionality of the core plugin by introducing additional display styles, such as attractive shelf style, organized list style, and visually appealing grid style. So improve the way you present your PDF documents to your audience with the help of this addon.
Purchase & Download
Display – TNC FlipBook – PDF Viewer for WordPress Addon can be purchased through ThemeNcode Portal. Click here to go to the product page, select your license and continue to complete your purchase.
You can pay by credit/debit card. Payments are processed securely through Stripe gateway. After completing the purchase, you will be given the option to download the plugin file.
System Requirements
It is important to ensure that your system meets the necessary requirements for a smooth experience. You must install and activate TNC FlipBook – PDF viewer for WordPress (Available on CodeCanyon) Or TNC PDF viewer (Available on WordPress.org) Plugin before getting this addon. These prerequisites lay a solid foundation for leveraging the Addon’s great features. This plugin works easily with any WordPress version.
Installation
Install Display - TNC FlipBook - PDF viewer for WordPress Addon
Installing Display – TNC FlipBook – PDF viewer for WordPress Addon is very simple just like any other WordPress Plugins. Here are the steps required to install the plugin on your WordPress Website.
Purchase and download Display – TNC FlipBook – PDF viewer for WordPress Addon following the previous section
Once downloaded the plugin, login to your website admin panel
Go to Plugins > Add New Menu
Click on the Upload Plugin button
Click on Choose File
Select the plugin zip file you’ve downloaded on step #1
Click on Install Now button
Once installed, click on Activate button to activate the plugin
That’s it. The plugin is now installed on your WordPress site.
Usage
As mentioned above, this Addon will not work without the TNC FlipBook – PDF viewer for WordPress plugin. So after installing TNC Flipbook, you need to create a flipbook first. To create a flipbook, go to your WordPress dashboard and you will see a tab called TNC FlipBook. Click Add New and set a title. Then upload the PDF of your choice and click select. After that, set a featured image and add a new category. Insert the PDF file into your TNC Flipbook and you’re done! Now you can use this PDF as a flipbook on your website. Now it can be displayed or embedded in a post or page.
After successfully creating a flipbook now you can easily embed it in your page or post. For this go to your new or existing page and search for Display PDF Viewer block. Then click on Add Display PDF Viewer. Now you need to select the viewer type.
Bookshelf
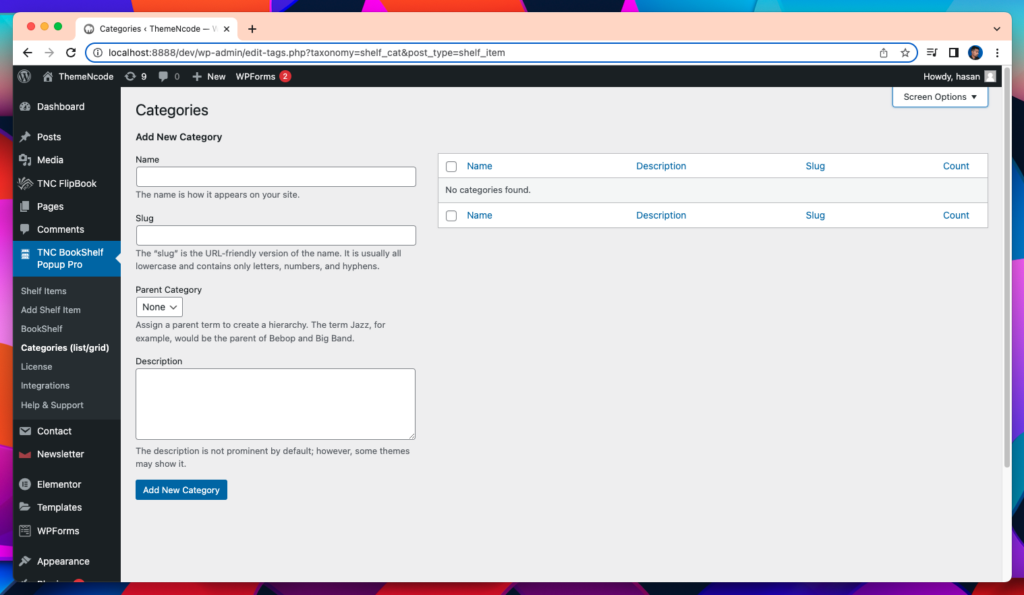
Display – List Grid
Bookshelf: Whenever you select Bookshelf you must first select Viewer to embed. Search for it using the flipbook title. And you cannot select more than five. After that you can select Open Type. You can select it as a link or popup. Then select the shelf type. Four types of shelves are available. You can choose at your own discretion. These are wood style 1, 2 and glass style 1, 2. Then the CSS class. You can add custom CSS to this field.
Display – List Grid: Whenever you select Display – List Grid, you first select a source. You can select it by all sources, categories or you can select individuals. If you select a category or individual viewer, search and select it by name. Next you need to select a display type. You can select it as a grid view or list view. After that you can select Open Type. You can select it as a link or popup. If you select display type as grid view, you will get some options like column, filter, sort, search. But if you select it as a list view, you won’t get those options. Then the CSS class. You can add custom CSS to this field.
After finishing all this click on the Display PDF Viewer button and then publish and preview your page.
Shortcodes
Shortcodes are a feature of WordPress that allow you to insert dynamic content or functionality into your posts, pages, and widgets with a simple, user-friendly syntax.There are 2 types of shortcodes available for Display – TNC FlipBook – PDF viewer for WordPress Addon.
Bookshelf Shortcode
List/Grid Shortcode
Bookshelf Shortcode
[pvfw-book-shelf]
This shortcode allows you to display selected PDF viewers using a BookShelf Style. It comes with a few parameters.
viewer_id: This is the list of comma-separated id’s of the viewer you want to embed. Use maximum 5 id’s or each shelf
open_type: This parameter defines how the viewers should appear, you can choose between link & popup.
link_target: It is applicable if you’ve used link in open_type parameter. Select _parent for same tab or _blank for new tab
shelf_type: Style of Shelf, currently applicable values are style-1, style-2, style-3, style-4
css_class: You can use any css class if you want to apply custom styles to the shelf.
This shortcode allows you to display selected PDF viewers using a Grid or List Style. It comes with a few parameters.
source: Where to pull the PDF viewers From, You can choose from all (Uses all PDF viewers), category (Select Categories in next parameter) or select-viewer (Select Viewers in next parameter)
viewer_id: This is the list of comma-separated id’s of the viewer you want to embed.
display_type: Choose between list or grid
category: Comma Separated list of category id’s you want to use posts from
open_type: This parameter defines how the viewers should appear, you can choose between link & popup.
link_target: It is applicable if you’ve used link in open_type parameter. Select _parent for same tab or _blank for new tab
column: Select Number of columns to show maximum. usable values are col-2, col-3, col-4. Applicable for Grid style only
filter: Use 0 to disable, 1 to enable filter. Applicable for Grid style only
sort: Use 0 to disable or 1 to enable sort. Applicable for Grid style only
search: use 0 to disable or 1 to enable search. Applicable for Grid style only
css_class: You can use any css class if you want to apply custom styles to the container.
This is an image filter that can be used to change the default placeholder image.
Refund Policy
At our company, customer satisfaction is our top priority, and we take great pride in delivering high-quality products. To ensure that you have a smooth and hassle-free experience with us, we have meticulously crafted a comprehensive refund policy that safeguards your rights as a valued customer.
Before initiating a refund application, we kindly request that you carefully review and fully understand our refund policy. It contains essential information regarding the eligibility criteria, timeframes, and the process for requesting a refund. Familiarizing yourself with these terms will enable us to process your request efficiently and effectively.
Our dedicated support team is always ready and eager to assist you with any queries or concerns you may have. If you encounter any technical issues or require guidance with our products, we strongly encourage you to get in touch with our support team immediately. They are well-equipped with the knowledge and expertise to address your concerns promptly, ensuring that you can make the most of our products.
Remember, we are here to provide you with the best possible experience, and our support team is just a click or a call away. Whether you need help with installation, troubleshooting, or understanding the features of our products, do not hesitate to reach out to us. Your satisfaction is paramount, and we are committed to going above and beyond to ensure your needs are met.
Updates and Support
Updates:
Stay at the forefront of technology advancements by choosing our annual plan, which offers an affordable and flexible subscription, giving you access to all the updates, enhancements and exciting new features released during the year. Benefit from the latest improvements. On the other hand, if you prefer the Lifetime Plan, you will enjoy the unparalleled benefits of not only enjoying our current cutting-edge products, but also all future updates and innovations.
Support:
Both plans, Annual and lifetime, provide 1 year of dedicated support to assist you with any inquiries or technical concerns you may encounter while using our product. This ensures a smooth and satisfying experience throughout the designated time frame.
For those seeking additional support beyond the initial 1-year period, we offer the option to purchase a supplementary support package. This extension ensures that you continue to receive expert assistance.
Mainly there are two types of plans available for Display – TNC FlipBook – PDF viewer for WordPress Addon. Annual and Lifetime.
Annual Plan: This is a yearly plan. You will get a 1-year license in this plan. There are three types of annual plans.
1 Site: This license can be used on one site
3 Sites: This license can be used on three sites
100 Sites: This license can be used on 100 sites
Lifetime Plan: This is a ‘pay once’ type of plan. You will get a lifetime license in this plan. There are three types of annual plans.
1 Site: This license can be used on one site
3 Sites: This license can be used on three sites
5 Sites: This license can be used on 5 sites
Check out the pricing table for more detailed information.
FAQ
How long will I get customer support?
You will get 1 year of support if you choose the annual plan and lifetime support with the lifetime plan. Check the pricing table for more details.
What is the refund policy?
We have a very well-prepared refund policy. Check this out.
Can I use it without a TNC FlipBook- PDF viewer for WordPress?
No, this is an Add-on of TNC FlipBook – PDF viewer for WordPress. You need to install TNC FlipBook – PDF viewer for WordPress first.
Why can’t I show anything on the Bookshelf?
Make sure you have featured images on all the PDF viewer pages to show them on the Bookshelf.
Does this plugin work with Page Builders?
Yes, it has widgets for almost all the page builders like Elementor, Divi, WPBakery, Avada etc.
Welcome to TNC FlipBook - PDF viewer for WordPress
First of all, thank you so much for choosing TNC FlipBook – PDF viewer for WordPress. This is the best PDF Embedder and Flipbook plugin since 2014. If you haven’t purchased TNC FlipBook – PDF viewer for WordPress yet, you can go ahead and get your copy now from CodeCanyon. Click here to visit the CodeCanyon product page.
Also, if you are using the free version of this plugin ( TNC PDF viewer ), you can find the ‘Get Premium’ button on the ‘Plugins’ page right below the name of the free plugin. Then you need to purchase and install the plugin on your Website. After activating the premium plugin, deactivate and then delete the free version of the plugin. Don’t worry, all your previous data will be saved and work finely with the premium version.
In the following sections of this documentation, we’re going to demonstrate how to use TNC FlipBook – PDF viewer for WordPress on your site to power up the visibility and performance of PDF files on your website.
Also, We’ve made a quick video to help you get started faster. You can follow this video and then go through all the other sections of documentation to understand every single detail of the plugin.
Method NO : 1
In this section, we’re going to walk you through the process of creating your first FlipBook using the first method mentioned above.
After installing and activating TNC FlipBook – PDF viewer for WordPress, Navigate to TNC FlipBook > Add New Menu
Put a title for your Flipbook, Keep it relevant to your PDF file as it will be used as the FlipBook title and while embedding using shortcodes.
In the next section under FlipBook Settings > Basic Settings Upload the PDF file you want to use
Select Page Mode. The default will be fine in most cases.
Default will open Default PDF viewer
Thumbnails will open with displaying page thumbnails on the left side
Bookmarks will open by displaying Bookmarks on the left side
Attachments will open by displaying attachments on the left side
Default Zoom: You can set your preferred default zoom level for this FlipBook on this input
Default Scrolling Mode: You can set your default scrolling mode here. Vertical, horizontal, wrapped or Flip.
Default Spread: Set your preferred default spread here.
Viewer Language: Select your preferred viewer language here.
Jump to page: Enter a page number here if you want to open/jump to a specific page.
Now, go to Toolbar Elements Tab
The first option here is to Use Global options, It’s enabled by default. If you need to hide any specific toolbar elements like download, print and others, you can disable this option and a list of toolbar elements will appear to enable or disable. I am not going through all the toolbar items here as all those are self-explanatory.
The next tab is the Appearance
We have a use global setting option here as well. Disable the global option only if you want to have a different theme/color setting for this specific viewer. Not going through the details here as well, you’ll understand by titles easily.
The next Tab is Privacy/Security
You don’t have to do anything on this tab. If you purchase WP File Access Manager, you’ll be able to manage the restriction settings from Media > File Access Manager Menu.
Once you’re done with all the settings, click on Publish button on the right sidebar
Now, you can share the link to this viewer with anyone.
Getting Started
First of all, Thank you so much for choosing WP File Access Manager.
This documentation is here to show you how you can install and use WP File Access Manager Easily and Efficiently.
For Detailed information and features of the Plugin, Please click here to go to CodeCanyon Plugin Page
To get started you need to Purchase WP File Access Manager for only $59 from Codecanyon. Click Here to Purchase WP File Access Manager If you’ve already purchased the plugin, you can continue to the next step.
Step 1: Download from CodeCanyon
After Purchasing the plugin on CodeCanyon. Go to the Downloads page
Find the Plugin on the list and click on Green Download Button
Save the zip file on your computer
Getting Started
First of all, thanks for choosing Divi – TNC FlipBook – PDF viewer for WordPress Addon. The only Divi extension that works with PDF files.
This documentation is to demonstrate everything about this Add-on. Right from buying the Add-on to using it efficiently.
To get started, you need to buy this from the landing page on the ThemeNcode website, Divi – TNC FlipBook – PDF viewer for WordPress Addon. There are three plans available for you at this moment. Select your plan and click ‘Buy Now’.
You’ll be redirected to our portal to complete your purchase, you can pay with any credit/debit card. Payments are processed securely through the Stripe gateway.
After completing the purchase, you’ll get the option to Download your plugin file. Download the plugin to your device and continue to the next section for details on installation.
If you already have this plugin, you should proceed to the next step. For more detailed information about the plugin and its features, you should check out the Divi – TNC FlipBook – PDF viewer for WordPress Addon landing page.
N.B.: Please note that this is not a standalone plugin. It requires both Divi Builder and TNC FlipBook – PDF viewer for WordPress installed in order to work. The purpose of this addon is to make the shortcode creation process of our plugin TNC FlipBook – PDF viewer for WordPress. Many users like the easy option of adding and editing shortcodes using the Divi Builder Module. So that’s why we are releasing this addon.
Getting Started
Welcome to ThemeNcode. First of all, thank you for choosing TNC Bookshelf Popup Pro. This plugin will enhance your website design. You can organize your website elements such as images, image galleries, videos, PDFs, WooCommerce products, as well as embedding elements, pages, posts and many other in Bookshelf style. This plugin has grid/list options as well as search, sort and filter options.
To purchase the TNC Bookshelf Popup Pro plugin, visit the portal page on the ThemeNcode website. After that select your preferred plan/package. Mainly there are two types of plans available for TNC Bookshelf Popup Pro, Annual and Lifetime. Check out the pricing table for more detailed information. After selecting your purchase plan, click on the button to purchase. You can pay with any credit/debit card. Payments are processed securely through the Stripe gateway.
After completing the purchase, you’ll get the option to Download your plugin file. Download the plugin to your device and continue to the next section for details on installation.
PDF viewer Embed
If you choose the PDF viewer Embed module it will show the PDF that you select right onto that page/post. Follow the next steps
Select the PDF viewer you want to show from ‘Select PDF’
Width is by default set to 100%. Change it if you want otherwise leave it as it is.
Height is by default set to 800. You can change it too if you want
Put a title in the iframe title option
In ‘Jump to Page’ you need to put a number to take your visitors straight to that page
Default Zoom is selected to auto by default. There are various options like 75%, 100%, page fit, etc. Choose the one that suits your need.
In the Default Page Mode, you get three options. Thumbnail, Bookmark, and Attachment. The thumbnail will show the thumbnails of the viewer on the left side of the viewer. Bookmark will show the bookmarks.
Then there are three more options. Link, Background, and Admin level. You can put the link of the module and select if you want to open it in a new tab or the same tab. Background color can be changed from the background option and the Admin label is to change the label of the module ( you should keep this as it is)
Save the changes and then publish and that page/post will show a PDF viewer now.
Getting Started
First of all, thanks for choosing Preview – TNC FlipBook – PDF viewer for WordPress Addon. This documentation is to demonstrate everything about this addon. Right from buying the addon to using it efficiently.
To get started, you need to buy this from the landing page on the ThemeNcode website, Preview – TNC FlipBook – PDF viewer for WordPress Addon. There are various plans available for you at this moment. Select your plan and click ‘Buy Now’.
You’ll be redirected to our portal to complete your purchase, you can pay with any credit/debit card. Payments are processed securely through the Stripe gateway.
After completing the purchase, you’ll get the option to Download your plugin file. Download the plugin to your device and continue to the next section for details on installation.
N.B.: Please note that this is not a standalone plugin. It requires TNC FlipBook – PDF viewer for WordPress or TNC PDF viewer installed in order to work. The purpose of this addon is to show a few selected pages of a PDF file and put restrictions so that only the permitted users can get access to the full PDF.
Getting Started
Welcome to ThemeNcode. “Display – TNC FlipBook – PDF Viewer for WordPress Addon” is a great extension for TNC FlipBook – PDF Viewer for WordPress plugin. This add-on extends the functionality of the core plugin by introducing additional display styles, such as attractive shelf style, organized list style, and visually appealing grid style. So improve the way you present your PDF documents to your audience with the help of this addon.
All Offers
In this section, you can find all the previously generated offers. You can edit the offer by clicking on the offer. You can view the offer from here also.
Purchase & Download
Display – TNC FlipBook – PDF Viewer for WordPress Addon can be purchased through ThemeNcode Portal. Click here to go to the product page, select your license and continue to complete your purchase.
You can pay by credit/debit card. Payments are processed securely through Stripe gateway. After completing the purchase, you will be given the option to download the plugin file.
Getting Started
Elementor – TNC FlipBook – PDF viewer for WordPress Addon helps you to display or embed PDFs easily if you use Elementor Page Builder. It enables TNC FlipBook – PDF viewer for WordPress or TNC PDF viewer (Available on WordPress. org) to work with Elementor.
This documentation is here to show you how you can install and use Elementor – TNC FlipBook – PDF viewer for WordPress Addon easily and efficiently.
For Detailed information and features of the Addon, Please click here to go to CodeCanyon Plugin Page
N.B.: Please note that this is not a standalone plugin. It requires Elementor Builder and TNC FlipBook – PDF viewer for WordPress or TNC PDF viewer (Available on WordPress. org) installed in order to work. The purpose of this addon is to make the shortcode creation process of our plugin TNC FlipBook – PDF viewer for WordPress or TNC PDF viewer. Many users like the easy option of adding and editing shortcodes using the Elementor Builder Widgets. So that’s why we are releasing this addon.
Automatic Installation
Log in to your WordPress admin panel.
Navigate to Appearance > Themes.
Click on the Add New button at the top of the page.
In the search field, enter “Theme Name.”
Locate the TNC INFINITY theme and click the Install button.
After installation, click the Activate button to activate the theme.
Step 1: Download from CodeCanyon
After Purchasing the plugin on CodeCanyon. Go to the Downloads page
Find the Plugin on the list and click on Green Download Button
Save the zip file on your computer
Install Display - TNC FlipBook - PDF viewer for WordPress Addon
Installing Display – TNC FlipBook – PDF viewer for WordPress Addon is very simple just like any other WordPress Plugins. Here are the steps required to install the plugin on your WordPress Website.
Purchase and download Display – TNC FlipBook – PDF viewer for WordPress Addon following the previous section
Once downloaded the plugin, login to your website admin panel
Go to Plugins > Add New Menu
Click on the Upload Plugin button
Click on Choose File
Select the plugin zip file you’ve downloaded on step #1
Click on Install Now button
Once installed, click on Activate button to activate the plugin
That’s it. The plugin is now installed on your WordPress site.
PDF viewer Embed
If you choose the PDF viewer Embed widget it will show the PDF that you select right onto that page/post. Follow the next steps
Select the PDF viewer you want to show from ‘Select PDF’
Width is by default set to 100%. Change it if you want otherwise leave it as it is.
Height is by default set to 800. You can change it too if you want
Put a title in the iframe title option
Site Identity
The Site Identity section allows you to set your website’s title, tagline, and logo. Here, you can:
Update your website’s title and tagline.
Upload a custom logo or use text-based branding.
Set a site icon (favicon) that appears in the browser tab.
Getting Started
First of all, thanks for choosing the Avada – TNC FlipBook – PDF viewer for WordPress Addon. The only Avada addon that works with PDF files.
This documentation is to demonstrate everything about this Addon. Right from buying the Add-on to using it efficiently.
After completing the purchase, you’ll get the option to Download your plugin file. Download the plugin to your device and continue to the next section for details on installation.
If you already have this plugin, you should proceed to the next step. For more detailed information about the plugin and its features, you should check out the “Avada – TNC FlipBook – PDF viewer for WordPress Addon” landing page.
N.B.: Please note that this is not a standalone plugin. It requires both Avada Builder and TNC FlipBook – PDF viewer for WordPress or TNC PDF viewer (Available on WordPress.org) installed in order to work.
Bookshelf - Display PDF viewer
To use this Widget you need an addon called “Display – TNC FlipBook – PDF viewer for WordPress Addon”. This will organize and show all the PDF files as a bookshelf. This looks super amazing. Get this addon from here, Display – TNC FlipBook – PDF viewer for WordPress Addon.
Read this documentation to learn how to work with this addon.
Getting Started
First of all, thanks for choosing the TNC PDF viewer WordPress plugin. This plugin is available on WordPress.org. You can install it in two ways.
Log in to your WordPress dashboard and go to Plugins -> Add New
Click Upload Plugin and then click Install Now
After installing click Activate
Install from WordPress Dashboard
Log into your WordPress dashboard and go to Plugins -> Add New
Search for TNC PDF viewer
Click Install now
After the installation is done, click Activate and you’re done.
Installation
Installing TNC FlipBook – PDF viewer for WordPress is as simple as any other WordPress plugin. Here are the steps required to install the plugin on your WordPress Website.
Purchase and download TNC FlipBook – PDF viewer for WordPress from this link
Once downloaded the plugin, login to your website admin panel
Go to Plugins > Add New Menu
Click on the Upload Plugin button
Click on Choose File
Select the plugin zip file you’ve downloaded on step #1
Click on the ‘Install Now’ button
Once installed, click on Activate button to activate the plugin
That’s it. The plugin is now installed on your WordPress site.
Method NO : 2
If you already have a lot of PDF links on your website and don’t want to go through each pdf to create a FlipBook individually, this section is for you!
You can enable Automatic iFrame or Automatic Link options to automatically convert all your links ending in .pdf to open with TNC FlipBook – PDF viewer for WordPress.
Please note that the pdf url’s href parameter must end in (.pdf ) and the file must be hosted under the same domain for this function to work.
So, let’s get started,
Navigate to FlipBook > Global Settings > Automatic Display Menu on your wp-admin
On the first field on this page, you’ll see 2 options to select from
Selecting the Automatic iFrame/Embed option will replace all the .pdf links with an embedded FlipBook in the same place where the link was.
If you select Automatic iFrame, 2 more fields will appear in the bottom section for setting iframe width and height. Set those fields and click on the save button to save the changes.
Selecting the Automatic Link option will replace all the .pdf links to open with a FlipBook. This option just changes the links, and anchor text, and everything else remains the same.
If you select the Automatic Link option, another field will appear below for setting Link Target. Set the Link target and hit save to save the changes.
Once the settings are saved, go to any page that contains a .pdf link & you should see the result there!
Getting Started
Thank you for choosing Hospital Child Theme – Divi. A perfect website for hospitals, healthcare foundations, medical institutions, and so on. In this documentation, you can learn how to use this theme and build your website with a step-by-step process.
Before proceeding I am assuming that you have already bought the Hospital Child Theme – TNC from the Elegant Themes Marketplace. If you haven’t please visit the Hospital Child Theme – TNC page on Elegant Themes Marketplace and click on Buy This Item. After that create an account if you don’t have one and complete your purchasing process. After that download the file.
Getting Started
Thank you for choosing TNC Cryptique Divi Child Theme. A perfect website for Crypto enthusiasts, Crypto bloggers, Crypto-related businesses, and so on. In this documentation, you can learn how to use this theme and build your website with a step-by-step process.
Before proceeding I am assuming that you have already bought the TNC Cryptique Divi Child Theme from the Elegant Themes Marketplace. If you haven’t please visit the TNC Cryptique Divi Child Theme page on Elegant Themes Marketplace and click on Buy This Item. After that create an account if you don’t have one and complete your purchasing process. After that download the file.
Getting Started
Thanks for choosing AI Excerpt Generator By ThemeNcode. This is a plugin that generates excerpts with the help of Chat GPT AI. You can quickly get the excerpt or summary of your posts, pages, and many other post types.
To purchase the AI Excerpt Generator By ThemeNcode plugin, visit the plugin landing page on the ThemeNcode website, select your preferred plan/package, and click on the button to purchase.
You’ll be redirected to our portal to complete your purchase, you can pay with any credit/debit card. Payments are processed securely through the stripe gateway.
After completing the purchase, you’ll get the option to Download your plugin file. Download the plugin to your device and continue to the next section for details on installation.
After Purchasing the plugin on CodeCanyon. Go to the Downloads page
Find the Plugin on the list and click on Green Download Button
Save the zip file on your computer
Step 2: Install via WordPress Admin (wp-admin)
Please follow these steps to install via wp-admin
Login as administrator to wp-admin using your username and password
Go to Plugins-> Add New
Click on the Upload Plugin button
Click on Choose File and choose the file you just downloaded from CodeCanyon
Click on Install Now
Click on Activate Plugin once the installation is done
That’s all, and the plugin is installed on your site now!
Getting Started
Thank you so much for choosing WPBakery – TNC FlipBook – PDF viewer for WordPress Addon. This addon makes the shortcode creation process easier for TNC FlipBook – PDF viewer for WordPress.
Get this plugin from CodeCanyon. Simply navigate to WPBakery – TNC FlipBook – PDF viewer for WordPress Addon page on CodeCanyon and complete your purchase. If you’ve already purchased the plugin, you can continue to the next step.
N.B.: Please note that this is not a standalone plugin. It requires both WPBakery Page Builder and TNC FlipBook – PDF viewer for WordPress installed in order to work. The purpose of this addon is to make the shortcode creation process of our plugin TNC FlipBook – PDF viewer for WordPress. Many users like the easy option of adding and editing shortcodes using the WPBakery Builder Elements. So that’s why we are releasing this addon.
Step 2: Install via WordPress Admin (wp-admin)
Please follow these steps to install via wp-admin
Login as administrator to wp-admin using your username and password
Go to Plugins-> Add New
Click on the Upload Plugin button
Click on Choose File and choose the file you just downloaded from CodeCanyon
Click on Install Now
Click on Activate Plugin once the installation is done
That’s all, and the plugin is installed on your site now!
Step 1: Download From CodeCanyon
After Purchasing the plugin on CodeCanyon. Go to the Downloads page
Find the Plugin on the list and click on Green Download Button
Save the zip file on your computer
Getting Started
Thank you for choosing TNC Lawyer Divi Child Theme. A perfect website for lawyers, advocates, attorneys, law firms, and so on. In this documentation, you can learn how to use this theme and build your website with a step-by-step process.
Before proceeding I am assuming that you have already bought the TNC Lawyer Divi Child Theme from the Elegant Themes Marketplace. If you haven’t please visit the TNC Cryptique Divi Child Theme page on Elegant Themes Marketplace and click on Buy This Item. After that create an account if you don’t have one and complete your purchasing process. After that download the file.
PDF viewer Link
If you choose the ‘PDF viewer Link’ element, It will show a text with a link on that specific page/post. When visitors will click the link it will open the selected PDF viewer.
Select PDF: The first field is to select the PDF viewer. Search for the desired PDF viewer and select that.
Link Class: Set a class name if you want to edit it later with additional CSS
Link Text: Put the text which will be turned into the hyperlink
Link Target: The PDF viewer can be opened in the same tab or a new tab. Select it from the link target
Click Save Changes and you’re done.
General
You will Select the default featured image.
You will get the option to display featured images in blog posts.
Display featured images in single posts.
You can also select page title background image
You can change your primary and heading font of your site.
These are the basic general settings available in TNC INFINITY. Explore the options provided by your theme and customize them to align with your brand, design preferences, and website requirements. Remember to save your changes after customizing the general settings to apply them to your website.
Getting Started
First of all, thanks for choosing TNC Residane. This documentation will help you in using the theme properly. Please read the whole documentation before using this theme and if you have any confusion feel free to contact us through our support hub.
Before installing, please make sure the following things:
You should have at least WordPress version 5.5 installed. Newer versions will work perfectly.
PHP version should be 5.4 or greater.
WordPress memory limit should be at least 128 MB
Installation
Before you can use this plugin, you’ll need TNC FlipBook – PDF viewer for WordPress and Divi Builder installed on your WordPress site. So, Please install these two first if you don’t have them already. When you are done with this proceed to the next step.
Purchase and download Divi – TNC FlipBook – PDF viewer for WordPress Addon
Once downloaded the plugin, login to your website admin panel
Go to Plugins > Add New Menu
Click on the Upload Plugin button
Click on Choose File
Select the plugin zip file you’ve downloaded on step #1
Click on the Install Now button
Once installed, click on Activate button to activate the plugin
That’s it. The plugin is now installed on your WordPress site.
Getting Started
Navigative is an addon for TNC FlipBook – PDF viewer for WordPress that allows you to display multiple pdf files on a single page with a navigation on the sidebar. This is useful, especially when you have a few pdf files which you want to display using the iframe shortcode but don’t want to create so many pages. You can use this addon with TNC PDF viewer (Available on WordPress.org) too.
For Detailed information and features of the Add-on, Please click here to go to CodeCanyon Plugin Page
To get started you need to Purchase this Add-on for only $25 from Codecanyon. Click Here to Purchase Navigative – TNC FlipBook – PDF viewer for WordPress Addon If you’ve already purchased the plugin, you can continue to the next step.
Step 1: Download from CodeCanyon
After Purchasing the plugin on CodeCanyon. Go to the Downloads page
Find the Plugin on the list and click on Green Download Button
Save the zip file on your computer
PDF viewer Link
If you choose the ‘PDF viewer Link’ module, it will create a link with your given text and when someone clicks the link, your selected PDF viewer will open. Follow these Steps:
Select the PDF viewer from the ‘Select PDF’ option.
In the Link Text, put a text which you want to turn into a link
Give the link a class name in the Link Class option if you want to customize the link later
Link target will make sure whether you want to open in a new tab or the same tab.
The later part is the same as the previous ‘PDF viewer Embed’. Follow those or you can keep them as it is also.
Getting Started
Facebook Fan Page widget comes with a widget that you can use on any widget area. You can set the Facebook Page URL, Width, Height, and other options. Pretty simple to use.
The best part of this plugin is you don’t have to create any Facebook application. Just install the plugin, put in your page URL, and nothing more…!
Getting Started
First of all, thanks for choosing TNC Hospital. This documentation will help you in using the theme properly. Please read the whole documentation before using this theme, and if you have any confusion, feel free to contact us through our support hub.
Before installing, please make sure the following things:
You should have at least WordPress version 5.5 installed. Newer versions will work perfectly.
PHP version should be 5.4 or greater.
WordPress memory limit should be at least 128 MB
Getting Started
Thank you so much for choosing QuoteX. This plugin helps you to receive custom price quote requests from your customers and you can send them a custom price quote and then collaborate over the price.
Get this plugin from CodeCanyon. Simply navigate to QuoteX – WooCommerce Request a Quote page on CodeCanyon and complete your purchase. If you’ve already purchased the plugin, you can continue to the next step.
This documentation is here to show you how you can install and use QuoteX Easily and Efficiently.
For Detailed information and features of the Plugin, Please click here to go to the QuoteX landing page on ThemeNcode.
Step 1: Download From CodeCanyon
After Purchasing the plugin on CodeCanyon. Go to the Downloads page
Find the Plugin on the list and click on Green Download Button
Save the zip file on your computer
Display Settings
After installing and activating QuoteX successfully you need to set it up.
Got to Quotes -> Settings
Then click ‘Display Setting’
On the Request a Quote Button you need to enable the ‘Request a Quote’ Button. You can show this on all products, selected categories, or individual products
The next option is ‘Exclude Products’. Put the name of the product that you want to exclude.
If you want to hide the ‘Add to Cart’ button enable the option from the ‘Hide Add to Cart Button’. You can hide this from all products, selected categories, or individual products. You can exclude specific products here too.
Next, you can do the same with the Price in the ‘Hide Price’ section. You can hide the rice from all products, selected categories, or individual products.
Getting Started
Thanks for choosing OfferPress. This is a plugin that will make your business on WooCommerce even easier by simplifying the offer link generation process. You can easily create links with various types of offers with a lot of parameters.
To purchase the OfferPress plugin, visit the OfferPress landing page on the ThemeNcode website, select your preferred plan/package, and click on the button to purchase.
You’ll be redirected to our portal to complete your purchase, you can pay with any credit/debit card. Payments are processed securely through the stripe gateway.
After completing the purchase, you’ll get the option to Download your plugin file. Download the plugin to your device and continue to the next section for details on installation.
Add New Offer
First, go to Offers -> Add New Offer
Basic Settings:
Status: The status can be set to ‘Active’, ‘Disabled’, or ‘Expired’.
Offer Message: In this field, you can put a message which will be displayed above the ‘Avail Offer’ button
Products:
Product: Here you can select the product for the offer. You can change the product from this option.
Quantity: Set the amount of how many products you want to give the offer.
Price: Set the price of the product.
Users:
In this segment, you can see the users that can avail of the offer. There are three categories
All users: Everyone can avail of this kind of offer
Selected Roles: Those users who have the given role can avail of this kind of offer. All of the WordPress user roles are available here
Selected Users: Only the selected users can get this kind of offer.
Limit and Expiration:
Expiration Date: Here you can set the date of expiration. After that date, the offer will not work and the status will be expired.
Max Usage: The maximum number of users that can get this offer. Use -1 for setting the usage to unlimited.
After selecting everything, click update and you will get a link that you can share. By clicking on that link visitors can get the offer.
Installation
Before you begin, make sure you have a working WordPress installation. If you don’t have WordPress installed, follow these steps:
Download the latest version of WordPress from wordpress.org and follow the installation instructions provided.
Once WordPress is installed and running, you’re ready to install the TNC INFINITY theme.
If you choose the ‘PDF viewer Link’ widget, it will create a link with your given text and when someone clicks the link, your selected PDF viewer will open. Follow these Steps:
Select the PDF viewer from the ‘Select PDF’ option.
In the Link Text, put a text which you want to turn into a link
Give the link a class name in the Link Class option if you want to customize the link later
Link target will make sure whether you want to open in a new tab or the same tab.
Colors
The Colors and Background sections enable you to customize the color scheme and background of your website. In these sections, you can customize the color of specific elements like:
Header Background
Site Title
Site Tagline
Navbar Top Menu
Dropdown Menu with Background
Active Menu
Hamburger Icon
Font Color
Body Color
Link Color and many more.
Installation
Before you can use this plugin, you’ll need TNC FlipBook – PDF viewer for WordPress and Avada Builder installed on your WordPress site. So, Please install these two first if you don’t have them already. When you are done with this proceed to the next step.
Read this documentation to learn how to work with this addon.
Creating The First PDF viewer
After installing and activating the TNC PDF viewer, Navigate to PDF viewer > Add New Menu
Put a title for your PDF viewer, Keep it relevant to your PDF file as it will be used as the viewer title and while embedding using shortcodes.
In the next section under PDF viewer Settings > Basic Settings Upload the PDF file you want to use
Select Page Mode. The default will be fine in most cases.
Default will open Default PDF viewer
Thumbnails will open with displaying page thumbnails on the left side
Bookmarks will open by displaying Bookmarks on the left side
Attachments will open by displaying attachments on the left side
Default Zoom: You can set your preferred default zoom level for this PDF viewer on this input
Default Scrolling Mode: You can set your default scrolling mode here. Vertical, horizontal, wrapped or Flip.
Default Spread: Set your preferred default spread here.
Viewer Language: Select your preferred viewer language here.
Now, go to Toolbar Elements Tab
The first option is called Global options, It’s enabled only on the Premium version. Suppose you need to hide any specific toolbar elements like download, print, etc. In that case, you can disable this option and a list of toolbar elements will appear to enable or disable it. I am not going through all the toolbar items here as all those are self-explanatory.
The next tab is the Appearance
We have a use global setting option here as well but it only can be accessed in the Premium Version. Disable the global option only if you want to have a different theme/color setting for this specific viewer. Not going through the details here as well, you’ll understand by titles easily.
The next Tab is Privacy/Security
You don’t have to do anything on this tab. If you purchase WP File Access Manager, you’ll be able to manage the restriction settings from Media > File Access Manager Menu.
Once you’re done with all the settings, click on Publish button on the right sidebar
Now, you can share the link to this viewer with anyone.
Welcome to TNC FlipBook - PDF viewer for WordPress
First of all, thank you so much for choosing TNC FlipBook – PDF viewer for WordPress. This is the best PDF Embedder and Flipbook plugin since 2014. If you haven’t purchased TNC FlipBook – PDF viewer for WordPress yet, you can go ahead and get your copy now from CodeCanyon. Click here to visit the CodeCanyon product page.
Also, if you are using the free version of this plugin ( TNC PDF viewer ), you can find the ‘Get Premium’ button on the ‘Plugins’ page right below the name of the free plugin. Then you need to purchase and install the plugin on your Website. After activating the premium plugin, deactivate and then delete the free version of the plugin. Don’t worry, all your previous data will be saved and work finely with the premium version.
In the following sections of this documentation, we’re going to demonstrate how to use TNC FlipBook – PDF viewer for WordPress on your site to power up the visibility and performance of PDF files on your website.
Also, We’ve made a quick video to help you get started faster. You can follow this video and then go through all the other sections of documentation to understand every single detail of the plugin.
Installation
Installing TNC FlipBook – PDF viewer for WordPress is as simple as any other WordPress plugin. Here are the steps required to install the plugin on your WordPress Website.
Purchase and download TNC FlipBook – PDF viewer for WordPress from this link
Once downloaded the plugin, login to your website admin panel
Go to Plugins > Add New Menu
Click on the Upload Plugin button
Click on Choose File
Select the plugin zip file you’ve downloaded on step #1
Click on the ‘Install Now’ button
Once installed, click on Activate button to activate the plugin
That’s it. The plugin is now installed on your WordPress site.
Setup and Creating Your First FlipBook
From version Version 11.1.0 of TNC FlipBook – PDF viewer for WordPress, there are 2 different ways to create FlipBook.
Create FlipBook from TNC FlipBook > Add New Menu & then link or embed the viewers by using or not using shortcodes.
Setup to open or embed all ( .pdf ) links automatically with TNC FlipBook.
Method NO : 1
In this section, we’re going to walk you through the process of creating your first FlipBook using the first method mentioned above.
After installing and activating TNC FlipBook – PDF viewer for WordPress, Navigate to TNC FlipBook > Add New Menu
Put a title for your Flipbook, Keep it relevant to your PDF file as it will be used as the FlipBook title and while embedding using shortcodes.
In the next section under FlipBook Settings > Basic Settings Upload the PDF file you want to use
Select Page Mode. The default will be fine in most cases.
Default will open Default PDF viewer
Thumbnails will open with displaying page thumbnails on the left side
Bookmarks will open by displaying Bookmarks on the left side
Attachments will open by displaying attachments on the left side
Default Zoom: You can set your preferred default zoom level for this FlipBook on this input
Default Scrolling Mode: You can set your default scrolling mode here. Vertical, horizontal, wrapped or Flip.
Default Spread: Set your preferred default spread here.
Viewer Language: Select your preferred viewer language here.
Jump to page: Enter a page number here if you want to open/jump to a specific page.
Now, go to Toolbar Elements Tab
The first option here is to Use Global options, It’s enabled by default. If you need to hide any specific toolbar elements like download, print and others, you can disable this option and a list of toolbar elements will appear to enable or disable. I am not going through all the toolbar items here as all those are self-explanatory.
The next tab is the Appearance
We have a use global setting option here as well. Disable the global option only if you want to have a different theme/color setting for this specific viewer. Not going through the details here as well, you’ll understand by titles easily.
The next Tab is Privacy/Security
You don’t have to do anything on this tab. If you purchase WP File Access Manager, you’ll be able to manage the restriction settings from Media > File Access Manager Menu.
Once you’re done with all the settings, click on Publish button on the right sidebar
Now, you can share the link to this viewer with anyone.
Method NO : 2
If you already have a lot of PDF links on your website and don’t want to go through each pdf to create a FlipBook individually, this section is for you!
You can enable Automatic iFrame or Automatic Link options to automatically convert all your links ending in .pdf to open with TNC FlipBook – PDF viewer for WordPress.
Please note that the pdf url’s href parameter must end in (.pdf ) and the file must be hosted under the same domain for this function to work.
So, let’s get started,
Navigate to FlipBook > Global Settings > Automatic Display Menu on your wp-admin
On the first field on this page, you’ll see 2 options to select from
Selecting the Automatic iFrame/Embed option will replace all the .pdf links with an embedded FlipBook in the same place where the link was.
If you select Automatic iFrame, 2 more fields will appear in the bottom section for setting iframe width and height. Set those fields and click on the save button to save the changes.
Selecting the Automatic Link option will replace all the .pdf links to open with a FlipBook. This option just changes the links, and anchor text, and everything else remains the same.
If you select the Automatic Link option, another field will appear below for setting Link Target. Set the Link target and hit save to save the changes.
Once the settings are saved, go to any page that contains a .pdf link & you should see the result there!
Inserting FlipBook into WordPress Posts/Pages
In the last chapter, you’ve created your first FlipBook, Now it’s time to insert the FlipBook on any of your posts or pages on your WordPress Website. This chapter is useful only if you’re using the default WordPress Gutenberg Block Editor or Classic Editor.
If you’re using any page builders like Elementor or WPBakery Page Builder, we have addons for those page builders. Please check the Add-ons and integrations section in that case.
Go to Add or Edit any page or posts
If you’re using Gutenberg Block Editor, click on Add Block icon
Search for TNC FlipBook Block
Click on Add FlipBook Button
Select Embed a FlipBook if you want to embed a FlipBook using iFrame on the page you’re editing.
On Select Embed a FlipBook, Search & select by the title of the FlipBook you’ve created and want to embed on this page.
Set width, and height, jump to page & iframe_title parameters of your choice & click on insert FlipBook.
All these settings are for the iframe that will be embedded on the page.
Now, Publish or update the page & then view the page to see the FlipBook embed there.
Select Link to a FlipBook if you want to insert a link on the page that will open the FlipBook when clicked.
On Select Link to a FlipBook, Search & select by the title of the FlipBook you’ve created and want to link from this page.
Set Link Text, Target, jump to page and CSS class of your choice & click on Insert FlipBook
Now, Publish or update the page & then view the page to see the FlipBook link there.
If you’re using Classic Editor, Click on ADD FlipBook button just above the editor
Select Embed a FlipBook if you want to embed a FlipBook using iFrame on the page you’re editing.
On Select Embed a FlipBook, Search & select by the title of the FlipBook you’ve created and want to embed on this page.
Set width, and height, jump to page & iframe_title parameters of your choice & click on insert FlipBook.
All these settings are for the iframe that will be embedded on the page.
Now, Publish or update the page & then view the page to see the FlipBook embed there.
Select Link to a FlipBook if you want to insert a link on the page that will open the FlipBook when clicked.
On Select Link to a FlipBook, Search & select by the title of the FlipBook you’ve created and want to link from this page.
Set Link Text, Target, jump to page and CSS class of your choice & click on Insert FlipBook
Now, Publish or update the page & then view the page to see the Link to a FlipBook there.
Global Settings
You can set options in the Global settings page after activating TNC FlipBook – PDF viewer for WordPress. Navigate to TNC FlipBook > Global Settings Menu to get started.
1.Automatic Display
In this section You can set options here to have all of your current .pdf links to either open or embed as a FlipBook
Automatic Display: If you want to convert all current .pdf links to open as a FlipBook, select any of the options. All links ending in .pdf will be replaced with Embedded FlipBook automatically
Automatic IFrame/Embed
Automatic Link
Automatic iFrame Width: Here you can select your preferred width of your automatic iframe
Automatic iFrame Height: Here you can select your preferred Height of your automatic iframe
2. General Settings
There are a few settings on the General Settings tab of Global Settings. Navigate to the General Settings tab.
Logo: This logo will be used on the top right side of the viewer. You can control logo visibility in the toolbar setting section globally or in each viewer section as well. The recommended maximum height for this logo is 20px
Favicon: This is the shortcut icon/favicon that will be used on the viewer pages.
Fullscreen Link Text: When you use [pvfw-embed] shortcode or use automatic iframe options, a link on top of the viewer appears with a link to open the specific viewer on fullscreen mode. This text will be used as anchor text for that link.
Return to Site Link Text: When you’re on the fullscreen view of any viewer, there’s a button appears in the bottom right corner to return to the previous page. This text will be used as anchor text for that link.
Google Analytics ID: If you want to track your users using Google Analytics, you can add the analytics ID for the site in this field. This code will be used on viewer pages only.
Mobile iFrame Height (Under 800px screen size): This option for customizing height of iFrame on smaller screens.
iFrame Responsive Fix: This option adds a simple line of CSS on the front end to resize the iframe width based on device size.
3. Appearance Settings
Disable Flip Sound: You can enable or disable Flip sound from here.
Do you want to use a Theme or use custom colors? You can select your custom colour or theme from here.
Select Theme: This option on the appearance page is to select whether you want to use one of the built-in themes. Here is a list of predefined themes: Aqua White, Material Blue, Midnight Calm, Smart Red, Louis Purple, Sea Green .
Use Background Image: You can enable or disable background image from here
Choose icon Size: You can choose your preferred icon size ( Small, Medium, Large )
Select Toolbar Style: There are various type of toolbar style available like Top Full Width, Bottom Full Width, Top Center, Bottom Center. Select your preferred one.
4. Toolbar Settings
Default Scroll: If you want to use Flipbook mode by default, you can choose the FLIP option on this setting. Other available settings are vertical, horizontal and wrapped scrolling.
Default Spread: This setting controls the spread of pages. You can choose from No Spreads, Even Spreads and Odd Spread.
Default Zoom: You can select various zooming options like page fit, page width, page height or you can select it Automatic.
FlipBook Language: There are more than 100 languages available for the viewer, you can select your preferred viewer language on this setting.
Page Mode: Three types of page modes are available: Bookmarks, Thumbnails, Attachments. You can select it as per your needs.
Toolbar Elements Visibility: This section lists all the toolbar elements and lets you either display or hide the specific toolbar elements globally. You can overwrite this for specific viewers as well.
5. Advanced Settings
ThemeNcode PDF viewer Page: PDF viewer for WordPress creates 2 pages when activated. This setting should have ThemeNcode PDF viewer [Do not Delete] page selected here. Do not change it to any other page as it will break the viewers, especially the viewers that are created using old shortcodes or automatic options will stop working.
ThemeNcode PDF viewer SC Page: PDF viewer for WordPress creates 2 pages when activated. This setting should have ThemeNcode PDF viewer SC [Do not Delete] page selected here. Do not change it to any other page as it will break the viewers, especially the viewers that are created using old shortcodes that will stop working.
Context Menu/Right Click on Viewer Pages: This setting allows you to disable right clicks on viewer pages.
Text Copying (ctrl+c) keyboard shortcut: This setting allows you to prevent the use of ctrl+c or cmd + c on viewer pages. If you want to protect PDF content from copying, this setting is for you.
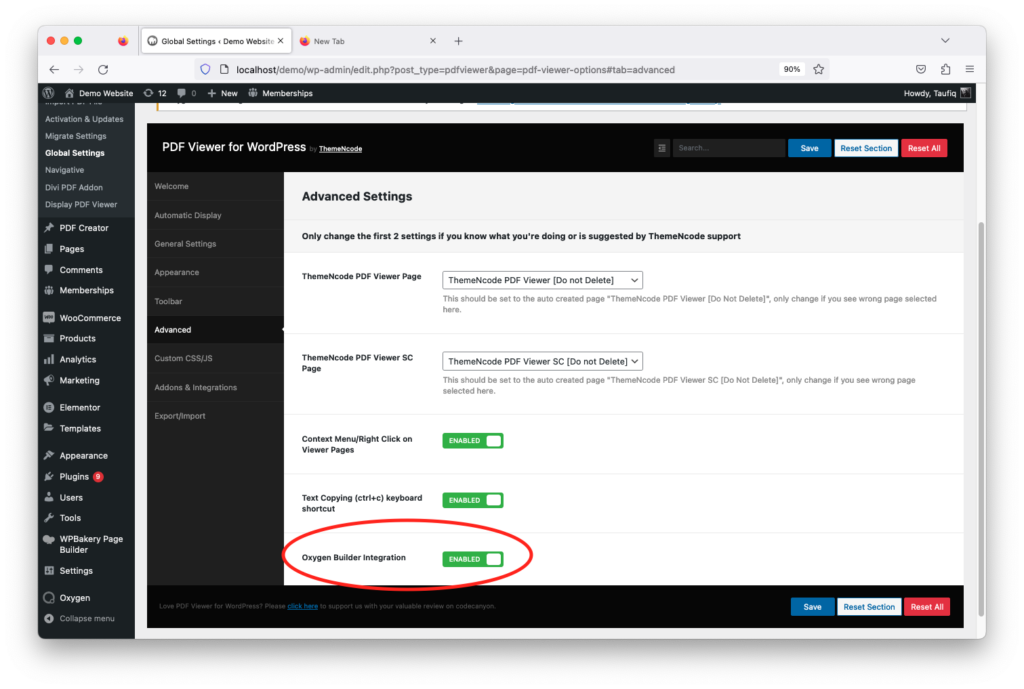
Oxygen Builder Integration:
6. Custom CSS/JS
Custom CSS: You can use custom CSS code here. The CSS you provide here will be used only on viewer pages. start writing custom CSS right away.
Custom JS: You can use custom JS code here. The JS you provide here will be used only on viewer pages. start writing custom JS right away. you don’t have to add any script tags. just write the javascript here.
7. Export/Import
This page allows you to import and export the settings of the Global Settings page. This is useful if you need to copy the settings to other sites.
Update
There are 3 ways to update TNC FlipBook – PDF viewer for WordPress. We’ll be demonstrating all of those ways here, Let’s start with the easier & efficient one.
Automatic Update
Go to the ‘Plugins’ page on your WordPress dashboard. Find ‘TNC FlipBook – PDF viewer for WordPress’ and you can see there is an option named ‘Enable Auto Update’. Click that and then when an update comes it will automatically update the plugin.
Update From Plugin Menu
TNC FlipBook – PDF viewer for WordPress comes with another automatic update option. What you need to do is, register your copy of the plugin on the TNC FlipBook > Activation & Updates page using your purchase code. You can get the purchase code on the support tab of the CodeCanyon product page. Click here to go to the support tab and find the purchase code.
Once the plugin is registered for updates, you’ll be able to update the plugin from the Plugins page and the Dashboard > Activation & Updates page.
* If your updates fail for some reason. please go to Dashboard > Updates page and click on the check again link. Then try to update the plugin again.
Manual Update (Not Recommended)
This is not a recommended way to update TNC FlipBook – PDF viewer for WordPress. Still, we’re leaving the details here if you need to do a manual update for any reason.
Download the latest version of the plugin from CodeCanyon
Login to your wp-admin and navigate to the Plugins page
Deactivate and Delete the copy of TNC FlipBook – PDF viewer for the WordPress plugin currently installed
Go to Plugins > Add New page
Click on the Upload plugin, choose the file you’ve downloaded, and click on the upload now button.
Once the plugin is installed, click on Activate button to activate the plugin.
That’s it. The plugin is now updated to the latest version.
Add-ons and Integrations
TNC FlipBook – PDF viewer for WordPress comes with a variety of Add-ons and integrations to make working even simpler. With these Add-ons, you can easily show PDF files on using different themes and page builders.
Add-ons:
1. Elementor – TNC FlipBook – PDF viewer for WordPress: This Add-on comes up with 6 widgets for Elementor. If you use Elementor as your page builder this Add-on will save a lot of time and effort for you. Just drag and drop the widgets and show or embed PDF just as you want. The 5 widgets are:
PDF viewer Link
PDF viewer Embed/iFrame
PDF viewer Image Link
Bookshelf – Display PDF viewer
List/Grid – Display PDF viewer
PDF viewer Navigative
2. Display – TNC FlipBook – PDF viewer for WordPress Addon: If you want to organize and display your PDF files or Ebooks as a bookshelf then this is the Add-on for you. It enhances the visual presentation and visitors can easily go through the PDF files also. This Add-on has 3 modes.
Bookshelf
List View
Grid View
3. Divi – TNC FlipBook – PDF viewer for WordPress Addon: Embed and show pdf files using your Divi page builder. This Add-on has six modules.
PDF viewer Link
PDF viewer Embed/iFrame
PDF viewer Image Link
PDF viewer Navigative
Bookshelf – Display PDF viewer
List/Grid – Display PDF viewer
4. WPBakery – TNC FlipBook – PDF viewer for WordPressAddon: Easily display PDF viewers by using WPBakery Page Builder. The purpose of this addon is to make the shortcode creation process of TNC FlipBook – PDF viewer for WordPress.
5. Navigative – TNC FlipBook – PDF viewer for WordPress addon: This is an addon for TNC FlipBook – PDF viewer for WordPress which allows you to display multiple pdf files on a single page with a navigation on the sidebar. This is useful, especially when you have a few pdf files which you want to display using the iframe shortcode but don’t want to create so many pages.
6. WP File Access Manager: WP File Access Manager is a WordPress plugin that allows you to control access for every single file you upload to your WordPress Media Library. It comes with the integration of WooCommerce & Paid Memberships Pro which lets you set up your eCommerce or membership site media restriction management a lot simpler.
Support
ThemeNcode provides support through the support portal. We’ve already organized many articles for you to find your solution, so please do a search with your issue first. Then if your issue is not answered anywhere, go ahead and create a support ticket using this link.
At our company, customer satisfaction is our top priority, and we take great pride in delivering high-quality products. To ensure that you have a smooth and hassle-free experience with us, we have meticulously crafted a comprehensive refund policy that safeguards your rights as a valued customer.
Before initiating a refund application, we kindly request that you carefully review and fully understand our refund policy. It contains essential information regarding the eligibility criteria, timeframes, and the process for requesting a refund. Familiarizing yourself with these terms will enable us to process your request efficiently and effectively.
Our dedicated support team is always ready and eager to assist you with any queries or concerns you may have. If you encounter any technical issues or require guidance with our products, we strongly encourage you to get in touch with our support team immediately. They are well-equipped with the knowledge and expertise to address your concerns promptly, ensuring that you can make the most of our products.
Remember, we are here to provide you with the best possible experience, and our support team is just a click or a call away. Whether you need help with installation, troubleshooting, or understanding the features of our products, do not hesitate to reach out to us. Your satisfaction is paramount, and we are committed to going above and beyond to ensure your needs are met.
Regular License: Use, by you or one client, in a single end product which end users are not charged for. The total price includes the item price and a buyer fee.
Extended License: Use, by you or one client, in a single end product which end users can be charged for. The total price includes the item price and a buyer fee.
Read Aloud / Listen to Flipbook Feature of TNC FlipBook
Listen to Flipbook (Transcribe) feature in TNC FlipBook allows users to listen to the content of their PDF files. It actively reads your PDF files aloud and converts static text into audible content. This innovative feature supports many languages and voices. You can listen in your preferred language. You can also customize the voice. It provides the ability to listen to documents in the language of your choice and customize the audio output as per your needs. Whether you’re multitasking, learning a new language, or looking for improved accessibility, Transcribe offers a convenient and efficient solution.
Transcribe makes PDFs more useful. It converts text to speech. This makes information easier to access. It’s helpful when reading is difficult. For example, use it while traveling. Use it while working. It’s also good for visual impairments. Choose your language. Choose your voice. Transcribe gives you a personalized experience. Whenever this feature reads your PDF, it will highlight each line and automatically flip to the next page and continue reading.
Key Elements
Multiple PDF Languages: Listen to PDFs in a wide range of languages. (See Supported Languages section)
Default Model: You can choose from different voice options within each language, and customize tone, pronunciation, and speed. A total of 43 voices are available.
Default Speed: You can select the default speed of the voice, and make it slow fast, or original. The user may be able to choose it based on the visibility settings below.
Default Pitch: You can select the default pitch of the voice, the user may be able to choose it based on the visibility settings below.
Visibility Settings: You can select which controls you want your readers to have for the Transcribe feature.
Voice/Model Selection: You can show or hide the ability to change voice/model for readers.
Speed Control: You can show or hide the ability to change speed for readers.
Pitch Control: You can display or hide the ability to change pitch for readers.
Visibility Settings For Mobile Screen:
Voice/Model Selection: You can show or hide the ability to change voice/model for readers.
Speed Control: You can show or hide the ability to change speed for readers.
Pitch Control: You can display or hide the ability to change pitch for readers.
How to Use Transcribe
Active Transcribe: Enable or Disable the Transcribe feature for this FlipBook
Open PDF: Open your PDF file in TNC FlipBook.
Access Transcribe: Click on the “headphones icon” to start listening.
Select Language: Choose your desired language.
Select Voice: Select your preferred voice.
Start Playback: Click “Read”
Adjust Settings: Use playback controls (Read, Pause, Resume, Stop)
Stop Playback: Click “Stop.”
Supported Languages
English
Italian
Swedish
French
Malay
German
Hebrew
Indonesian
Bulgarian
Spanish
Finnish
Portuguese
Dutch
Japanese
Romanian
Thai
Croatian
Slovak
Hindi
Ukrainian
Chinese
Vietnamese
Greek
Russian
Catalan
Norwegian Bokmål
Danish
Hungarian
Turkish
Korean
Polish
Czech
System Requirements
TNC FlipBook – PDF viewer for WordPress (latest version recommended)
Speakers or headphones on your device
Troubleshooting
No Sound:
Check if your speakers or headphones are properly connected and turned on.
Ensure the volume is turned on your computer.
Check if the correct audio output device is selected on your computer.
Playback Issues:
If you select another voice while reading, it will give you an error message (Already reading. Please pause or stop first) Before selecting another voice or language or anything, you need to stop reading first.
Whenever someone turns the page without stopping, it will not play the next page, you must stop and then turn the new page to read the page.
Check your internet connection if required for certain voices.
Tips for Best Experience
For best listening, use headphones or speakers in a quiet environment.
Experiment with different voices and speeds to find the settings that work best for you
Simplify PDF and avoid images, it can’t read image text inside PDF. Avoid complicated PDF formatting.
Support & Contact Information
For any questions or support regarding the Transcribe feature, please contact with ThemeNcode support portal. You can also create a ticket by emailing [email protected]
FAQ
Failed to Fetch Error Message – An error occurred while loading the PDF
We’ve received many support requests with this error message and that’s why this article is here. It includes a video as well, so you can understand it easily.
This error comes up when you have a mismatch in your file URL & website URL structure.
For example, your site may use URLs like: http://www.example.com or https://www.example.com or https://example.com or http://example.com
There’s no issue with any format, you can use any structure of URL but what you need to make sure of is the file URL you provide while creating the shortcode must have the same URL structure. Don’t use a different URL structure. Here is a video tutorial for you.
404 error on viewer pages
PDF viewer for WordPress creates 2 pages called ThemeNcode PDF viewer and ThemeNcode PDF viewer SC when you install the plugin. You may get a 404 error if these pages are deleted somehow.
To solve this: Please go to your plugins page, Deactivate PDF viewer for the WordPress plugin and activate it again. That should solve the issue.
How Can I use pdf files from external websites/URLs?
How can I change/customize WP File Access Manager Error Message on PDF viewer?
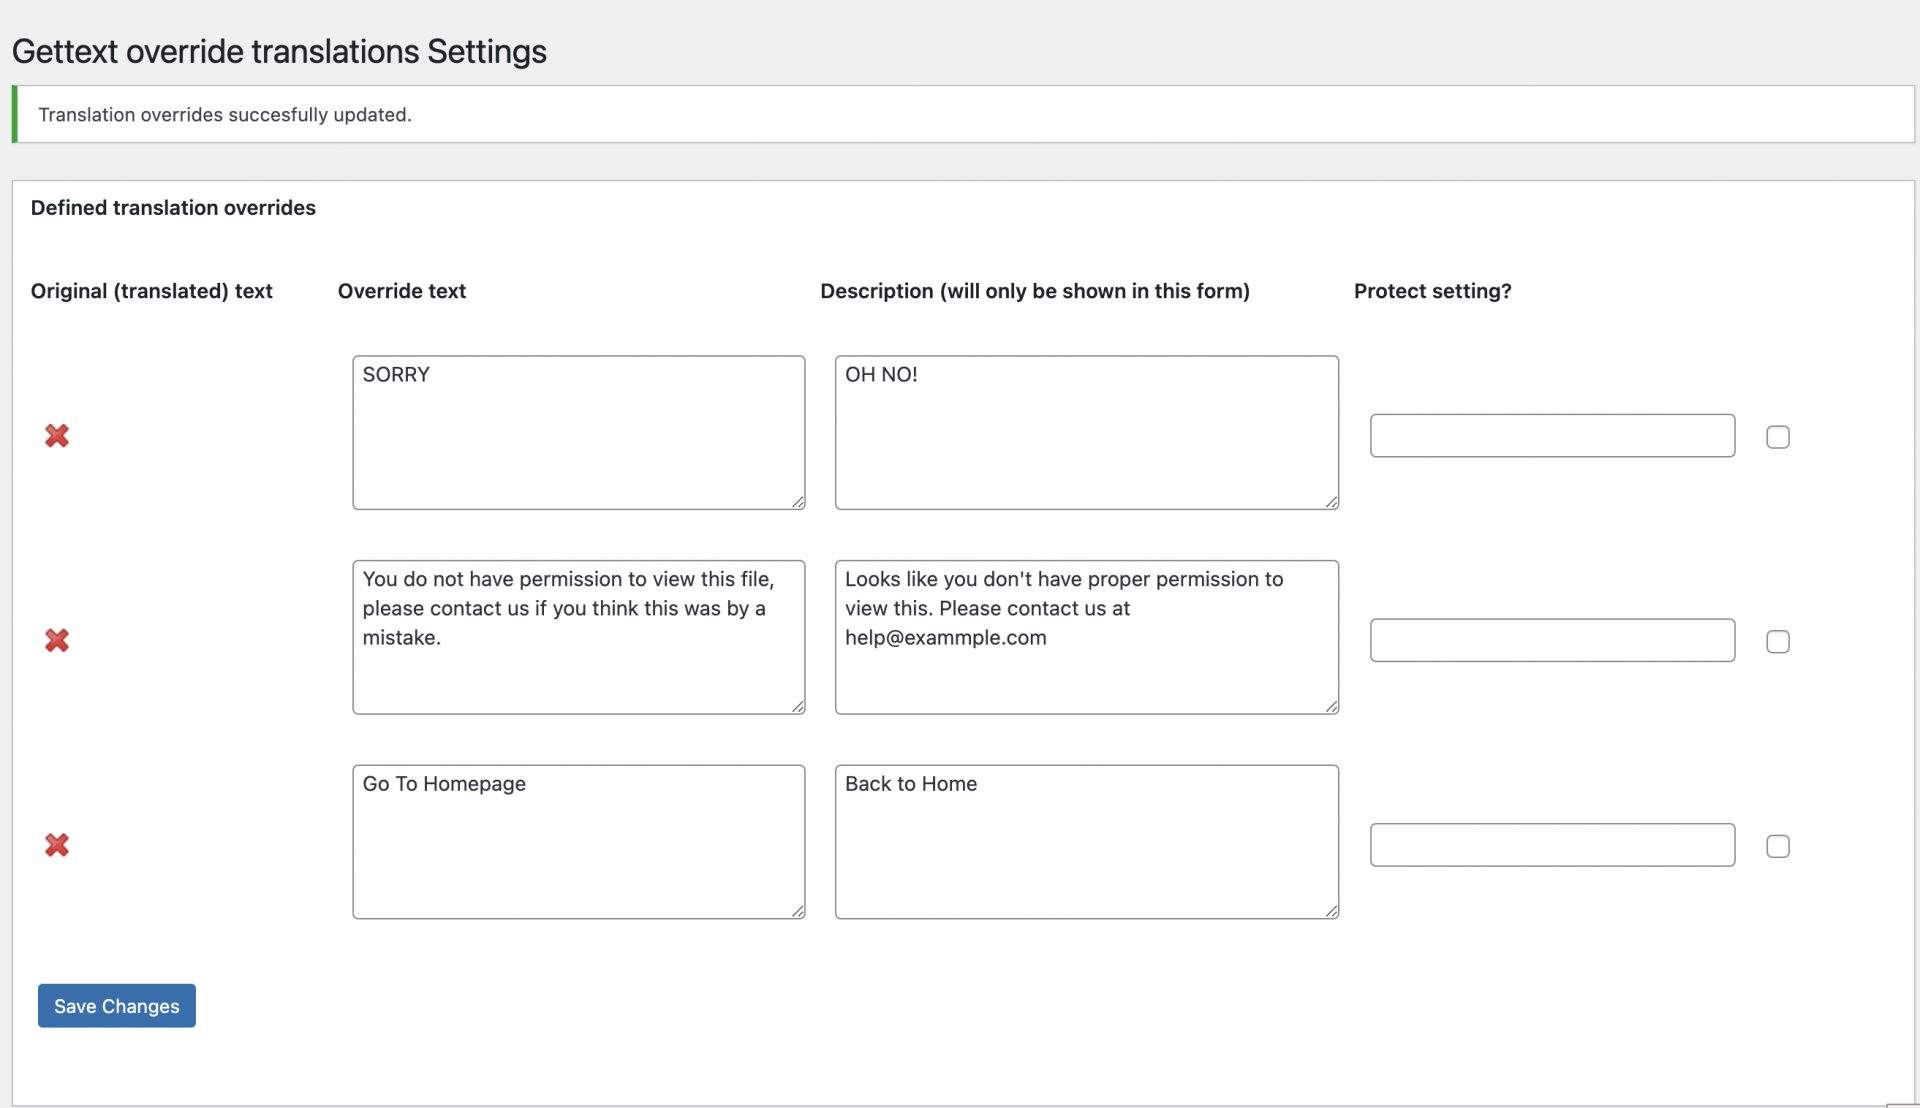
This question comes a lot about changing or customizing the error message when a user doesn’t have access to a specific PDF file. The default message Appears as:
SORRY
You do not have permission to view this file, please contact us if you think this was by a mistake.
Go To Homepage
I am going to show you a quick workaround for changing this text. You’ll need to install a free plugin for this. So, Here are the steps:
Search and install a plugin called Gettext to override translations & activate the plugin. Direct link here.
Go to Plugins > Gettext override translations
Add the text overrides on this page and save settings.
The image below provides more specific details on exactly which string you should use to replace.
This should change the text for you.
Here’s an example:
I hope it helps.
Previews/Next Navigation arrows are not showing on the left/right side of the PDF viewer
If you see the Previous & next icons on the left and right side of PDF viewer, it’s mostly caused by lazyload functionality. What you need to do is Disable Lazyload for viewer pages to get it displaying properly.
Hooks & Filters
This document lists the custom WordPress hooks available in the TNC FlipBook – PDF viewer for WordPress plugin along with usage examples.
If you are enjoying using the TNC FlipBook – PDF viewer for WordPress plugin, you can leave us a review. It helps us to improve the product even more. You can submit an additional feature request too.
Using TNC FlipBook - PDF viewer for WordPress with Oxygen Builder
A few days ago, we introduced integration with Oxygen Builder which needed some work to set it up. From version 10.9.2 TNC FlipBook – PDF viewer for WordPress comes with a way better integration with Oxygen Builder. There are two different methods to work with Oxygen Builder.
Method 1: The regular way
You can now use the default way of creating FlipBook (PDF viewer > Add New) with Oxygen Builder. To use the integration, you just need to enable the integration of Oxygen Builder from TNC FlipBook > Global Settings > Advanced Tab.
Once you enable Oxygen Builder Integration following the process above, you can start creating FlipBook from TNC FlipBook > Add New Menu. Once published, you can visit the viewer normally. This is the first method of creating a FlipBook using TNC FlipBook – PDF viewer for WordPress with Oxygen builder.
Method 2: Using Shortcodes
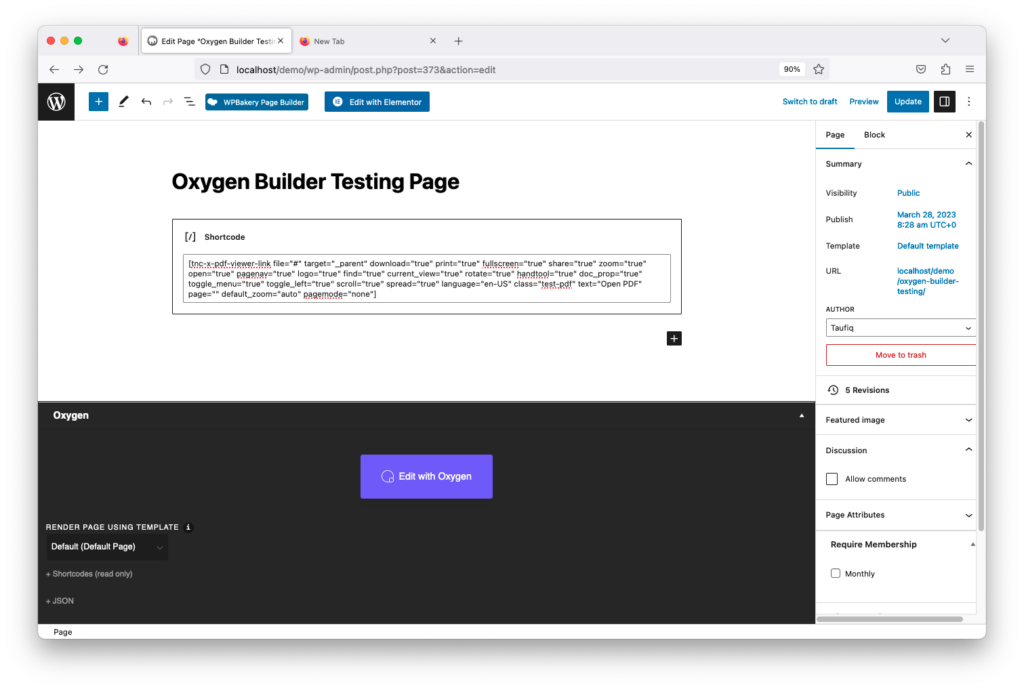
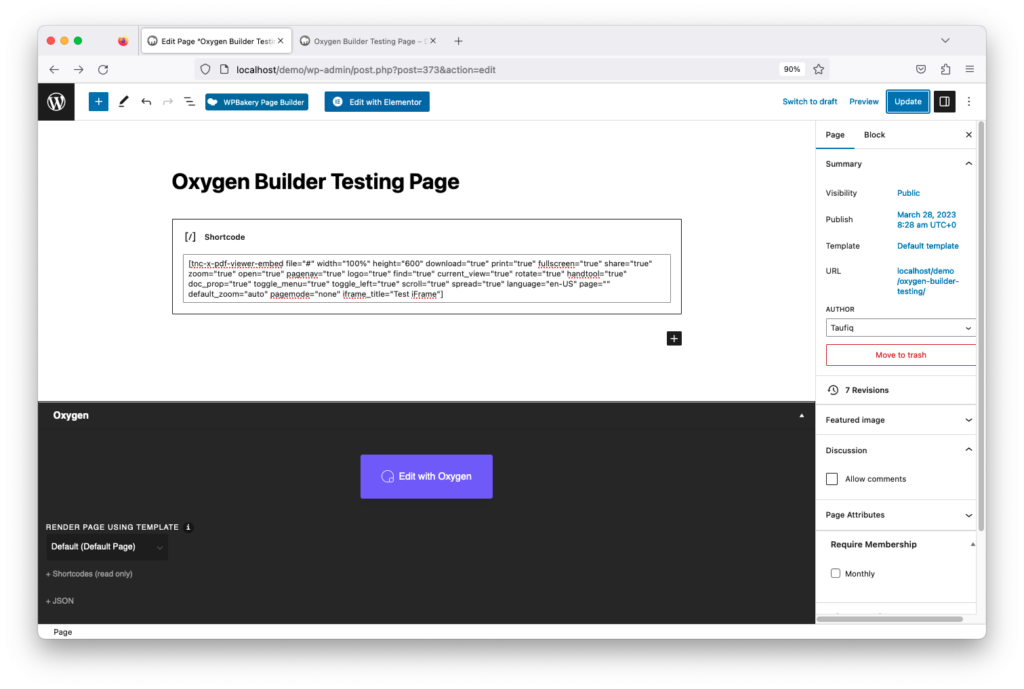
Additionally. you can still use the previous method of inserting shortcodes. here are shortcodes you can use.
TNC FlipBook – PDF viewer for WordPress 10.9.0 comes with 2 extra shortcodes to make it compatible with Oxygen Builder or any other builders that get rid of page templates. In this article, you’ll get the list of those 2 shortcodes with the parameters. You just need to copy the shortcodes, replace the file URL and paste them on any of your pages or posts to have the viewer display there.
file: This is where you’ll provide the URL to the pdf file that will be opened with FlipBook. Make sure you use the direct URL to the pdf file ending in .pdf, otherwise it will not work. Also, make sure the pdf files are hosted under the same domain.
class: You can use a custom CSS class for the generated link. Basically, this class is used for styling. for example, if you want the link to be a button and you’re using the bootstrap CSS framework, you can use the following in this field: btn btn-default
text: This is the text that will appear as a link. Please make sure to fill this field, as it will display nothing on the front end if you keep this field empty.
target: Link Target, Select how you want the link to open, in the same tab or in a new tab.
download: Select if you want to show the Download button in the toolbar.
print: Select if you want to show the Print button in the toolbar.
fullscreen: Select if you want to show the Fullscreen button in the toolbar.
Share: Select if you want to show the Share button in the toolbar.
zoom: Select if you want to show the Zoom option in the toolbar.
open: Select if you want to show the Open button in the toolbar.
logo: Select if you want to show the Logo button in the toolbar.
pagenav : Select if you want to show the Pagenav button in the toolbar.
find: Select if you want to show the Find button in the toolbar.
page: Enter the page number if you want to send the user to a specific page on opening of the file.
default_zoom: Select the Default Zoom here
pagemode : If you select Thumbs as pagemode, the left bar will be opened with page thumbnails and if you choose bookmarks, the left bar will be opened with the list of bookmarks. It is not recommended to use as it may not work smoothly on smaller screen sizes. We’ve added it just because it might be helpful for some users.
language: Select the language you want to use
current_view: Select if you want to show the Current View button in the toolbar.
rotate: Select if you want to show Rotate View button in the toolbar.
handtool: Select if you want to show the Hand Tool button in the toolbar.
doc_prop: Select if you want to show the Document Properties button in the toolbar.
toggle_menu: Select if you want to show the Toggle Menu button in the toolbar.
toggle_left: Select if you want to show the Toggle Left button in the toolbar.
scroll: Select if you want to show Scroll options in the toolbar.
spread: Select if you want to show Spread options in the toolbar.
default_scroll: Default Scroll Method, Use 1 for Vertical scrolling, Use 2 for Horizontal Scrolling, and use 3 for Flip Book
default_spread: Default Spread Mode, options: 1 for No Spread, 2 for Odd Spreads, 3 for Even Spreads
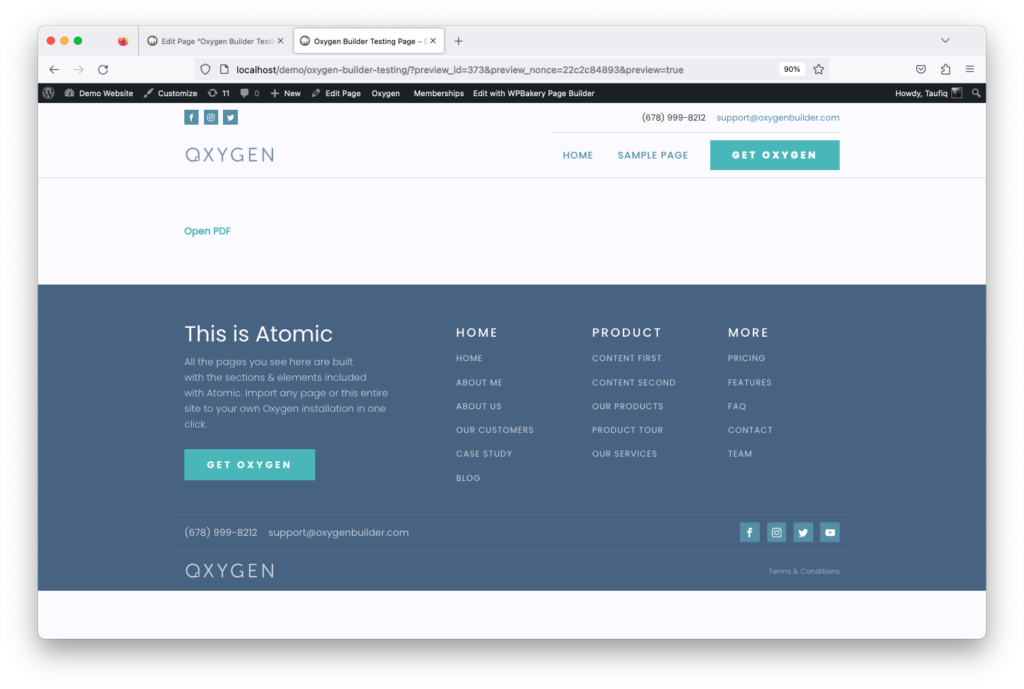
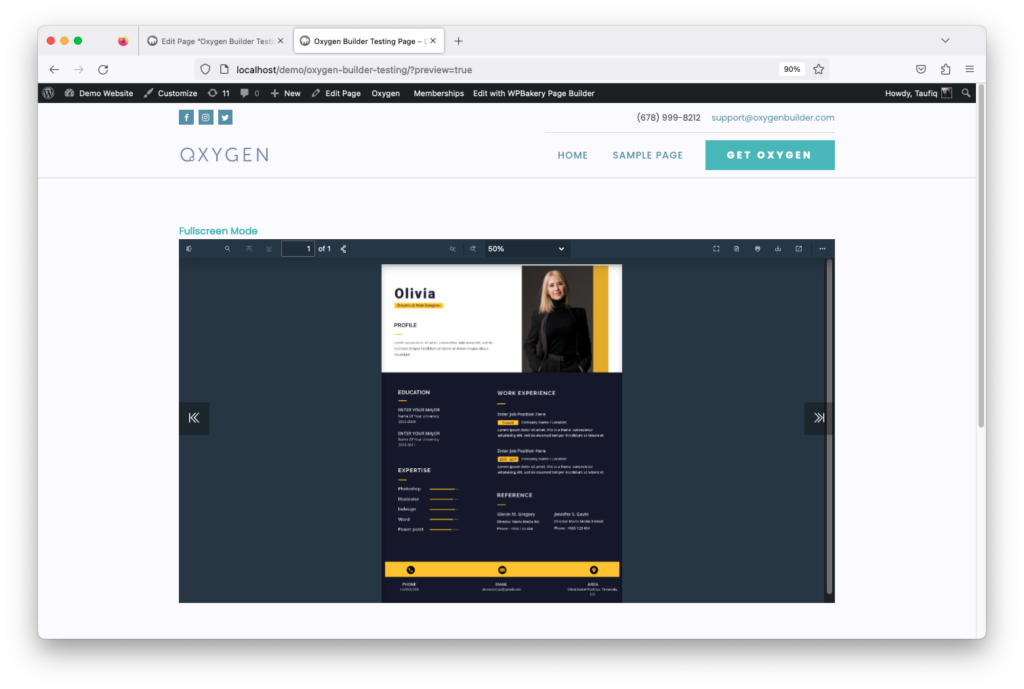
Output:
You can see there is a link with the text “Open PDF”. When someone clicks the link a PDF file will open. The text can be changed to anything from the shortcode.
file: This is where you’ll provide the URL to the pdf file that will be opened with FlipBook. Make sure you use the direct URL to the pdf file ending in .pdf, otherwise, it will not work. Also, make sure the pdf files are hosted under the same domain.
width: Specify the Width of iFrame in pixels here. For example, you can use 600
height: Specify the height of iFrame in Pixels here. For Example, you can use 800
download: Select if you want to show the Download button in the toolbar.
print: Select if you want to show the Print button in the toolbar.
fullscreen: Select if you want to show the Fullscreen button in the toolbar.
Share: Select if you want to show the Share button in the toolbar.
zoom: Select if you want to show the Zoom option in the toolbar.
open: Select if you want to show the Open button in the toolbar.
logo: Select if you want to show the Logo button in the toolbar. The logo will not be displayed if theiFrame width is small. But will display when users go to fullscreen mode.
pagenav: Select if you want to show the Pagenav button in the toolbar.
find: Select if you want to show the Find button in the toolbar.
page: Enter the page number if you want to send the user to a specific page on opening of the file.
default_zoom: Select the Default Zoom here
pagemode: If you select Thumbs as pagemode, the left bar will be opened with page thumbnails and if you choose bookmarks, the left bar will be opened with the list of bookmarks. It is not recommended to use as it may not work smoothly on smaller screen sizes. We’ve added it just because it might be helpful for some users.
language: Select the language you want to use
current_view: Select if you want to show the Current View button in the toolbar.
rotate: Select if you want to show Rotate View button in the toolbar.
handtool: Select if you want to show the Hand Tool button in the toolbar.
doc_prop: Select if you want to show the Document Properties button in the toolbar.
toggle_menu: Select if you want to show the Toggle Menu button in the toolbar.
toggle_left: Select if you want to show the Toggle Left button in the toolbar.
scroll: Select if you want to show Scroll options in the toolbar.
spread: Select if you want to show Spread options in the toolbar.
iframe_title: Title of the iFrame tag
default_scroll: Default Scroll Method, Use 1 for Vertical scrolling, Use 2 for Horizontal Scrolling and use 3 for Flip Book
default_spread: Default Spread Mode, options: 1 for No Spread, 2 for Odd Spreads, 3 for Even Spreads
Output:
By using this shortcode, one can directly embed and show a PDF file with a FlipBook on a page or post. Change the shortcode as you need and the viewer will be changed according to it also.
Troubleshoot
TNC FlipBook – PDF viewer for WordPress – Flipbook Conflict with Divi Theme
Shortcodes included with TNC FlipBook - PDF viewer for WordPress version 11.1 and newer
We had a bunch of shortcodes included with older versions of TNC FlipBook – PDF viewer for WordPress. But we’ve streamlined the shortcodes and lowered the number of shortcodes to only 3 from version 11.1 .
However, the previously generated shortcodes will still work, but there’s no way to create those old shortcodes now.
Here are the new shortcodes that come with TNC FlipBook – PDF Viewer for WordPress version 11.1 :
1. [pvfw-embed]
This shortcode allows you to embed already created FlipBook (Using TNC FlipBook > Add New menu) on any post or page. It comes with a few parameters.
viewer_id: This is the id of the viewer you want to embed.
width: This is the width of the iframe that will be embedded on the page.
height: This is the height of the iframe that will be embedded on the page.
[pvfw-link] shortcode allows you to insert a link to an already created FlipBook (Using TNC FlipBook > Add New menu). It comes with a few parameters.
viewer_id: This is the id of the viewer you want to link to.
text: The anchor text that will be used as a link.
class: you can add a CSS class here to the link.
target: Defines the target of the link. Put _blank if you want to open the link in a new tab or use _parent if you want to open the link on the same tab.
[pvfw-image-link] shortcode allows you to insert a link to an already created FlipBook (TNC FlipBook > Add New menu) with an image. It comes with a few parameters.
viewer_id: This is the id of the viewer you want to link to.
upload Image: The anchor text that will be used as a link.
alt_text: You can set ALT Text from here.
link target: defines the target of the link. Put _blank if you want to open the link in a new tab or use _parent if you want to open the link on the same tab.
width: Image width
height: Image Height.
css class: you can add a CSS class here to the link.
image alignment: Image alignment (values: inherit, left, center, right)
From version 10 TNC FlipBook – PDF Viewer for WordPress comes with a whole new system of creating PDF viewers which made us introduce a new set of shortcodes and discontinue the previous set of shortcodes.
However, Those old shortcodes are not completely removed from the plugin. If you’ve generated those shortcodes previously, these shortcodes will work fine. But we’ve removed the ability to create those discontinued shortcodes from version 10.
Here’s a list of shortcodes you should not use anymore and replaced them with new shortcodes if possible.
In this section, we’re going to walk you through the process of creating your first FlipBook using the first method mentioned above.
After installing and activating TNC FlipBook – PDF viewer for WordPress, Navigate to TNC FlipBook > Add New Menu
Put a title for your Flipbook, Keep it relevant to your PDF file as it will be used as the FlipBook title and while embedding using shortcodes.
In the next section under FlipBook Settings > Basic Settings Upload the PDF file you want to use
Select Page Mode. The default will be fine in most cases.
Default will open Default PDF viewer
Thumbnails will open with displaying page thumbnails on the left side
Bookmarks will open by displaying Bookmarks on the left side
Attachments will open by displaying attachments on the left side
Default Zoom: You can set your preferred default zoom level for this FlipBook on this input
Default Scrolling Mode: You can set your default scrolling mode here. Vertical, horizontal, wrapped or Flip.
Default Spread: Set your preferred default spread here.
Viewer Language: Select your preferred viewer language here.
Jump to page: Enter a page number here if you want to open/jump to a specific page.
Now, go to Toolbar Elements Tab
The first option here is to Use Global options, It’s enabled by default. If you need to hide any specific toolbar elements like download, print and others, you can disable this option and a list of toolbar elements will appear to enable or disable. I am not going through all the toolbar items here as all those are self-explanatory.
The next tab is the Appearance
We have a use global setting option here as well. Disable the global option only if you want to have a different theme/color setting for this specific viewer. Not going through the details here as well, you’ll understand by titles easily.
The next Tab is Privacy/Security
You don’t have to do anything on this tab. If you purchase WP File Access Manager, you’ll be able to manage the restriction settings from Media > File Access Manager Menu.
Once you’re done with all the settings, click on Publish button on the right sidebar
Now, you can share the link to this viewer with anyone.
Method NO : 2
If you already have a lot of PDF links on your website and don’t want to go through each pdf to create a FlipBook individually, this section is for you!
You can enable Automatic iFrame or Automatic Link options to automatically convert all your links ending in .pdf to open with TNC FlipBook – PDF viewer for WordPress.
Please note that the pdf url’s href parameter must end in (.pdf ) and the file must be hosted under the same domain for this function to work.
So, let’s get started,
Navigate to FlipBook > Global Settings > Automatic Display Menu on your wp-admin
On the first field on this page, you’ll see 2 options to select from
Selecting the Automatic iFrame/Embed option will replace all the .pdf links with an embedded FlipBook in the same place where the link was.
If you select Automatic iFrame, 2 more fields will appear in the bottom section for setting iframe width and height. Set those fields and click on the save button to save the changes.
Selecting the Automatic Link option will replace all the .pdf links to open with a FlipBook. This option just changes the links, and anchor text, and everything else remains the same.
If you select the Automatic Link option, another field will appear below for setting Link Target. Set the Link target and hit save to save the changes.
Once the settings are saved, go to any page that contains a .pdf link & you should see the result there!
Extract The Downloaded File
After downloading the file you need to extract the zip file and you will get the following files:
Theme File: This is the main file of the child theme
Theme Builder layout: This file contains the templates for the Divi Theme Builder
WooCommerce File: It has the shop, cart, account, and product page files
License.txt file
Extract the Downloaded File
After downloading the file you need to extract the zip file and you will get the following files:
Theme File: This is the main file of the child theme
Theme Builder layout: This file contains the templates for the Divi Theme Builder
WooCommerce File: It has the shop, cart, account, and product page files
After Purchasing the plugin on CodeCanyon. Go to the Downloads page
Find the Plugin on the list and click on Green Download Button
Save the zip file on your computer
Step 2: Install via WordPress Admin (wp-admin)
Please follow these steps to install via wp-admin
Login as administrator to wp-admin using your username and password
Go to Plugins-> Add New
Click on the Upload Plugin button
Click on Choose File and choose the file you just downloaded from CodeCanyon
Click on Install Now
Click on Activate Plugin once the installation is done
That’s all, and the plugin is installed on your site now!
First Things First
So now, You have the plugin installed on your WordPress Website, Congrats!
The plugin adds some custom code in your .htaccess file if you’re using apache. However, in some cases, it may fail for a few reasons like the .htaccess file not being writeable by WordPress.
If you’ve activated the plugin and added some restrictions but nothing is working, please try to deactivate and reactivate the plugin first. If that doesn’t solve the issue, please continue with the process below:
Apache Server
If you’re using an apache server, the plugin tries to automatically add some code to your .htaccess file. If your .htaccess file is not writeable by WordPress, these rules will not be added automatically, in that case, you need to put the following lines of code in your .htaccess file at the very bottom:
Login as administrator to wp-admin using your username and password
Go to Plugins-> Add New
Click on the Upload Plugin button
Click on Choose File and choose the file you just downloaded from CodeCanyon
Click on Install Now
Click on Activate Plugin once the installation is done
That’s all, and the plugin is installed on your site now!
Installation
Installing AI Excerpt Generator Plugin is as simple as any other WordPress plugin. Here are the steps required to install the plugin on your WordPress Website.
Purchase and download the plugin by following the previous section
Once downloaded the plugin, login to your website’s admin panel
Go to Plugins > Add New Menu
Click on the Upload Plugin button
Click on Choose File
Select the plugin zip file you’ve downloaded on step #1
Click on the Install Now button
Once installed, click on Activate button to activate the plugin
That’s it. The plugin is now installed on your WordPress website.
Extract the Downloaded File
Theme File: This is the main file of the child theme
Theme Builder layout: This file contains the templates for the Divi Theme Builder
License.txt file
PDF viewer Embed
If you choose ‘PDF viewer Embed’ it will embed the PDF into that specific page/post and visitors can read directly while visiting that page.
Select PDF viewer: The first field is to select the PDF viewer. Search for the desired PDF viewer and select that.
Width: The default width is 100%. Change it if you want
Height: The default height is set to 800px. You can change it too if you want.
Title: Put an iframe title here.
Click Save Changes and it’s done
Newsletter
You can show or hide your newsletter of your site.
You can change Subheading, Heading, Button Text and Button URL here.
Installing the Theme
The installation process is really simple and straightforward. Follow the steps:
Step 1: Log in to your WordPress Dashboard Step 2: Go to Appearance and then Themes Step 3: Click on Add new and then click Upload theme Step 4: Select TNC Residane from your device and then upload the theme Step 5: Click Install and then activate the theme
Now, TNC Residane is successfully installed and activated on your WordPress website.
After Purchasing the plugin on CodeCanyon. Go to the Downloads page
Find the Plugin on the list and click on Green Download Button
Save the zip file on your computer
Step 2: Install via WordPress Admin (wp-admin)
Please follow these steps to install via wp-admin
Login as administrator to wp-admin using your username and password
Go to Plugins-> Add New
Click on the Upload Plugin button
Click on Choose File and choose the file you just downloaded from CodeCanyon
Click on Install Now
Click on Activate Plugin once the installation is done
That’s all, and the plugin is installed on your site now!
Installation
Installing TNC Bookshelf Popup Pro is very simple just like any other WordPress plugin. Here are the steps required to install the plugin on your WordPress Website.
Follow the previous section to purchase and download TNC Bookshelf Popup Pro
Once downloaded the plugin, login to your website admin panel
Go to Plugins > Add New Menu
Click on the Upload Plugin button
Click on Choose File
Select the plugin zip file you’ve downloaded on step #1
Click on the Install Now button
Once installed, click on Activate button to activate the plugin
That’s it. The plugin is now installed on your WordPress website
After that you will get a new tab called TNC Bookshelf Popup Pro in your WordPress dashboard.
Step 2: Install via WordPress Admin (wp-admin)
Please follow these steps to install via wp-admin
Login as administrator to wp-admin using your username and password
Go to Plugins-> Add New
Click on the Upload Plugin button
Click on Choose File and choose the file you just downloaded from CodeCanyon
Click on Install Now
Click on Activate Plugin once the installation is done
That’s all, and the plugin is installed on your site now!
PDF Viewer Image
If you choose the ‘PDF Viewer Image’ option it will show an image with a link and when someone clicks that image it will open a PDF viewer. Follow these steps
Select a PDF viewer for the ‘Select PDF’ option
Copy an image link from your WordPress media library and paste it into the ‘Image URL’
Put the alt text in the Alt Text option
Image Alignment can be left, center, or right. Choose what you want.
The other options are the same as in previous modules.
Click save changes and then publish and you are done.
Upload PDF and Create FlipBook
As this is an Add-on of TNC FlipBook – PDF viewer for WordPress you can’t upload PDFs with this. To upload PDF files and create a FlipBook you first need to do that with TNC FlipBook – PDF viewer for WordPress. Follow these steps to create your first FlipBook and if you are already a user of TNC FlipBook – PDF viewer for WordPress you can skip this step.
After installing and activating TNC FlipBook – PDF viewer for WordPress, Navigate to TNC FlipBook> Add New Menu
Put a title for your FlipBook, Keep it relevant to your PDF file as it will be used as the viewer title and while embedding using shortcodes.
In the next section under FlipBook Settings > Basic Settings Upload the PDF file you want to use
Select Page Mode. The default will be fine in most cases.
Default will open Default FlipBook
Thumbnails will open with displaying page thumbnails on the left side
Bookmarks will open by displaying Bookmarks on the left side
Attachments will open by displaying attachments on the left side
Default Zoom: You can set your preferred default zoom level for this FlipBook on this input
Default Scrolling Mode: You can set your default scrolling mode here. Vertical, horizontal, wrapped or Flip.
Default Spread: Set your preferred default spread here.
Viewer Language: Select your preferred viewer language here.
Jump to page: Enter a page number here if you want to open/jump to a specific page.
Now, go to Toolbar Elements Tab
The first option here is to Use Global options, It’s enabled by default. If you need to hide any specific toolbar elements like download, print and others, you can disable this option and a list of toolbar elements will appear to enable or disable. I am not going through all the toolbar items here as all those are self-explanatory.
The next tab is the Appearance
We have a use global setting option here as well. Disable the global option only if you want to have a different theme/color setting for this specific viewer. Not going through the details here as well, you’ll understand by titles easily.
The next Tab is Privacy/Security
You don’t have to do anything on this tab. If you purchase WP File Access Manager, you’ll be able to manage the restriction settings from Media > File Access Manager Menu.
Once you’re done with all the settings, click on Publish button on the right sidebar
Installation
The installation process of the Fan Page Widget is very simple. It is just like installing any other plugin.
Click here to go to the Fan Page Widget page on WordPress.org.
Click Download and the plugin zip will be downloaded
Now log in to your WordPress dashboard
Go to Plugins -> Add New
Upload the zip file on your WordPress website.
Click Install and then Activate the plugin
Or you can search from your WordPress dashboard.
Go to Plugins -> Add New
Search Fan page widget by ThemeNcode
Click Install and then activate the plugin
Installing The Theme
The installation process is really simple and straightforward. Follow the steps:
Step 1: Log in to your WordPress Dashboard Step 2: Go to Appearance and then Themes Step 3: Click on Add new and then click Upload theme Step 4: Select TNC Hospital from your device and then upload the theme Step 5: Click Install and then activate the theme
Now, TNC Hospital is successfully installed and activated on your WordPress website.
Shelf Items
This is the first section of TNC Bookshelf Popup Pro. In this section you can display all your items or you can create new shelf items here.
After Purchasing the plugin on CodeCanyon. Go to the Downloads page
Find the Plugin on the list and click on Green Download Button
Save the zip file on your computer
Step 2: Install via WordPress Admin (wp-admin)
Please follow these steps to install via wp-admin
Login as administrator to wp-admin using your username and password
Go to Plugins-> Add New
Click on the Upload Plugin button
Click on Choose File and choose the file you just downloaded from CodeCanyon
Click on Install Now
Click on Activate Plugin once the installation is done
That’s all, and the plugin is installed on your site now!
Step 2: Install via WordPress Admin (wp-admin)
Please follow these steps to install via wp-admin
Login as administrator to wp-admin using your username and password
Go to Plugins-> Add New
Click on the Upload Plugin button
Click on Choose File and choose the file you just downloaded from CodeCanyon
Click on Install Now
Click on Activate Plugin once the installation is done
That’s all, and the plugin is installed on your site now!
Installation
Installing Preview – TNC FlipBook – PDF viewer for WordPress Addon is very simple just like any other WordPress Plugins. Here are the steps required to install the plugin on your WordPress Website.
Purchase and download Preview – TNC FlipBook – PDF viewer for WordPress Addon following the previous section
Once downloaded the plugin, login to your website admin panel
Go to Plugins > Add New Menu
Click on the Upload Plugin button
Click on Choose File
Select the plugin zip file you’ve downloaded on step #1
Click on the Install Now button
Once installed, click on Activate button to activate the plugin
That’s it. The plugin is now installed on your WordPress site.
Misc. Settings
Request a Quote Button Text: Change the name of the button to anything you want. It is set to ‘Request a Quote’ by default.
Require Login to Request Quote?: Here you can choose whether the user must log in or not for requesting quotes.
Quoted Price Expires After: Set an expiration period for the quoted price.
Currency: There is every possible currency. By default, it is set to US Dollars.
Method 1: The regular way
You can now use the default way of creating FlipBook (PDF viewer > Add New) with Oxygen Builder. To use the integration, you just need to enable the integration of Oxygen Builder from TNC FlipBook > Global Settings > Advanced Tab.
Once you enable Oxygen Builder Integration following the process above, you can start creating FlipBook from TNC FlipBook > Add New Menu. Once published, you can visit the viewer normally. This is the first method of creating a FlipBook using TNC FlipBook – PDF viewer for WordPress with Oxygen builder.
Installation
Installing Display – PDF viewer for WordPress Addon is very simple just as any other WordPress Plugins. Here are the steps required to install the plugin on your WordPress Website.
Purchase and download OfferPress following the previous section
Once downloaded the plugin, login to your website admin panel
Go to Plugins > Add New Menu
Click on the Upload Plugin button
Click on Choose File
Select the plugin zip file you’ve downloaded on step #1
Click on Install Now button
Once installed, click on Activate button to activate the plugin
That’s it. The plugin is now installed on your WordPress site.
System Requirements
It is important to ensure that your system meets the necessary requirements for a smooth experience. You must install and activate TNC FlipBook – PDF viewer for WordPress (Available on CodeCanyon) Or TNC PDF viewer (Available on WordPress.org) Plugin before getting this addon. These prerequisites lay a solid foundation for leveraging the Addon’s great features. This plugin works easily with any WordPress version.
Install Display - TNC FlipBook - PDF viewer for WordPress Addon
Installing Display – TNC FlipBook – PDF viewer for WordPress Addon is very simple just like any other WordPress Plugins. Here are the steps required to install the plugin on your WordPress Website.
Purchase and download Display – TNC FlipBook – PDF viewer for WordPress Addon following the previous section
Once downloaded the plugin, login to your website admin panel
Go to Plugins > Add New Menu
Click on the Upload Plugin button
Click on Choose File
Select the plugin zip file you’ve downloaded on step #1
Click on Install Now button
Once installed, click on Activate button to activate the plugin
That’s it. The plugin is now installed on your WordPress site.
List/Grid Shortcode
[pvfw-list-grid]
This shortcode allows you to display selected PDF viewers using a Grid or List Style. It comes with a few parameters.
source: Where to pull the PDF viewers From, You can choose from all (Uses all PDF viewers), category (Select Categories in next parameter) or select-viewer (Select Viewers in next parameter)
viewer_id: This is the list of comma-separated id’s of the viewer you want to embed.
display_type: Choose between list or grid
category: Comma Separated list of category id’s you want to use posts from
open_type: This parameter defines how the viewers should appear, you can choose between link & popup.
link_target: It is applicable if you’ve used link in open_type parameter. Select _parent for same tab or _blank for new tab
column: Select Number of columns to show maximum. usable values are col-2, col-3, col-4. Applicable for Grid style only
filter: Use 0 to disable, 1 to enable filter. Applicable for Grid style only
sort: Use 0 to disable or 1 to enable sort. Applicable for Grid style only
search: use 0 to disable or 1 to enable search. Applicable for Grid style only
css_class: You can use any css class if you want to apply custom styles to the container.
As this is an Addon of TNC FlipBook – PDF viewer for WordPress or TNC PDF viewer you can’t upload PDFs with this. To upload PDF files and create a PDF viewer you first need to do that with TNC FlipBook – PDF viewer for WordPress or TNC PDF viewer. Follow these steps to create your first PDF viewer and if you are already a user of TNC FlipBook – PDF viewer for WordPress or TNC PDF viewer you can skip this step.
After installing and activating TNC FlipBook – PDF viewer for WordPress or TNC PDF viewer, Navigate to PDF viewer > Add New Menu
Put a title for your PDF viewer, Keep it relevant to your PDF file as it will be used as the viewer title and while embedding using shortcodes.
In the next section under PDF viewer Settings > Basic Settings Upload the PDF file you want to use
Select Page Mode. The default will be fine in most cases.
Default will open Default PDF viewer
Thumbnails will open with displaying page thumbnails on the left side
Bookmarks will open by displaying Bookmarks on the left side
Attachments will open by displaying attachments on the left side
Default Zoom: You can set your preferred default zoom level for this PDF viewer on this input
Default Scrolling Mode: You can set your default scrolling mode here. Vertical, horizontal, wrapped or Flip (Only available in TNC FlipBook).
Default Spread: Set your preferred default spread here.
Viewer Language: Select your preferred viewer language here.
Jump to page: Enter a page number here if you want to open/jump to a specific page.
Now, go to Toolbar Elements Tab
The first option here is to Use Global options, It’s enabled by default. If you need to hide any specific toolbar elements like download, print, and others, you can disable this option and a list of toolbar elements will appear to enable or disable. I am not going through all the toolbar items here as all those are self-explanatory.
The next tab is the Appearance
We have a use global setting option here as well. Disable the global option only if you want to have a different theme/color setting for this specific viewer. Not going through the details here as well, you’ll understand by titles easily.
The next Tab is Privacy/Security
You don’t have to do anything on this tab. If you purchase WP File Access Manager, you’ll be able to manage the restriction settings from Media > File Access Manager Menu.
Once you’re done with all the settings, click on Publish button on the right sidebar
Theme Setup
Once the theme is activated, it’s time to set it up to match your preferences. Here are a few steps to get you started:
Navigate to Appearance > Customize to access the theme customization options.
Explore the various sections and settings available, including site identity, colors, typography, header, footer, and more. Customize these settings to reflect your brand and design preferences.
Save your changes by clicking the Publish button at the top of the customizer.
To set up menus, go to Appearance > Menus. Create a new menu and assign it to the desired locations within your theme.
Create and assign a static front page to define your homepage layout. You can do this under Settings > Reading.
Take some time to familiarize yourself with the theme’s settings and options. Refer to the corresponding sections in this documentation for detailed explanations and instructions.
That’s it! You are now ready to start building your website with the TNC INFINITY theme. If you need further assistance or have any questions, refer to the other sections of this documentation or reach out to our support team.
PDF viewer Image Link
If you choose the ‘PDF viewer Image’ option it will show an image with a link and when someone clicks that image it will open a PDF viewer. Follow these steps
Select a PDF viewer for the ‘Select PDF’ option
Copy an image link from your WordPress media library and paste it into the ‘Image URL’
Put the alt text in the Alt Text option
Image Alignment can be left, center, or right. Choose what you want.
The other options are the same as in previous modules.
Click save changes and then publish and you are done.
Menus
TNC INFINITY allows you to create and customize menus to navigate your website’s content efficiently. You can create and manage menus, assign them to different locations, and customize their appearance.
Upload PDF and Create FlipBook
As this is an Add-on of TNC FlipBook – PDF viewer for WordPress you can’t upload PDFs without this. To upload PDF files and create a FlipBook you first need to do that with TNC FlipBook – PDF viewer for WordPress. Follow these steps to create your first FlipBook and if you are already a user of TNC FlipBook – PDF viewer for WordPress you can skip this step.
After installing and activating TNC FlipBook – PDF viewer for WordPress, Navigate to FlipBook > Add New Menu
Put a title for your FlipBook, Keep it relevant to your PDF file as it will be used as the FlipBook title and while embedding using shortcodes.
In the next section under FlipBook Settings > Basic Settings Upload the PDF file you want to use
Select Page Mode. The default will be fine in most cases.
Default will open Default FlipBook
Thumbnails will open with displaying page thumbnails on the left side
Bookmarks will open by displaying Bookmarks on the left side
Attachments will open by displaying attachments on the left side
Default Zoom: You can set your preferred default zoom level for this PDF viewer on this input
Default Scrolling Mode: You can set your default scrolling mode here. Vertical, horizontal, wrapped or Flip.
Default Spread: Set your preferred default spread here.
Viewer Language: Select your preferred viewer language here.
Jump to page: Enter a page number here if you want to open/jump to a specific page.
Now, go to Toolbar Elements Tab
The first option here is to Use Global options, It’s enabled by default. If you need to hide any specific toolbar elements like download, print and others, you can disable this option and a list of toolbar elements will appear to enable or disable. I am not going through all the toolbar items here as all those are self-explanatory.
The next tab is the Appearance
We have a use global setting option here as well. Disable the global option only if you want to have a different theme/color setting for this specific viewer. Not going through the details here as well, you’ll understand by titles easily.
The next Tab is Privacy/Security
You don’t have to do anything on this tab. If you purchase WP File Access Manager, you’ll be able to manage the restriction settings from Media > File Access Manager Menu.
Once you’re done with all the settings, click on Publish button on the right sidebar
PDF viewer Link
If you choose the ‘PDF viewer Link’ module, it will create a link with your given text and when someone clicks the link, your selected PDF viewer will open. Follow these Steps:
Select the PDF viewer from the ‘Select PDF’ option.
Give the link a class name in the Link Class option if you want to customize the link later
In the Link Text, put a text which you want to turn into a link
Link target will make sure whether you want to open in a new tab or the same tab.
Click save and you’re done.
Inserting PDF viewer in Posts/Pages
In the last chapter, you’ve created your first PDF viewer, Now it’s time to insert the viewer on any of your posts or pages on your WordPress Website. This chapter is useful only if you’re using the default WordPress Gutenberg Block Editor or Classic Editor.
If you’re using any page builders like Elementor, Divi, or WPBakery Page Builder, we have addons for those page builders. Please check the Add-ons and integrations section in that case.
Go to Add or Edit any page or posts
If you’re using Gutenberg Block Editor, click on Add Block icon
Search for PDF viewer Block
Click on Add PDF viewer Button
Select Embed a PDF viewer if you want to embed a PDF viewer using iFrame on the page you’re editing.
On Select Viewer to Embed, Search & select by the title of the PDF viewer you’ve created and want to embed on this page.
Set width, and height, jump to page & iframe_title parameters of your choice & click on insert PDF viewer.
All these settings are for the iframe that will be embedded on the page.
Now, Publish or update the page & then view the page to see PDF viewer embed there.
Select Link to a PDF viewer if you want to insert a link on the page that will open the PDF viewer when clicked.
On Select Viewer to Link to, Search & select by the title of the PDF viewer you’ve created and want to link from this page.
Set Link Text, Target, jump to page and CSS class of your choice & click on Insert PDF viewer
Now, Publish or update the page & then view the page to see PDF viewer link there.
If you’re using Classic Editor, Click on ADD PDF viewer button just above the editor
Select Embed a PDF viewer if you want to embed a PDF viewer using iFrame on the page you’re editing.
On Select Viewer to Embed, Search & select by the title of the PDF viewer you’ve created and want to embed on this page.
Set width, and height, jump to page & iframe_title parameters of your choice & click on insert PDF viewer.
All these settings are for the iframe that will be embedded on the page.
Now, Publish or update the page & then view the page to see PDF viewer embed there.
Select Link to a PDF viewer if you want to insert a link on the page that will open the PDF viewer when clicked.
On Select Viewer to Link to, Search & select by the title of the PDF viewer you’ve created and want to link from this page.
Set Link Text, Target, jump to page and CSS class of your choice & click on Insert PDF viewer
Now, Publish or update the page & then view the page to see PDF viewer link there.
Inserting FlipBook into WordPress Posts/Pages
In the last chapter, you’ve created your first FlipBook, Now it’s time to insert the FlipBook on any of your posts or pages on your WordPress Website. This chapter is useful only if you’re using the default WordPress Gutenberg Block Editor or Classic Editor.
If you’re using any page builders like Elementor or WPBakery Page Builder, we have addons for those page builders. Please check the Add-ons and integrations section in that case.
Go to Add or Edit any page or posts
If you’re using Gutenberg Block Editor, click on Add Block icon
Search for TNC FlipBook Block
Click on Add FlipBook Button
Select Embed a FlipBook if you want to embed a FlipBook using iFrame on the page you’re editing.
On Select Embed a FlipBook, Search & select by the title of the FlipBook you’ve created and want to embed on this page.
Set width, and height, jump to page & iframe_title parameters of your choice & click on insert FlipBook.
All these settings are for the iframe that will be embedded on the page.
Now, Publish or update the page & then view the page to see the FlipBook embed there.
Select Link to a FlipBook if you want to insert a link on the page that will open the FlipBook when clicked.
On Select Link to a FlipBook, Search & select by the title of the FlipBook you’ve created and want to link from this page.
Set Link Text, Target, jump to page and CSS class of your choice & click on Insert FlipBook
Now, Publish or update the page & then view the page to see the FlipBook link there.
If you’re using Classic Editor, Click on ADD FlipBook button just above the editor
Select Embed a FlipBook if you want to embed a FlipBook using iFrame on the page you’re editing.
On Select Embed a FlipBook, Search & select by the title of the FlipBook you’ve created and want to embed on this page.
Set width, and height, jump to page & iframe_title parameters of your choice & click on insert FlipBook.
All these settings are for the iframe that will be embedded on the page.
Now, Publish or update the page & then view the page to see the FlipBook embed there.
Select Link to a FlipBook if you want to insert a link on the page that will open the FlipBook when clicked.
On Select Link to a FlipBook, Search & select by the title of the FlipBook you’ve created and want to link from this page.
Set Link Text, Target, jump to page and CSS class of your choice & click on Insert FlipBook
Now, Publish or update the page & then view the page to see the Link to a FlipBook there.
How to use
After extracting follow the process below to use the child theme.
Upload the child theme on your website:
Go to Appearance -> Themes
Click on Add new
Upload Hospital Child Theme – TNC
Click Activate
Install Required Plugins
After activating the child you will get a message to install the required plugins
Click Begin installing plugins
Select all and from the bulk settings select install and then install the required plugins. All the plugins are free and required to make this theme functional. So make sure you install all of them properly.
After installing, go to plugins and activate the installed plugins
Import demo data
Go to the Appearance tab -> Import Demo data
Click on Import demo data and the process will automatically start
Change the Menu
Go to Appearance and then Menus
Select the Primary menu
Click save
Change the Permalink structure
Go to Settings -> permalinks
Select “Post name” as the permalink structure
Click save settings
Change the Reading settings:
Go to Settings -> Reading
From “Your homepage displays” select “A static page”
Select Home as the Homepage
Select Blog as the Posts page
Import templates in Theme Builder
Go to Divi -> Theme Builder
At the top right corner, you will see a portability option (up and down arrow). Click on that.
Portability Popup will come up
Go to the Import tab
Select the Theme Builder layout file that you got while downloading the file
Click Import Divi Builder Templates
Select the WooCommerce Pages
Go to WooCommerce -> Settings
Then go to Products
Select Shop as the Shop Page. You need to select the shop page that comes with the child theme, not the previously generated one.
Then go to Advanced
Select the Cart Page, Checkout Page, and My Account Page. You need to select the pages that come with the child theme, no the previously generated one.
Click Save Changes
Import Product Filters
Go to Product Filters
Click on Import
Select the product file and your products will be uploaded
Clear Static CSS File Generation
Go to Divi -> Theme Options
Then from the builder tab go to Advanced
Click clear beside Static CSS File Generation field
First of all, Thank you so much for choosing WP File Access Manager.
This documentation is here to show you how you can install and use WP File Access Manager Easily and Efficiently.
For Detailed information and features of the Plugin, Please click here to go to CodeCanyon Plugin Page
To get started you need to Purchase WP File Access Manager for only $59 from Codecanyon. Click Here to Purchase WP File Access Manager If you’ve already purchased the plugin, you can continue to the next step.
Installation
Step 1: Download from CodeCanyon
After Purchasing the plugin on CodeCanyon. Go to the Downloads page
Find the Plugin on the list and click on Green Download Button
Save the zip file on your computer
Step 2: Install via WordPress Admin (wp-admin)
Please follow these steps to install via wp-admin
Login as administrator to wp-admin using your username and password
Go to Plugins-> Add New
Click on the Upload Plugin button
Click on Choose File and choose the file you just downloaded from CodeCanyon
Click on Install Now
Click on Activate Plugin once the installation is done
That’s all, and the plugin is installed on your site now!
First Things First
So now, You have the plugin installed on your WordPress Website, Congrats!
The plugin adds some custom code in your .htaccess file if you’re using apache. However, in some cases, it may fail for a few reasons like the .htaccess file not being writeable by WordPress.
If you’ve activated the plugin and added some restrictions but nothing is working, please try to deactivate and reactivate the plugin first. If that doesn’t solve the issue, please continue with the process below:
Apache Server
If you’re using an apache server, the plugin tries to automatically add some code to your .htaccess file. If your .htaccess file is not writeable by WordPress, these rules will not be added automatically, in that case, you need to put the following lines of code in your .htaccess file at the very bottom:
After activating the plugin, you’ll notice a New submenu item under Media called File Access Manager. Click on the menu and you’ll get a page with a few tabs. That’s the interface you’ll be dealing with to use the plugin. It’s very simple and straightforward. All the tabs and fields contain proper instructions about how things work but still here are some more details on each of the tabs and settings.
Individual File Access
The first tab is Restrict Individual Files, You can select any file or upload a new file from this interface and then set up access settings for the selected/uploaded file. Please remember, if a file has access settings assigned at an individual level, that’s the setting the file will use. Especially The ‘Require Login for This File‘ field controls most of it. So, If you want individual file settings to be ignored for any file, make sure you uncheck the ‘Require Login for This File‘ field.
However, Let’s do a test setting:
Once you’re on the page, Click on the button that says Upload or Select a File
It will bring up the media library, select any file you want to manage access for, and click on the ‘Select This File‘ button in the bottom right corner of the popup window
The page will now display additional fields to set access for the selected file.
1. Require Login for this file: Check if you want this file to be only accessible by Logged in users. Users who are not logged in will get a 404 error when they browse the file URL
2. Restrict By: You can restrict files by Users, User roles, WooCommerce ( if enabled ), and Paid Membership Pro ( if enabled). Select the one that you want to use.
3. Access Type: This setting is related to the next 2 settings (User Roles and Users). This field will tell those fields about what to do with their data. If you choose to allow it here, the roles and users you assign on the next 2 fields will have access to this file. If you choose to disallow here, the roles and users you assign on the next 2 fields won’t have access to this file.
4. Select User Roles: Select the roles that should or should not (based on the access type above) have access to this file
5. Select Users: Search and select the users that should or should not (based on the access type above) have access to this file. You can search by user’s id, name, email, etc.
6. Select WooCommerce Products: Purchasing any of the selected products will allow or disallow access to this file.
7. Select Paid Membership Pro Levels: Users with any of the selected Pmpro levels will be allowed/disallowed.
Once you’re done setting up the restrictions for the file, hit Save Changes and you’re all set! Test the file on your browser and it should have the restrictions applied.
Restrict By File Type
Sometimes, you may only want to restrict a specific file type. For example, you may only want to restrict PDF files to keep those protected and use in PDF viewer for WordPress Plugin
On this page, you can set access options for all file types you’ve uploaded to your Media Library. The plugin will check the media library and automatically generate and display the settings for each of the file types you have on your website.
Settings on this page are used when a file doesn’t have access settings at an individual level.
Settings are pretty much the same as Individual File Access Settings.
1. Require Login for this file: Check this if you want files of this file type to be only accessible by Logged in users. Users who are not logged in will get a 404 error when they browse the file URL
2. Restrict By: You can restrict files by Users, User roles, WooCommerce ( if enabled ), and Paid Membership Pro ( if enabled). Select the one that you want to use.
3. Access Type: This setting is related to the next 2 settings (User Roles and Users). This field will tell those fields about what to do with their data. If you choose to allow this here, the roles and users you assign on the next 2 fields will have access to files of this file type. If you choose to disallow here, the roles and users you assign on the next 2 fields won’t have access to files of this file type.
4. Select User Roles: Select the roles that should or should not (based on the access type above) have access to files of this file type
5. Select Users: Search and select the users that should or should not (based on the access type above) have access to files of this file type. You can search by user’s id, name, email, etc.
Once you’re done setting up the restrictions for the file, hit Save Changes and you’re all set! Test any file on your browser and it should have the restrictions applied.
Restrict All Uploads
On this page, you can set access options for all the files you’ve uploaded to your Media Library.
Settings on this page are used when a file doesn’t have access settings at an individual level or file type level.
Settings are pretty much the same as other tabs.
1. Require Login for this file: Check this if you want all files to be only accessible by Logged in users. Users who are not logged in will get a 404 error when they browse the file URL
2. Access Type: This setting is related to the next 2 settings (User Roles and Users). This field will tell those fields about what to do with their data. If you choose to allow it here, the roles and users you assign on the next 2 fields will have access to all files. If you choose to disallow here, the roles and users you assign on the next 2 fields won’t have access to all files.
3. Select User Roles: Select the roles that should or should not (based on the access type above) have access to all files
4. Select Users: Search and select the users that should or should not (based on the access type above) have access to all files. You can search by user’s id, name, email, etc.
5. Select WooCommerce Products: Purchasing any of the selected products will allow or disallow access to this file.
6. Select Paid Membership Pro Levels: Users with any of the selected Pmpro levels will be allowed/disallowed.
Once you’re done setting up the restrictions for the file, hit Save Changes and you’re all set! Test any file on your browser and it should have the restrictions applied.
Help/About
The help/About page contains lots of information about the plugin, documentation, support, and other useful information. Go ahead and have a look at the page to see what’s there!
These settings pages that come with the WP File Access manager are available to admins only. However, in some cases, you may want to allow other user roles to be able to access this setting page and work on restrictions.
To Do that the plugin has a filter, You need to put the following Lines on your active Theme’s functions.php file:
function your_prefix_update_wfam_capability(){
	return 'edit_others_posts'; // For complete list of capabilities, please head over to: https://wordpress.org/support/article/roles-and-capabilities/
}
add_filter( 'wfam_required_capability_for_admin_pages', 'your_prefix_update_wfam_capability', 10 );
You’ll get all the plugin updates from CodeCanyon. You’ll see a notification in your wp-admin if there’s a new update available. And then you can download the update from the CodeCanyon downloads page.
Regular License: Use, by you or one client, in a single end product which end users are not charged for. The total price includes the item price and a buyer fee.
Extended License: Use, by you or one client, in a single end product which end users can be charged for. The total price includes the item price and a buyer fee.
Conclusion
That’s all you need to know about the usage of the WP File Access Manager Plugin. Please feel free to let us know by support ticket if you have any questions or ideas to improve the things we provide.
Your input is important to us and we care about every single input from you.
If you are enjoying using the WP File Access Manager, you can leave us a review. It helps us to improve the product even more. You can submit an additional feature request too.
FAQ
What is the refund policy? WP File Access Manager is a product of ThemeNCode. Check out the refund policy of ThemeNCode. What payment method do you accept? This plugin is sold on CodeCanyon. You can use PayPal, Skrill (for non-US customers only), and credit cards (Visa or Mastercard), to make purchases Can I integrate the plugin with woo-commerce to add my own payment gateway? Yes. It comes with the integration of WooCommerce. Any file size limit? Any file type? There is no file size limit. It works with 30+ file types. Where can I ask a question about an item I want to purchase? Ask any queries through our support hub. Here is the link https://themencode.support-hub.io/ Can I use the plugin with WooCommerce? Yes. You can use this plugin with WooCommerce. It comes with the integration of WooCommerce Does this plugin support multisite? No. It only works on single WordPress installations.
How to use
After extracting follow the process below to use the child theme.
Upload the child theme on your website:
Go to Appearance -> Themes
Click on Add new
Upload TNC Cryptique Divi Child Theme
Click Activate
Install Required Plugins
After activating the child you will get a message to install the required plugins
Click Begin installing plugins
Select all and from the bulk settings select install and then install the required plugins. All the plugins are free and required to make this theme functional. So make sure you install all of them properly.
After installing, go to plugins and activate the installed plugins
Import demo data
Go to the Appearance tab -> Import Demo data
Click on Import demo data and the process will automatically start
Change the Menu
Go to Appearance and then Menus
Select the Primary menu
Click save
Change the Permalink structure
Go to Settings -> permalinks
Select “Post name” as the permalink structure
Click save settings
Change the Reading settings:
Go to Settings -> Reading
From “Your homepage displays” select “A static page”
Select Home as the Homepage
Select Blog as the Posts page
Import templates in Theme Builder
Go to Divi -> Theme Builder
At the top right corner, you will see a portability option (up and down arrow). Click on that.
Portability Popup will come up
Go to the Import tab
Select the Theme Builder layout file that you got while downloading the file. It’s in the demo-data folder. And, the file name is tnc-cryptique-divi-theme-builder.json
Click Import Divi Builder Templates
Select the WooCommerce Pages
Go to WooCommerce -> Settings
Then go to Products
Select Shop as the Shop Page. You need to select the shop page that comes with the child theme, not the previously generated one.
Then go to Advanced
Select the Cart Page, Checkout Page, and My Account Page. You need to select the pages that come with the child theme, no the previously generated one.
Click Save Changes
Import Product Filters
Go to Product Filters
Click on Import
Select the product file and your products will be uploaded
Clear Static CSS File Generation
Go to Divi -> Theme Options
Then from the builder tab go to Advanced
Click clear beside the Static CSS File Generation field
Setting Up Options
After activating the plugin, you’ll notice a New submenu item under Media called File Access Manager. Click on the menu and you’ll get a page with a few tabs. That’s the interface you’ll be dealing with to use the plugin. It’s very simple and straightforward. All the tabs and fields contain proper instructions about how things work but still here are some more details on each of the tabs and settings.
Upload PDF and Create PDF viewer
As this is an addon of TNC FlipBook – PDF viewer for WordPress you can’t upload PDFs with this. To upload PDF files and create a PDF viewer you first need to do that with TNC FlipBook – PDF viewer for WordPress. Follow these steps to create your first PDF viewer and if you are already a user of TNC FlipBook – PDF viewer for WordPress you can skip this step.
After installing and activating TNC FlipBook – PDF viewer for WordPress, Navigate to PDF viewer > Add New Menu
Put a title for your PDF viewer, Keep it relevant to your PDF file as it will be used as the viewer title and while embedding using shortcodes.
In the next section under PDF viewer Settings > Basic Settings Upload the PDF file you want to use
Select Page Mode. The default will be fine in most cases.
Default will open Default PDF viewer
Thumbnails will open with displaying page thumbnails on the left side
Bookmarks will open by displaying Bookmarks on the left side
Attachments will open by displaying attachments on the left side
Default Zoom: You can set your preferred default zoom level for this PDF viewer on this input
Default Scrolling Mode: You can set your default scrolling mode here. Vertical, horizontal, wrapped or Flip.
Default Spread: Set your preferred default spread here.
Viewer Language: Select your preferred viewer language here.
Jump to page: Enter a page number here if you want to open/jump to a specific page.
Now, go to Toolbar Elements Tab
The first option here is to Use Global options, It’s enabled by default. If you need to hide any specific toolbar elements like download, print and others, you can disable this option and a list of toolbar elements will appear to enable or disable. I am not going through all the toolbar items here as all those are self-explanatory.
The next tab is the Appearance
We have a use global setting option here as well. Disable the global option only if you want to have a different theme/color setting for this specific viewer. Not going through the details here as well, you’ll understand by titles easily.
The next Tab is Privacy/Security
You don’t have to do anything on this tab. If you purchase WP File Access Manager, you’ll be able to manage the restriction settings from Media > File Access Manager Menu.
Once you’re done with all the settings, click on Publish button on the right sidebar
PDF viewer Image
This element will show an image and when the image is clicked it will open a PDF viewer.
Select PDF viewer: The first field is to select the PDF viewer. Search for the desired PDF viewer and select that.
Image URL: Search for the image from the media library to show
Alt Text: Put an alt text for the image
Image Link Target: It can be opened in the same tab or a new tab
Image Width: Put the width of the image. By default, it is set to 100%
Image Height: By default, it is set to auto.
Image Alignment: Align the image to the left, right, or center.
Image CSS Class: Put a class to add CSS later.
Click Save Changes and it’s done.
How to Use
After extracting follow the process below to use the child theme.
Upload the child theme on your website:
Go to Appearance -> Themes
Click on Add new
Upload TNC Cryptique Divi Child Theme
Click Activate
Install Required Plugins
After activating the child you will get a message to install the required plugins
Click Begin installing plugins
Select all and from the bulk settings select install and then install the required plugins. All the plugins are free and required to make this theme functional. So make sure you install all of them properly.
After installing, go to plugins and activate the installed plugins
Import demo data
Go to the Appearance tab -> Import Demo data
Click on Import demo data and the process will automatically start
Change the Menu
Go to Appearance and then Menus
Select the Primary menu
Click save
Change the Permalink structure
Go to Settings -> permalinks
Select “Post name” as the permalink structure
Click save settings
Change the Reading settings:
Go to Settings -> Reading
From “Your homepage displays” select “A static page”
Select Home as the Homepage
Select Blog as the Posts page
Import templates in Theme Builder
Go to Divi -> Theme Builder
At the top right corner, you will see a portability option (up and down arrow). Click on that.
Portability Popup will come up
Go to the Import tab
Select the Theme Builder layout file that you got while downloading the file
Click Import Divi Builder Templates
Clear Static CSS File Generation
Go to Divi -> Theme Options
Then from the builder tab go to Advanced
Click clear beside the Static CSS File Generation field
Plugin Settings
After installing, now it’s time to set up the plugin. The process is quite easy and straightforward. In order to set up the AI Excerpt Generator By ThemeNcode go to Settings -> ThemeNcode AI Excerpt.
Get the OpenAI API key
In the ThemeNcode Ai Excerpt page, you will first find a field named “OpenAI API Key”. You need to put your API key here. There is a link below which will take you to your API Key. Follow the steps below:
Click on the link
If you already have an OpenAI account login to that or create a new account
You will see a page for API Keys. Click ‘Create new secret key’. It will give you a secret key.
Copy the secret key
Paste the secret key in the ThemeNcode AI Excerpt settings OpenAI API Key field and you are done
Enable on Post Types
This plugin can work on various post types. Here you can select which post types you need to work with. Just select those post types that you want to create excerpts with this plugin.
Select Model
There are 4 different primary OpenAI models or engines. You can choose anyone from there.
Maximum Token
The GPT family of models process text using tokens, which are common sequences of characters found in the text. A helpful rule of thumb is that one token generally corresponds to ~4 characters of text for common English text. This translates to roughly ¾ of a word (so 100 tokens ~= 75 words). By default, it is set to 60. You can change this according to your need.
After completing these steps just click ‘Save Changes’ and you’re done.
Install Required Plugins
When the installation is done, you will see a notice. This theme requires four plugins to work perfectly. They are:
Elementor – Pages are created using Elementor
One Click Demo Import – To import the demo contents
Contact Form 7 – Forms are created using this plugin
TNC Residane Elements – It is important to use several elements related to this theme
Add Shelf Item
To show items on a bookshelf first you need to add shelf items and later while embedding you can use them with a bookshelf. Follow the process to add shelf items.
From the Bookshelf tab, go to Add New Item on your WordPress Dashboard.
Set Featured Image: This is the image that will be shown on the bookshelf.
Item Content
Content to display: In this field, select the type of item you want to share. The following options are available:
Single Image
Image Gallery
Add to Youtube Video
Add Vimeo Video
Add Maps or any other Embedded items
Shortcode
Custom title and text
Any post or page
WooCommerce Product
TNC FlipBook / PDF Viewer
-> Single Image: If you select the Single Image option then you will get another field to upload an image. This image will be opened as a popup or in a new tab when someone will click the feature image on the bookshelf.
-> Image Gallery: Selecting an image gallery will enable the option to add a gallery. If you already have galleries created you can select that or you can choose multiple images and create a new gallery to show.
-> Add to Youtube Video: Youtube video will ask for the youtube video link in the next field. So when someone clicks the feature image that is on the bookshelf as an item this video will be played.
-> Add Vimeo Video: Same as youtube video. It will ask for a Vimeo video link.
-> Add Maps or any other Embedded items:
Put the link of a map or any other embedded items on this field.
Select size: It can be set to either full screen or custom width and height.
Full Screen: If you choose full screen then the next field will be selected fullscreen. It can be either true or false. Select true to show as fullscreen and false otherwise.
Custom width and height: If you choose this option then two more fields of Iframe width and height will come up. Put a number according to your need.
->Shortcode: The shortcode is usually provided by the plugin developer, and it’s a specific identifier for a particular functionality or feature of the plugin. For example, a plugin that adds a contact form to your site might provide a shortcode. When you place shortcodes in a post or page and view it on the front-end of your website.
Here is our list of shortcodes:
Bookshelf Shortcode[bstnc-book-shelf]
List / Grid Shortcode[bstnc-list-grid]
Popup [bstnc-popup]
Bookshelf Posts [bstnc-posts]
Bookshelf Shortcode [bstnc-book-shelf]
This shortcode allows you to display selected shelf items using a BookShelf Style. It comes with a few parameters.
viewer_id: This is the list of comma-separated id’s of the viewer you want to embed. Use maximum 5 id’s or each shelf
open_type: This parameter defines how the viewers should appear, you can choose between link & popup.
shelf_type: Style of Shelf, currently applicable values are style-1, style-2, style-3, style-4
css_class: You can use any css class if you want to apply custom styles to the shelf.
This shortcode allows you to display selected shelf items in a Grid or List Style. It comes with a few parameters.
For Grid View:
Source by: Where to pull the PDF viewers From, You can choose from all (Uses all PDF viewers), category (Select Categories in next parameter) or select-viewer (Select Viewers in next parameter)
display_type: Select grid here.
open_type: This parameter defines how the viewers should appear, you can choose between a link & popup.
column: Select the number of columns to show the maximum. usable values are col-2, col-3, col-4. Applicable for Grid style only
filter: Use 0 to disable, 1 to enable the filter. Applicable for Grid style only
sort: Use 0 to disable or 1 to enable sort. Applicable for Grid style only
search: use 0 to disable or 1 to enable search. Applicable for Grid style only
css_class: You can use any CSS class if you want to apply custom styles to the container.
Source by: Where to pull the PDF viewers From, You can choose from all (Uses all PDF viewers), category (Select Categories in next parameter) or select-viewer (Select Viewers in next parameter)
display_type: Select list here
open_type: This parameter defines how the viewers should appear, you can choose between a link & popup.
css_class: You can use any CSS class if you want to apply custom styles to the container.
This Shortcode allows you to post filtered content and Shelf settings. It comes with a few parameters.
Post_Types: In this case you can select your post type from here by searching at least 3 characters. This is the list of comma-separated id’s you want to embed.
Author: You can choose your author in this field.
Category: You can choose your category in this field.
Tag: You can choose and select tag in this field.
Taxonomy: You can attach taxonomy and terms to this field.
Status: Here you can set your post status like ( Publish, Pending, Draft, Auto draft, Future )
Sort By: You can sort by ID, Title, Date, None, Type, Rand, Comment Count, Menu Order, Modified, Name, Author, Relevance. And also select your order Ascending or Descending.
Custom_Field (post meta): This is a custom field where you can set your Meta Key, Meta Value and Meta Compare.
Pagination: Here you can On/Off your pagination, and you can indicate your posts per page.
Shelf_Settings: In this section you can select Open Type(Popup/Link), Select Shelf items, Shelf type(Wood Style 1,2 or Glass style 1,2) and CSS Class
-> Custom Title and Text: If you select this type there will be two more fields.
Title: Put the title which will be shown when someone clicks this item on the bookshelf.
Text: This is like the description under the heading
-> Any page or Post: Here you can show any page or type of post as an item on the bookshelf. These options will come up when you select this type of item:
Select content: Here you can select any page or post from your WordPress
Select size: It can be set to either full screen or custom width and height.
Full Screen: If you choose full screen then the next field will be selected fullscreen. Select true to show as fullscreen and false otherwise.
Custom width and height: If you choose this option then two more fields of Iframe width and height will come up. Put a number according to your need.
-> WooCommerce Product: You can display your WooCommerce product post if you select this field. For this first you need to select your content and after that you need to select your post size, full screen or you can select your custom screen size.
-> TNC FlipBook / PDF Viewer: For this case, first you need to install and activate the TNC FlipBook – PDF viewer for WordPress plugin and then you need to create the flipbook. So after installing TNC Flipbook, you need to create a flipbook first. To create a flipbook, go to your WordPress dashboard and you will see a tab called TNC FlipBook. Click Add New and set a title. Then upload the PDF of your choice and click select. Insert the PDF file into your TNC Flipbook and you’re done! Now you can use this PDF as a flipbook on your website. Now it can be displayed or embedded in a post or page. You can search for the name and embed it when you create your FlipBook.
List View Excerpt:
This is only applicable to the Bookshelf list view shortcodes. Put a summary or short description of that specific item. This text will come under the title if you show items with list view mode.
Modules
You can embed PDF or display it as a link right from your Divi builder (Visual Builder) if you use this Addon. In order to use this Addon First you need to go to the page/post on your WordPress website where you want to show the PDF. If you want to show PDF on a new page/post create a new page/post. After locating the page/post, press ‘Edit with Divi’.
On the Divi builder search for PDF and you will find 6 modules.
If you choose the PDF viewer Embed module it will show the PDF that you select right onto that page/post. Follow the next steps
Select the PDF viewer you want to show from ‘Select PDF’
Width is by default set to 100%. Change it if you want otherwise leave it as it is.
Height is by default set to 800. You can change it too if you want
Put a title in the iframe title option
In ‘Jump to Page’ you need to put a number to take your visitors straight to that page
Default Zoom is selected to auto by default. There are various options like 75%, 100%, page fit, etc. Choose the one that suits your need.
In the Default Page Mode, you get three options. Thumbnail, Bookmark, and Attachment. The thumbnail will show the thumbnails of the viewer on the left side of the viewer. Bookmark will show the bookmarks.
Then there are three more options. Link, Background, and Admin level. You can put the link of the module and select if you want to open it in a new tab or the same tab. Background color can be changed from the background option and the Admin label is to change the label of the module ( you should keep this as it is)
Save the changes and then publish and that page/post will show a PDF viewer now.
PDF viewer Link
If you choose the ‘PDF viewer Link’ module, it will create a link with your given text and when someone clicks the link, your selected PDF viewer will open. Follow these Steps:
Select the PDF viewer from the ‘Select PDF’ option.
In the Link Text, put a text which you want to turn into a link
Give the link a class name in the Link Class option if you want to customize the link later
Link target will make sure whether you want to open in a new tab or the same tab.
The later part is the same as the previous ‘PDF viewer Embed’. Follow those or you can keep them as it is also.
PDF Viewer Image
If you choose the ‘PDF Viewer Image’ option it will show an image with a link and when someone clicks that image it will open a PDF viewer. Follow these steps
Select a PDF viewer for the ‘Select PDF’ option
Copy an image link from your WordPress media library and paste it into the ‘Image URL’
Put the alt text in the Alt Text option
Image Alignment can be left, center, or right. Choose what you want.
The other options are the same as in previous modules.
Click save changes and then publish and you are done.
Navigative PDF viewer
In order to use this module, you need to get another Add-on called Navigative – TNC FlipBook – PDF viewer for WordPress Addon . Get this plugin from CodeCanyon. It will open all the toolbar options right into that module. It makes the working process so easy that you can change everything while watching live and in one place. If you use Navigative PDF viewer Addon, it will open all the PDF files dynamically, so you don’t need to create a separate PDF viewer every time. It allows you to display multiple pdf files on a single page with a navigation on the sidebar.
Copy the PDF link and paste it into the ‘PDF Link URL’ field
Width: The default width is 100%. Change it if you want
Height: The default height is set to 800px. You can change it too if you want.
Title: Put an iframe title here.
Jump to Page: Put a number and the PDF will automatically go to that page.
Logo: By default, the logo will be enabled. Select hide if you don’t want to show.
Click Save Changes and it’s done
Toolbar options:
The download option can be changed. It will show by default, you can hide it if you want.
The Print option can be changed in the same way. By default, it will show, you can hide this also if you want.
The fullscreen option is set to default. If you want to hide it you can change this too.
There will be a share button by default. Disable it if you need.
Zoom is set to auto by default. There are various options. Choose according to your need.
Open is by default set to on. You can turn it off.
The next option is the Page nav. You can turn it off or on.
The find button is on by default. Change it to turn it off if you need.
You can show or hide the Current View option
Rotate option can be shown or hide the button if you want
Hand Tool: Show or hide. By default, it is shown
Document Properties: Show or hide. By default, it is shown
Right Toggle Menu: Show or hide. By default, it is shown
Change the Default Zoom as per your need.
Page Mode can be thumbnails, bookmarks, or attachments. Select what you want.
Toggle Left: Show or hide. By default, it is shown
Scroll: Show or hide. By default, it is shown
Spread: Show or hide. By default, it is shown
Default Scroll: Vertical, Horizontal, Wrapped, and flipbook scrolling is available. Choose one.
Default Spread: It can be Odd or Even. Choose anyone.
Select the language that you want to work with. By default it is English.
Then click Save changes and you’re done
Bookshelf - Display PDF viewer
To use this Widget you need an Add-on called Display – TNC FlipBook – PDF viewer for WordPress Addon. This will organize and show all the PDF files as a bookshelf. This looks super amazing. Get this addon from here, DISPLAY – TNC FlipBook – PDF viewer for WordPress Addon.
Here you can select PDF files which will be shown on a bookshelf. You can choose the open type as either PopUp or Link. And, there are 4 types of bookshelf styles available with this Add-on.
Select Viewer: Choose the viewer that you want to show on the bookshelf
Open Type: You can open this as PopUp or Link
Shelf Style: There are 4 types of shelves available. Choose the one you want.
CSS Class: Give a class name to put additional CSS later.
Read this documentation to learn how to work with this Add-on.
In this module, you can either use the list or grid. You can show PDFs by categories or specific viewers. You can show all of them also.
Select Viewer: Choose the viewer that you want to show on the bookshelf
Source By: Show the grid or list by category, viewer, or all.
Choose the Display type to either list or grid. In the grid mode, you can select the number of columns you want to show. And also, you can disable or enable the filtering, searching and sorting functions.
Open Type: You can open this as PopUp or Link
CSS Class: Give a class name to put additional CSS later.
Read this documentation to learn how to work with this Add-on.
Upload PDF and Create PDF viewer
As this is an addon of TNC FlipBook – PDF viewer for WordPress you can’t upload PDFs with this. To upload PDF files and create a PDF viewer you first need to do that with TNC FlipBook – PDF viewer for WordPress. Follow these steps to create your first PDF viewer and if you are already a user of TNC FlipBook – PDF viewer for WordPress you can skip this step.
After installing and activating TNC FlipBook – PDF viewer for WordPress, Navigate to PDF viewer > Add New Menu
Put a title for your PDF viewer, Keep it relevant to your PDF file as it will be used as the viewer title and while embedding using shortcodes.
In the next section under PDF viewer Settings > Basic Settings Upload the PDF file you want to use
Select Page Mode. The default will be fine in most cases.
Default will open Default PDF viewer
Thumbnails will open with displaying page thumbnails on the left side
Bookmarks will open by displaying Bookmarks on the left side
Attachments will open by displaying attachments on the left side
Default Zoom: You can set your preferred default zoom level for this PDF viewer on this input
Default Scrolling Mode: You can set your default scrolling mode here. Vertical, horizontal, wrapped or Flip.
Default Spread: Set your preferred default spread here.
Viewer Language: Select your preferred viewer language here.
Jump to page: Enter a page number here if you want to open/jump to a specific page.
Now, go to Toolbar Elements Tab
The first option here is to Use Global options, It’s enabled by default. If you need to hide any specific toolbar elements like download, print and others, you can disable this option and a list of toolbar elements will appear to enable or disable. I am not going through all the toolbar items here as all those are self-explanatory.
The next tab is the Appearance
We have a use global setting option here as well. Disable the global option only if you want to have a different theme/color setting for this specific viewer. Not going through the details here as well, you’ll understand by titles easily.
The next Tab is Privacy/Security
You don’t have to do anything on this tab. If you purchase WP File Access Manager, you’ll be able to manage the restriction settings from Media > File Access Manager Menu.
Once you’re done with all the settings, click on Publish button on the right sidebar
Navigative PDF viewer
In order to use this module, you need to get another Add-on called Navigative – TNC FlipBook – PDF viewer for WordPress Addon . Get this plugin from CodeCanyon. It will open all the toolbar options right into that module. It makes the working process so easy that you can change everything while watching live and in one place. If you use Navigative PDF viewer Addon, it will open all the PDF files dynamically, so you don’t need to create a separate PDF viewer every time. It allows you to display multiple pdf files on a single page with a navigation on the sidebar.
Copy the PDF link and paste it into the ‘PDF Link URL’ field
Width: The default width is 100%. Change it if you want
Height: The default height is set to 800px. You can change it too if you want.
Title: Put an iframe title here.
Jump to Page: Put a number and the PDF will automatically go to that page.
Logo: By default, the logo will be enabled. Select hide if you don’t want to show.
Click Save Changes and it’s done
Toolbar options:
The download option can be changed. It will show by default, you can hide it if you want.
The Print option can be changed in the same way. By default, it will show, you can hide this also if you want.
The fullscreen option is set to default. If you want to hide it you can change this too.
There will be a share button by default. Disable it if you need.
Zoom is set to auto by default. There are various options. Choose according to your need.
Open is by default set to on. You can turn it off.
The next option is the Page nav. You can turn it off or on.
The find button is on by default. Change it to turn it off if you need.
You can show or hide the Current View option
Rotate option can be shown or hide the button if you want
Hand Tool: Show or hide. By default, it is shown
Document Properties: Show or hide. By default, it is shown
Right Toggle Menu: Show or hide. By default, it is shown
Change the Default Zoom as per your need.
Page Mode can be thumbnails, bookmarks, or attachments. Select what you want.
Toggle Left: Show or hide. By default, it is shown
Scroll: Show or hide. By default, it is shown
Spread: Show or hide. By default, it is shown
Default Scroll: Vertical, Horizontal, Wrapped, and flipbook scrolling is available. Choose one.
Default Spread: It can be Odd or Even. Choose anyone.
Select the language that you want to work with. By default it is English.
Then click Save changes and you’re done
How to Show the Widget
Using the Fan page widget by ThemeNcode is really easy and simple. You just need a few clicks of the mouse and it will be ready. Follow these steps:
Go to Appearance -> Widget
You can add this anywhere whether that is in the sidebar or the footer.
Click on the plus icon
Search Facebook Fan Page Widget
Click on the Facebook Fan Page Widget
Title: Put any text that you want to show as the title.
Facebook Page Url: Put the link of the Facebook page that you want to show.
Width: The default width is set to 340 px. You can change it, just write the pixel you want.
Height: The default height is set to 500px. You can change it too.
Show Friends Faces: Select yes or no to show or hide Friends’ faces
Hide Cover?: Select yes or no to show or hide the cover picture of the Facebook page
Show Posts?: Select yes or no. If you select yes it will show a post with a scrolling bar and if you select no it won’t show any posts.
Then click update.
You can now see there is a Facebook fan page widget in the sidebar or footer where you selected. A Follow page button will automatically appear on that.
Install Required Plugins
When the installation is done, you will see a notice. This theme requires four plugins to work perfectly. They are:
Elementor – Pages are created using Elementor
One Click Demo Import – To import the demo contents
Contact Form 7 – Forms are created using this plugin
TNC Hospital Elements – It is important to use several elements related to this theme
Photo Gallery Builder – This plugin helps you to showcase photos as a masonry gallery.
Themify – WooCommerce Product Filter – Filter between WooCommerce Products
WooCommerce – This is essential if you want to have products and make your website an e-commerce site.
BookingPress Appointment Booking – It will let your visitors book appointments directly on your website for the doctors.
Steps to follow:
Click on Begin installing plugins
Select all the plugins
From the Bulk Action, choose Install
Click Apply
After installing the required plugins, get back to the previous page.
Select all the plugins, and choose Activate from the Bulk action
After installing and activating QuoteX successfully you need to set it up.
Got to Quotes -> Settings
Then click ‘Display Setting’
On the Request a Quote Button you need to enable the ‘Request a Quote’ Button. You can show this on all products, selected categories, or individual products
The next option is ‘Exclude Products’. Put the name of the product that you want to exclude.
If you want to hide the ‘Add to Cart’ button enable the option from the ‘Hide Add to Cart Button’. You can hide this from all products, selected categories, or individual products. You can exclude specific products here too.
Next, you can do the same with the Price in the ‘Hide Price’ section. You can hide the rice from all products, selected categories, or individual products.
Misc. Settings
Request a Quote Button Text: Change the name of the button to anything you want. It is set to ‘Request a Quote’ by default.
Require Login to Request Quote?: Here you can choose whether the user must log in or not for requesting quotes.
Quoted Price Expires After: Set an expiration period for the quoted price.
Currency: There is every possible currency. By default, it is set to US Dollars.
Pages
Select Basket Page: Select the page that you want to use as your quote basket. It is separated from the cart. One page is already created for you just set it to ‘Basket’
Select Requests Page: Select the page that you want as your Quote request page. Here users can see the quote requests. One page is already created for you just set it to ‘Quote Request’
Email Settings
Email Sender Settings:
Logo: Put the logo that will show up on emails
Email From Name: This is the name from which the email will come
Email Sender Email: Emails will come from this address.
Admin Email Settings
Admin Email: This email will be used for sending admin notification
Enable/Disable Certain Emails
You can enable or disable the below options:
Admin Email on Quote Request
Admin Email on Quote Comment
Admin Email on Quote Accept
Admin Email on Quote Reject
Customer Email on Quote Request
Customer Email on Quote Comment
Email Content
Admin Notification Email on Quote Request
Subject: Subject for Admin Email on Quote Request. Two shortcodes available
%name%
%id%
Heading: Heading for Admin Email on Quote Request. Two shortcodes available
%name%
%id%
Content: Content for Admin Email on Quote Request. Three Shortcodes available
%name%
%phone%
%message%
You can do the same setting for the below options also:
Admin Notification Email on Quote Comment
Admin Notification Email on Quote Accept
Admin Notification Email on Quote Reject
Customer Notification Email on Quote Request
Customer Notification Email on Quote Comment
Customer Notification Email on Quote Update
Pages
Select Basket Page: Select the page that you want to use as your quote basket. It is separated from the cart. One page is already created for you just set it to ‘Basket’
Select Requests Page: Select the page that you want as your Quote request page. Here users can see the quote requests. One page is already created for you just set it to ‘Quote Request’
Upload PDF and Create FlipBook
As this is an Add-on of TNC FlipBook – PDF viewer for WordPress you can’t upload PDFs without this. To upload PDF files and create a FlipBook you first need to do that with TNC FlipBook – PDF viewer for WordPress. Follow these steps to create your first FlipBook and if you are already a user of TNC FlipBook – PDF viewer for WordPress you can skip this step.
After installing and activating TNC FlipBook – PDF viewer for WordPress, Navigate to TNC FlipBook > Add New Menu
Put a title for your FlipBook, Keep it relevant to your PDF file as it will be used as the viewer title and while embedding using shortcodes.
In the next section under FlipBook Settings > Basic Settings Upload the PDF file you want to use
Select Page Mode. The default will be fine in most cases.
Default will open Default FlipBook
Thumbnails will open with displaying page thumbnails on the left side
Bookmarks will open by displaying Bookmarks on the left side
Attachments will open by displaying attachments on the left side
Default Zoom: You can set your preferred default zoom level for this PDF viewer on this input
Default Scrolling Mode: You can set your default scrolling mode here. Vertical, horizontal, wrapped or Flip.
Default Spread: Set your preferred default spread here.
Viewer Language: Select your preferred viewer language here.
Jump to page: Enter a page number here if you want to open/jump to a specific page.
Now, go to Toolbar Elements Tab
The first option here is to Use Global options, It’s enabled by default. If you need to hide any specific toolbar elements like download, print and others, you can disable this option and a list of toolbar elements will appear to enable or disable. I am not going through all the toolbar items here as all those are self-explanatory.
The next tab is the Appearance
We have a use global setting option here as well. Disable the global option only if you want to have a different theme/color setting for this specific viewer. Not going through the details here as well, you’ll understand by titles easily.
The next Tab is Privacy/Security
You don’t have to do anything on this tab. If you purchase WP File Access Manager, you’ll be able to manage the restriction settings from Media > File Access Manager Menu.
Once you’re done with all the settings, click on Publish button on the right sidebar
Method 2: Using Shortcodes
Additionally. you can still use the previous method of inserting shortcodes. here are shortcodes you can use.
TNC FlipBook – PDF viewer for WordPress 10.9.0 comes with 2 extra shortcodes to make it compatible with Oxygen Builder or any other builders that get rid of page templates. In this article, you’ll get the list of those 2 shortcodes with the parameters. You just need to copy the shortcodes, replace the file URL and paste them on any of your pages or posts to have the viewer display there.
file: This is where you’ll provide the URL to the pdf file that will be opened with FlipBook. Make sure you use the direct URL to the pdf file ending in .pdf, otherwise it will not work. Also, make sure the pdf files are hosted under the same domain.
class: You can use a custom CSS class for the generated link. Basically, this class is used for styling. for example, if you want the link to be a button and you’re using the bootstrap CSS framework, you can use the following in this field: btn btn-default
text: This is the text that will appear as a link. Please make sure to fill this field, as it will display nothing on the front end if you keep this field empty.
target: Link Target, Select how you want the link to open, in the same tab or in a new tab.
download: Select if you want to show the Download button in the toolbar.
print: Select if you want to show the Print button in the toolbar.
fullscreen: Select if you want to show the Fullscreen button in the toolbar.
Share: Select if you want to show the Share button in the toolbar.
zoom: Select if you want to show the Zoom option in the toolbar.
open: Select if you want to show the Open button in the toolbar.
logo: Select if you want to show the Logo button in the toolbar.
pagenav : Select if you want to show the Pagenav button in the toolbar.
find: Select if you want to show the Find button in the toolbar.
page: Enter the page number if you want to send the user to a specific page on opening of the file.
default_zoom: Select the Default Zoom here
pagemode : If you select Thumbs as pagemode, the left bar will be opened with page thumbnails and if you choose bookmarks, the left bar will be opened with the list of bookmarks. It is not recommended to use as it may not work smoothly on smaller screen sizes. We’ve added it just because it might be helpful for some users.
language: Select the language you want to use
current_view: Select if you want to show the Current View button in the toolbar.
rotate: Select if you want to show Rotate View button in the toolbar.
handtool: Select if you want to show the Hand Tool button in the toolbar.
doc_prop: Select if you want to show the Document Properties button in the toolbar.
toggle_menu: Select if you want to show the Toggle Menu button in the toolbar.
toggle_left: Select if you want to show the Toggle Left button in the toolbar.
scroll: Select if you want to show Scroll options in the toolbar.
spread: Select if you want to show Spread options in the toolbar.
default_scroll: Default Scroll Method, Use 1 for Vertical scrolling, Use 2 for Horizontal Scrolling, and use 3 for Flip Book
default_spread: Default Spread Mode, options: 1 for No Spread, 2 for Odd Spreads, 3 for Even Spreads
Output:
You can see there is a link with the text “Open PDF”. When someone clicks the link a PDF file will open. The text can be changed to anything from the shortcode.
file: This is where you’ll provide the URL to the pdf file that will be opened with FlipBook. Make sure you use the direct URL to the pdf file ending in .pdf, otherwise, it will not work. Also, make sure the pdf files are hosted under the same domain.
width: Specify the Width of iFrame in pixels here. For example, you can use 600
height: Specify the height of iFrame in Pixels here. For Example, you can use 800
download: Select if you want to show the Download button in the toolbar.
print: Select if you want to show the Print button in the toolbar.
fullscreen: Select if you want to show the Fullscreen button in the toolbar.
Share: Select if you want to show the Share button in the toolbar.
zoom: Select if you want to show the Zoom option in the toolbar.
open: Select if you want to show the Open button in the toolbar.
logo: Select if you want to show the Logo button in the toolbar. The logo will not be displayed if theiFrame width is small. But will display when users go to fullscreen mode.
pagenav: Select if you want to show the Pagenav button in the toolbar.
find: Select if you want to show the Find button in the toolbar.
page: Enter the page number if you want to send the user to a specific page on opening of the file.
default_zoom: Select the Default Zoom here
pagemode: If you select Thumbs as pagemode, the left bar will be opened with page thumbnails and if you choose bookmarks, the left bar will be opened with the list of bookmarks. It is not recommended to use as it may not work smoothly on smaller screen sizes. We’ve added it just because it might be helpful for some users.
language: Select the language you want to use
current_view: Select if you want to show the Current View button in the toolbar.
rotate: Select if you want to show Rotate View button in the toolbar.
handtool: Select if you want to show the Hand Tool button in the toolbar.
doc_prop: Select if you want to show the Document Properties button in the toolbar.
toggle_menu: Select if you want to show the Toggle Menu button in the toolbar.
toggle_left: Select if you want to show the Toggle Left button in the toolbar.
scroll: Select if you want to show Scroll options in the toolbar.
spread: Select if you want to show Spread options in the toolbar.
iframe_title: Title of the iFrame tag
default_scroll: Default Scroll Method, Use 1 for Vertical scrolling, Use 2 for Horizontal Scrolling and use 3 for Flip Book
default_spread: Default Spread Mode, options: 1 for No Spread, 2 for Odd Spreads, 3 for Even Spreads
Output:
By using this shortcode, one can directly embed and show a PDF file with a FlipBook on a page or post. Change the shortcode as you need and the viewer will be changed according to it also.
Working Principle
After successfully installing OfferPress on your WordPress website you will get a new menu item on your WordPress Dashboard named ‘Offers’.
In this section, you can find all the previously generated offers. You can edit the offer by clicking on the offer. You can view the offer from here also.
Add New Offer
First, go to Offers -> Add New Offer
Basic Settings:
Status: The status can be set to ‘Active’, ‘Disabled’, or ‘Expired’.
Offer Message: In this field, you can put a message which will be displayed above the ‘Avail Offer’ button
Products:
Product: Here you can select the product for the offer. You can change the product from this option.
Quantity: Set the amount of how many products you want to give the offer.
Price: Set the price of the product.
Users:
In this segment, you can see the users that can avail of the offer. There are three categories
All users: Everyone can avail of this kind of offer
Selected Roles: Those users who have the given role can avail of this kind of offer. All of the WordPress user roles are available here
Selected Users: Only the selected users can get this kind of offer.
Limit and Expiration:
Expiration Date: Here you can set the date of expiration. After that date, the offer will not work and the status will be expired.
Max Usage: The maximum number of users that can get this offer. Use -1 for setting the usage to unlimited.
After selecting everything, click update and you will get a link that you can share. By clicking on that link visitors can get the offer.
Usage
As mentioned above, this Addon will not work without the TNC FlipBook – PDF viewer for WordPress plugin. So after installing TNC Flipbook, you need to create a flipbook first. To create a flipbook, go to your WordPress dashboard and you will see a tab called TNC FlipBook. Click Add New and set a title. Then upload the PDF of your choice and click select. After that, set a featured image and add a new category. Insert the PDF file into your TNC Flipbook and you’re done! Now you can use this PDF as a flipbook on your website. Now it can be displayed or embedded in a post or page.
After successfully creating a flipbook now you can easily embed it in your page or post. For this go to your new or existing page and search for Display PDF Viewer block. Then click on Add Display PDF Viewer. Now you need to select the viewer type.
Bookshelf
Display – List Grid
Bookshelf: Whenever you select Bookshelf you must first select Viewer to embed. Search for it using the flipbook title. And you cannot select more than five. After that you can select Open Type. You can select it as a link or popup. Then select the shelf type. Four types of shelves are available. You can choose at your own discretion. These are wood style 1, 2 and glass style 1, 2. Then the CSS class. You can add custom CSS to this field.
Display – List Grid: Whenever you select Display – List Grid, you first select a source. You can select it by all sources, categories or you can select individuals. If you select a category or individual viewer, search and select it by name. Next you need to select a display type. You can select it as a grid view or list view. After that you can select Open Type. You can select it as a link or popup. If you select display type as grid view, you will get some options like column, filter, sort, search. But if you select it as a list view, you won’t get those options. Then the CSS class. You can add custom CSS to this field.
After finishing all this click on the Display PDF Viewer button and then publish and preview your page.
Updates and Support
This plugin has two types of update and support systems.
Yearly: If you buy the Yearly plan then you will get 1 year of support and after every year you need to renew.
Lifetime: Lifetime support and updates comes with lifetime plans.
You can embed PDF or display it as a link right from your Elementor page builder if you use this Add-on. In order to use this Addon First you need to go to the page/post on your WordPress website where you want to show the PDF. If you want to show PDF on a new page/post create a new page/post. After locating the page/post, press ‘Edit with Elementor’.
On the Elementor page builder search for pdf and you will find 5 widgets.
If you choose the PDF viewer Embed widget it will show the PDF that you select right onto that page/post. Follow the next steps
Select the PDF viewer you want to show from ‘Select PDF’
Width is by default set to 100%. Change it if you want otherwise leave it as it is.
Height is by default set to 800. You can change it too if you want
Put a title in the iframe title option
PDF viewer Link
If you choose the ‘PDF viewer Link’ widget, it will create a link with your given text and when someone clicks the link, your selected PDF viewer will open. Follow these Steps:
Select the PDF viewer from the ‘Select PDF’ option.
In the Link Text, put a text which you want to turn into a link
Give the link a class name in the Link Class option if you want to customize the link later
Link target will make sure whether you want to open in a new tab or the same tab.
PDF viewer Image Link
If you choose the ‘PDF viewer Image’ option it will show an image with a link and when someone clicks that image it will open a PDF viewer. Follow these steps
Select a PDF viewer for the ‘Select PDF’ option
Copy an image link from your WordPress media library and paste it into the ‘Image URL’
Put the alt text in the Alt Text option
Image Alignment can be left, center, or right. Choose what you want.
The other options are the same as in previous modules.
Click save changes and then publish and you are done.
Bookshelf - PDF viewer
To use this Widget you need an addon called Display – TNC FlipBook – PDF viewer for WordPress Addon. This will organize and show all the PDF files as a bookshelf. This looks super amazing. Get this addon from here, Display – TNC FlipBook – PDF viewer for WordPress Addon.
Select Viewer: Choose the viewer that you want to show on the bookshelf
Open Type: You can open this as PopUp or Link
Shelf Style: There are 4 types of shelves available. Choose the one you want.
CSS Class: Give a class name to put additional CSS later.
Read this documentation to learn how to work with this addon.
Select Viewer: Choose the viewer that you want to show on the bookshelf
Source By: Show the grid or list by category, viewer, or all.
Choose the Display type to either list or grid. In the grid mode, you can select the number of columns you want to show. And also, you can disable or enable the filtering, searching and sorting functions.
Open Type: You can open this as PopUp or Link
CSS Class: Give a class name to put additional CSS later.
Read this documentation to learn how to work with this addon.
Copy the PDF link and paste it into the ‘PDF Link URL’ field
Width: The default width is 100%. Change it if you want
Height: The default height is set to 800px. You can change it too if you want.
Title: Put an iframe title here.
Jump to Page: Put a number and the PDF will automatically go to that page.
Logo: By default, the logo will be enabled. Select hide if you don’t want to show.
Click Save Changes and it’s done
Toolbar options:
The download option can be changed. It will show by default, you can hide it if you want.
The Print option can be changed in the same way. By default, it will show, you can hide this also if you want.
The fullscreen option is set to default. If you want to hide it you can change this too.
There will be a share button by default. Disable it if you need.
Zoom is set to auto by default. There are various options. Choose according to your need.
Open is by default set to on. You can turn it off.
The next option is the Page nav. You can turn it off or on.
The find button is on by default. Change it to turn it off if you need.
You can show or hide the Current View option
Rotate option can be shown or hide the button if you want
Hand Tool: Show or hide. By default, it is shown
Document Properties: Show or hide. By default, it is shown
Right Toggle Menu: Show or hide. By default, it is shown
Change the Default Zoom as per your need.
Page Mode can be thumbnails, bookmarks, or attachments. Select what you want.
Toggle Left: Show or hide. By default, it is shown
Scroll: Show or hide. By default, it is shown
Spread: Show or hide. By default, it is shown
Default Scroll: Vertical, Horizontal, Wrapped, and flipbook scrolling is available. Choose one.
Default Spread: It can be Odd or Even. Choose anyone.
Select the language that you want to work with. By default it is English.
Then click Save changes and you’re done
Theme Customization
TNC INFINITY offers extensive customization options to help you personalize your website’s appearance and tailor it to your specific needs. In this section, we will explore the different ways you can customize your theme, including colors, fonts, layouts, and more.
Customizer
The easiest way to customize your theme is through the WordPress Customizer. The Customizer provides a live preview of your changes, allowing you to see how they will affect your website in real-time. To access the Customizer:
The Site Identity section allows you to set your website’s title, tagline, and logo. Here, you can:
Update your website’s title and tagline.
Upload a custom logo or use text-based branding.
Set a site icon (favicon) that appears in the browser tab.
Colors
The Colors and Background sections enable you to customize the color scheme and background of your website. In these sections, you can customize the color of specific elements like:
Header Background
Site Title
Site Tagline
Navbar Top Menu
Dropdown Menu with Background
Active Menu
Hamburger Icon
Font Color
Body Color
Link Color and many more.
Menus
TNC INFINITY allows you to create and customize menus to navigate your website’s content efficiently. You can create and manage menus, assign them to different locations, and customize their appearance.
Widgets
TNC INFINITY supports the use of widgets to add various functionality and content to your website’s sidebars, footers, and other widgets areas. Widget areas, also known as sidebars, are specific regions of your website where you can place widgets. TNC INFINITY typically includes several predefined widget areas, such as:
Sidebar: The primary sidebar typically displayed on the side of your blog or pages.
Footer: The footer area typically displayed at the bottom of your website.
Homepage Settings
You can choose what’s displayed on the homepage of your site. It can be posted in reverse chronological order (classic blog), or a fixed/static page. To set a static homepage, you first need to create two Pages. One will become the homepage, and the other will be where your posts are displayed.
You can change or remove your homepage title here.
Layout
It provides flexible layout options to help you structure and organize the content on your website. TNC INFINITY includes a variety of page templates that offer different layouts and styles. Also provide the option for full-width layouts, where the content spans the entire width of the screen, without sidebars or other elements. Full-width layouts are often used to create impactful landing pages or showcase specific content.
You can customize :
Home Page Layout
Archive Page Layout
Single Page Layout
Single Post Layout
Search Page Layout
Full-width layouts can give your content a spacious and immersive feel. The layout and elements of your website will automatically adjust based on the screen size, ensuring readability and usability across different devices. Depending on the features and capabilities of TNC INFINITY, you may have additional layout options available. These could include options for headers, footers, navigation menus, or specific sections of your website.
Blog Page
This section useful if you select “TNC Infinity Blog Page” for your page template. You can display different category on different section using this template.
You can choose different category for Featured, Popular Post and Image Gallery section.
Customize Single Page
In this section you will select the social icon to display on any post.
TNC Infinity Settings
TNC INFINITY provides a set of settings that allow you to configure various aspects of your theme’s functionality, appearance, and behavior. In this section, we will explore the available settings.
General
You will Select the default featured image.
You will get the option to display featured images in blog posts.
Display featured images in single posts.
You can also select page title background image
You can change your primary and heading font of your site.
These are the basic general settings available in TNC INFINITY. Explore the options provided by your theme and customize them to align with your brand, design preferences, and website requirements. Remember to save your changes after customizing the general settings to apply them to your website.
Newsletter
You can show or hide your newsletter of your site.
You can change Subheading, Heading, Button Text and Button URL here.
Footer
The footer section of your website appears at the bottom of each page and typically contains important information, links, and additional content. In this section, we will explore how to customize the footer in TNC INFINITY and make it suit your website’s needs.
You can customize and choose colors for:
Top Footer background
Top Footer padding
Copyright Footer background
Copyright Footer padding
Change the color of the social icon
You can set your preferred social URL like Facebook, Twitter, Vimeo, Instagram, Pinterest, Youtube
Additional CSS
TNC INFINITY allows you to add custom CSS code without modifying the theme files directly. This feature, known as Additional CSS, provides a convenient way to customize the appearance and styles of your website. In this section, we will explore how to use Additional CSS in TNC INFINITY.
To add Additional CSS code to your website:
In the Additional CSS section, you will see a text editor or a field where you can enter your custom CSS code.
Write or paste your CSS code into the provided area.
Ensure that your code is valid and properly formatted.
Preview the changes in the live preview pane to see how the CSS affects your website’s appearance.
Save the changes to apply the custom CSS to your website.
Single Post
In single post setting you can show or hide social icon of your single post.
Bookshelf - PDF viewer
To use this Widget you need an addon called Display – TNC FlipBook – PDF viewer for WordPress Addon. This will organize and show all the PDF files as a bookshelf. This looks super amazing. Get this addon from here, Display – TNC FlipBook – PDF viewer for WordPress Addon.
Select Viewer: Choose the viewer that you want to show on the bookshelf
Open Type: You can open this as PopUp or Link
Shelf Style: There are 4 types of shelves available. Choose the one you want.
CSS Class: Give a class name to put additional CSS later.
Read this documentation to learn how to work with this addon.
Widgets
TNC INFINITY supports the use of widgets to add various functionality and content to your website’s sidebars, footers, and other widgets areas. Widget areas, also known as sidebars, are specific regions of your website where you can place widgets. TNC INFINITY typically includes several predefined widget areas, such as:
Sidebar: The primary sidebar typically displayed on the side of your blog or pages.
Footer: The footer area typically displayed at the bottom of your website.
Elements
You can embed PDF or display it as a link right from your Avada builder (Live Builder) if you use this Add-on. In order to use this Addon First you need to go to the page/post on your WordPress website where you want to show the PDF. If you want to show PDF on a new page/post create a new page/post. After locating the page/post, press ‘Live Builder’.
On the Live builder search for pdf and you will find 5 elements.
To use this Widget you need an addon called “Display – TNC FlipBook – PDF viewer for WordPress Addon”. This will organize and show all the PDF files as a bookshelf. This looks super amazing. Get this addon from here, Display – TNC FlipBook – PDF viewer for WordPress Addon.
Read this documentation to learn how to work with this addon.
Read this documentation to learn how to work with this addon.
PDF viewer Link
If you choose the ‘PDF viewer Link’ module, it will create a link with your given text and when someone clicks the link, your selected PDF viewer will open. Follow these Steps:
Select the PDF viewer from the ‘Select PDF’ option.
Give the link a class name in the Link Class option if you want to customize the link later
In the Link Text, put a text which you want to turn into a link
Link target will make sure whether you want to open in a new tab or the same tab.
Click save and you’re done.
PDF viewer Embed
If you choose the PDF viewer Embed module it will show the PDF that you select right onto that page/post. Follow the next steps
Select the PDF viewer you want to show from ‘Select PDF’
Width is by default set to 100%. Change it if you want otherwise leave it as it is.
Height is by default set to 800. You can change it too if you want
Put a title in the iframe title option
Save the changes and then save and that page/post will show a PDF viewer now.
PDF viewer Image Link
If you choose the ‘PDF viewer Image Link’ option it will show an image with a link and when someone clicks that image it will open a PDF viewer. Follow these steps
Select a PDF viewer for the ‘Select PDF’ option
Click on the ” + ” icon and select the image from Media Library
Put the alt text in the Alt Text option
Link target will make sure whether you want to open in a new tab or the same tab.
Width is by default set to 100%, change this according to your need.
Height is by default set to auto, you can change this too.
Image Alignment can be left, center, or right. Choose what you want.
Put a class in the Image CSS Class field. You can put additional CSS with this class later.
Click save and you are done.
PDF viewer Embed
If you choose the PDF viewer Embed module it will show the PDF that you select right onto that page/post. Follow the next steps
Select the PDF viewer you want to show from ‘Select PDF’
Width is by default set to 100%. Change it if you want otherwise leave it as it is.
Height is by default set to 800. You can change it too if you want
Put a title in the iframe title option
Save the changes and then save and that page/post will show a PDF viewer now.
Add-ons and Integrations
TNC PDF viewer comes with a variety of Addons and integrations to make working even simpler. With these Add-ons, you can easily show PDF files on using different themes and page builders.
Add-ons:
1. Elementor – TNC FlipBook – PDF viewer for WordPress: This Addon comes up with 6 widgets for Elementor. If you use Elementor as your page builder this Addon will save a lot of time and effort for you. Just drag and drop the widgets and show or embed PDF just as you want. The 6 widgets are:
PDF viewer Link
PDF viewer Embed/iFrame
PDF viewer Image Link
Bookshelf – Display PDF viewer
List/Grid – Display PDF viewer
PDF viewer Navigative
2. Display – TNC FlipBook – PDF viewer for WordPress Addon: If you want to organize and display your PDF files or Ebooks as a bookshelf then this is the Add-on for you. It enhances the visual presentation and visitors can easily go through the PDF files also. This Add-on has 3 modes.
Bookshelf
List View
Grid View
3. Divi – TNC FlipBook – PDF viewer for WordPress Addon: Embed and show pdf files using your Divi page builder. This Add-on has six modules.
PDF viewer Link
PDF viewer Embed/iFrame
PDF viewer Image Link
PDF viewer Navigative
Bookshelf – Display PDF viewer
List/Grid – Display PDF viewer
4. WPBakery – TNC FlipBook – PDF viewer for WordPressAddon: Easily display PDF viewers by using WPBakery Page Builder. The purpose of this addon is to make the shortcode creation process of TNC PDF viewer and TNC FlipBook – PDF viewer for WordPress.
5. Navigative – TNC FlipBook – PDF viewer for WordPress addon: This is an addon for TNC FlipBook – PDF viewer for WordPress and TNC PDF viewer which allows you to display multiple pdf files on a single page with a navigation on the sidebar. This is useful, especially when you have a few pdf files which you want to display using the iframe shortcode but don’t want to create so many pages.
6. WP File Access Manager: WP File Access Manager is a WordPress plugin that allows you to control access for every single file you upload to your WordPress Media Library. It comes with the integration of WooCommerce & Paid Memberships Pro which lets you set up your eCommerce or membership site media restriction management a lot simpler.
Global Settings
You can set options in the Global settings page after activating TNC FlipBook – PDF viewer for WordPress. Navigate to TNC FlipBook > Global Settings Menu to get started.
1.Automatic Display
In this section You can set options here to have all of your current .pdf links to either open or embed as a FlipBook
Automatic Display: If you want to convert all current .pdf links to open as a FlipBook, select any of the options. All links ending in .pdf will be replaced with Embedded FlipBook automatically
Automatic IFrame/Embed
Automatic Link
Automatic iFrame Width: Here you can select your preferred width of your automatic iframe
Automatic iFrame Height: Here you can select your preferred Height of your automatic iframe
2. General Settings
There are a few settings on the General Settings tab of Global Settings. Navigate to the General Settings tab.
Logo: This logo will be used on the top right side of the viewer. You can control logo visibility in the toolbar setting section globally or in each viewer section as well. The recommended maximum height for this logo is 20px
Favicon: This is the shortcut icon/favicon that will be used on the viewer pages.
Fullscreen Link Text: When you use [pvfw-embed] shortcode or use automatic iframe options, a link on top of the viewer appears with a link to open the specific viewer on fullscreen mode. This text will be used as anchor text for that link.
Return to Site Link Text: When you’re on the fullscreen view of any viewer, there’s a button appears in the bottom right corner to return to the previous page. This text will be used as anchor text for that link.
Google Analytics ID: If you want to track your users using Google Analytics, you can add the analytics ID for the site in this field. This code will be used on viewer pages only.
Mobile iFrame Height (Under 800px screen size): This option for customizing height of iFrame on smaller screens.
iFrame Responsive Fix: This option adds a simple line of CSS on the front end to resize the iframe width based on device size.
3. Appearance Settings
Disable Flip Sound: You can enable or disable Flip sound from here.
Do you want to use a Theme or use custom colors? You can select your custom colour or theme from here.
Select Theme: This option on the appearance page is to select whether you want to use one of the built-in themes. Here is a list of predefined themes: Aqua White, Material Blue, Midnight Calm, Smart Red, Louis Purple, Sea Green .
Use Background Image: You can enable or disable background image from here
Choose icon Size: You can choose your preferred icon size ( Small, Medium, Large )
Select Toolbar Style: There are various type of toolbar style available like Top Full Width, Bottom Full Width, Top Center, Bottom Center. Select your preferred one.
4. Toolbar Settings
Default Scroll: If you want to use Flipbook mode by default, you can choose the FLIP option on this setting. Other available settings are vertical, horizontal and wrapped scrolling.
Default Spread: This setting controls the spread of pages. You can choose from No Spreads, Even Spreads and Odd Spread.
Default Zoom: You can select various zooming options like page fit, page width, page height or you can select it Automatic.
FlipBook Language: There are more than 100 languages available for the viewer, you can select your preferred viewer language on this setting.
Page Mode: Three types of page modes are available: Bookmarks, Thumbnails, Attachments. You can select it as per your needs.
Toolbar Elements Visibility: This section lists all the toolbar elements and lets you either display or hide the specific toolbar elements globally. You can overwrite this for specific viewers as well.
5. Advanced Settings
ThemeNcode PDF viewer Page: PDF viewer for WordPress creates 2 pages when activated. This setting should have ThemeNcode PDF viewer [Do not Delete] page selected here. Do not change it to any other page as it will break the viewers, especially the viewers that are created using old shortcodes or automatic options will stop working.
ThemeNcode PDF viewer SC Page: PDF viewer for WordPress creates 2 pages when activated. This setting should have ThemeNcode PDF viewer SC [Do not Delete] page selected here. Do not change it to any other page as it will break the viewers, especially the viewers that are created using old shortcodes that will stop working.
Context Menu/Right Click on Viewer Pages: This setting allows you to disable right clicks on viewer pages.
Text Copying (ctrl+c) keyboard shortcut: This setting allows you to prevent the use of ctrl+c or cmd + c on viewer pages. If you want to protect PDF content from copying, this setting is for you.
Oxygen Builder Integration:
6. Custom CSS/JS
Custom CSS: You can use custom CSS code here. The CSS you provide here will be used only on viewer pages. start writing custom CSS right away.
Custom JS: You can use custom JS code here. The JS you provide here will be used only on viewer pages. start writing custom JS right away. you don’t have to add any script tags. just write the javascript here.
7. Export/Import
This page allows you to import and export the settings of the Global Settings page. This is useful if you need to copy the settings to other sites.
Shortcodes included with TNC FlipBook - PDF viewer for WordPress version 11.1 and newer
We had a bunch of shortcodes included with older versions of TNC FlipBook – PDF viewer for WordPress. But we’ve streamlined the shortcodes and lowered the number of shortcodes to only 3 from version 11.1 .
However, the previously generated shortcodes will still work, but there’s no way to create those old shortcodes now.
Here are the new shortcodes that come with TNC FlipBook – PDF Viewer for WordPress version 11.1 :
1. [pvfw-embed]
This shortcode allows you to embed already created FlipBook (Using TNC FlipBook > Add New menu) on any post or page. It comes with a few parameters.
viewer_id: This is the id of the viewer you want to embed.
width: This is the width of the iframe that will be embedded on the page.
height: This is the height of the iframe that will be embedded on the page.
[pvfw-link] shortcode allows you to insert a link to an already created FlipBook (Using TNC FlipBook > Add New menu). It comes with a few parameters.
viewer_id: This is the id of the viewer you want to link to.
text: The anchor text that will be used as a link.
class: you can add a CSS class here to the link.
target: Defines the target of the link. Put _blank if you want to open the link in a new tab or use _parent if you want to open the link on the same tab.
[pvfw-image-link] shortcode allows you to insert a link to an already created FlipBook (TNC FlipBook > Add New menu) with an image. It comes with a few parameters.
viewer_id: This is the id of the viewer you want to link to.
upload Image: The anchor text that will be used as a link.
alt_text: You can set ALT Text from here.
link target: defines the target of the link. Put _blank if you want to open the link in a new tab or use _parent if you want to open the link on the same tab.
width: Image width
height: Image Height.
css class: you can add a CSS class here to the link.
image alignment: Image alignment (values: inherit, left, center, right)
The first tab is Restrict Individual Files, You can select any file or upload a new file from this interface and then set up access settings for the selected/uploaded file. Please remember, if a file has access settings assigned at an individual level, that’s the setting the file will use. Especially The ‘Require Login for This File‘ field controls most of it. So, If you want individual file settings to be ignored for any file, make sure you uncheck the ‘Require Login for This File‘ field.
However, Let’s do a test setting:
Once you’re on the page, Click on the button that says Upload or Select a File
It will bring up the media library, select any file you want to manage access for, and click on the ‘Select This File‘ button in the bottom right corner of the popup window
The page will now display additional fields to set access for the selected file.
1. Require Login for this file: Check if you want this file to be only accessible by Logged in users. Users who are not logged in will get a 404 error when they browse the file URL
2. Restrict By: You can restrict files by Users, User roles, WooCommerce ( if enabled ), and Paid Membership Pro ( if enabled). Select the one that you want to use.
3. Access Type: This setting is related to the next 2 settings (User Roles and Users). This field will tell those fields about what to do with their data. If you choose to allow it here, the roles and users you assign on the next 2 fields will have access to this file. If you choose to disallow here, the roles and users you assign on the next 2 fields won’t have access to this file.
4. Select User Roles: Select the roles that should or should not (based on the access type above) have access to this file
5. Select Users: Search and select the users that should or should not (based on the access type above) have access to this file. You can search by user’s id, name, email, etc.
6. Select WooCommerce Products: Purchasing any of the selected products will allow or disallow access to this file.
7. Select Paid Membership Pro Levels: Users with any of the selected Pmpro levels will be allowed/disallowed.
Once you’re done setting up the restrictions for the file, hit Save Changes and you’re all set! Test the file on your browser and it should have the restrictions applied.
If you choose the ‘PDF viewer Link’ element, It will show a text with a link on that specific page/post. When visitors will click the link it will open the selected PDF viewer.
Select PDF: The first field is to select the PDF viewer. Search for the desired PDF viewer and select that.
Link Class: Set a class name if you want to edit it later with additional CSS
Link Text: Put the text which will be turned into the hyperlink
Link Target: The PDF viewer can be opened in the same tab or a new tab. Select it from the link target
Click Save Changes and you’re done.
PDF viewer Embed
If you choose ‘PDF viewer Embed’ it will embed the PDF into that specific page/post and visitors can read directly while visiting that page.
Select PDF viewer: The first field is to select the PDF viewer. Search for the desired PDF viewer and select that.
Width: The default width is 100%. Change it if you want
Height: The default height is set to 800px. You can change it too if you want.
Title: Put an iframe title here.
Click Save Changes and it’s done
PDF viewer Image
This element will show an image and when the image is clicked it will open a PDF viewer.
Select PDF viewer: The first field is to select the PDF viewer. Search for the desired PDF viewer and select that.
Image URL: Search for the image from the media library to show
Alt Text: Put an alt text for the image
Image Link Target: It can be opened in the same tab or a new tab
Image Width: Put the width of the image. By default, it is set to 100%
Image Height: By default, it is set to auto.
Image Alignment: Align the image to the left, right, or center.
Copy the PDF link and paste it into the ‘PDF Link URL’ field
Width: The default width is 100%. Change it if you want
Height: The default height is set to 800px. You can change it too if you want.
Title: Put an iframe title here.
Jump to Page: Put a number and the PDF will automatically go to that page.
Logo: By default, the logo will be enabled. Select hide if you don’t want to show.
Click Save Changes and it’s done
Toolbar options:
The download option can be changed. It will show by default, you can hide it if you want.
The Print option can be changed in the same way. By default, it will show, you can hide this also if you want.
The fullscreen option is set to default. If you want to hide it you can change this too.
There will be a share button by default. Disable it if you need.
Zoom is set to auto by default. There are various options. Choose according to your need.
Open is by default set to on. You can turn it off.
The next option is the Page nav. You can turn it off or on.
The find button is on by default. Change it to turn it off if you need.
You can show or hide the Current View option
Rotate option can be shown or hide the button if you want
Hand Tool: Show or hide. By default, it is shown
Document Properties: Show or hide. By default, it is shown
Right Toggle Menu: Show or hide. By default, it is shown
Change the Default Zoom as per your need.
Page Mode can be thumbnails, bookmarks, or attachments. Select what you want.
Toggle Left: Show or hide. By default, it is shown
Scroll: Show or hide. By default, it is shown
Spread: Show or hide. By default, it is shown
Default Scroll: Vertical, Horizontal, Wrapped, and flipbook scrolling is available. Choose one.
Default Spread: It can be Odd or Even. Choose anyone.
Select the language that you want to work with. By default it is English.
Then click Save changes and you’re done
Bookshelf - Display PDF viewer
To use this Widget you need an addon called Display – TNC FlipBook – PDF viewer for WordPress Addon. This will organize and show all the PDF files as a bookshelf. This looks super amazing. Get this addon from here, Display – TNC FlipBook – PDF viewer for WordPress Addon.
Select Viewer: Choose the viewer that you want to show on the bookshelf
Open Type: You can open this as PopUp or Link
Shelf Style: There are 4 types of shelves available. Choose the one you want.
CSS Class: Give a class name to put additional CSS later.
Read this documentation to learn how to work with this addon.
Select Viewer: Choose the viewer that you want to show on the bookshelf
Source By: Show the grid or list by category, viewer, or all.
Choose the Display type to either list or grid. In the grid mode, you can select the number of columns you want to show. And also, you can disable or enable the filtering, searching and sorting functions.
Open Type: You can open this as PopUp or Link
CSS Class: Give a class name to put additional CSS later.
Read this documentation to learn how to work with this addon.
First of all, thanks for choosing Divi – TNC FlipBook – PDF viewer for WordPress Addon. The only Divi extension that works with PDF files.
This documentation is to demonstrate everything about this Add-on. Right from buying the Add-on to using it efficiently.
To get started, you need to buy this from the landing page on the ThemeNcode website, Divi – TNC FlipBook – PDF viewer for WordPress Addon. There are three plans available for you at this moment. Select your plan and click ‘Buy Now’.
You’ll be redirected to our portal to complete your purchase, you can pay with any credit/debit card. Payments are processed securely through the Stripe gateway.
After completing the purchase, you’ll get the option to Download your plugin file. Download the plugin to your device and continue to the next section for details on installation.
If you already have this plugin, you should proceed to the next step. For more detailed information about the plugin and its features, you should check out the Divi – TNC FlipBook – PDF viewer for WordPress Addon landing page.
N.B.: Please note that this is not a standalone plugin. It requires both Divi Builder and TNC FlipBook – PDF viewer for WordPress installed in order to work. The purpose of this addon is to make the shortcode creation process of our plugin TNC FlipBook – PDF viewer for WordPress. Many users like the easy option of adding and editing shortcodes using the Divi Builder Module. So that’s why we are releasing this addon.
Installation
Before you can use this plugin, you’ll need TNC FlipBook – PDF viewer for WordPress and Divi Builder installed on your WordPress site. So, Please install these two first if you don’t have them already. When you are done with this proceed to the next step.
Purchase and download Divi – TNC FlipBook – PDF viewer for WordPress Addon
Once downloaded the plugin, login to your website admin panel
Go to Plugins > Add New Menu
Click on the Upload Plugin button
Click on Choose File
Select the plugin zip file you’ve downloaded on step #1
Click on the Install Now button
Once installed, click on Activate button to activate the plugin
That’s it. The plugin is now installed on your WordPress site.
Upload PDF and Create FlipBook
As this is an Add-on of TNC FlipBook – PDF viewer for WordPress you can’t upload PDFs with this. To upload PDF files and create a FlipBook you first need to do that with TNC FlipBook – PDF viewer for WordPress. Follow these steps to create your first FlipBook and if you are already a user of TNC FlipBook – PDF viewer for WordPress you can skip this step.
After installing and activating TNC FlipBook – PDF viewer for WordPress, Navigate to TNC FlipBook> Add New Menu
Put a title for your FlipBook, Keep it relevant to your PDF file as it will be used as the viewer title and while embedding using shortcodes.
In the next section under FlipBook Settings > Basic Settings Upload the PDF file you want to use
Select Page Mode. The default will be fine in most cases.
Default will open Default FlipBook
Thumbnails will open with displaying page thumbnails on the left side
Bookmarks will open by displaying Bookmarks on the left side
Attachments will open by displaying attachments on the left side
Default Zoom: You can set your preferred default zoom level for this FlipBook on this input
Default Scrolling Mode: You can set your default scrolling mode here. Vertical, horizontal, wrapped or Flip.
Default Spread: Set your preferred default spread here.
Viewer Language: Select your preferred viewer language here.
Jump to page: Enter a page number here if you want to open/jump to a specific page.
Now, go to Toolbar Elements Tab
The first option here is to Use Global options, It’s enabled by default. If you need to hide any specific toolbar elements like download, print and others, you can disable this option and a list of toolbar elements will appear to enable or disable. I am not going through all the toolbar items here as all those are self-explanatory.
The next tab is the Appearance
We have a use global setting option here as well. Disable the global option only if you want to have a different theme/color setting for this specific viewer. Not going through the details here as well, you’ll understand by titles easily.
The next Tab is Privacy/Security
You don’t have to do anything on this tab. If you purchase WP File Access Manager, you’ll be able to manage the restriction settings from Media > File Access Manager Menu.
Once you’re done with all the settings, click on Publish button on the right sidebar
Modules
You can embed PDF or display it as a link right from your Divi builder (Visual Builder) if you use this Addon. In order to use this Addon First you need to go to the page/post on your WordPress website where you want to show the PDF. If you want to show PDF on a new page/post create a new page/post. After locating the page/post, press ‘Edit with Divi’.
On the Divi builder search for PDF and you will find 6 modules.
PDF viewer Embed
If you choose the PDF viewer Embed module it will show the PDF that you select right onto that page/post. Follow the next steps
Select the PDF viewer you want to show from ‘Select PDF’
Width is by default set to 100%. Change it if you want otherwise leave it as it is.
Height is by default set to 800. You can change it too if you want
Put a title in the iframe title option
In ‘Jump to Page’ you need to put a number to take your visitors straight to that page
Default Zoom is selected to auto by default. There are various options like 75%, 100%, page fit, etc. Choose the one that suits your need.
In the Default Page Mode, you get three options. Thumbnail, Bookmark, and Attachment. The thumbnail will show the thumbnails of the viewer on the left side of the viewer. Bookmark will show the bookmarks.
Then there are three more options. Link, Background, and Admin level. You can put the link of the module and select if you want to open it in a new tab or the same tab. Background color can be changed from the background option and the Admin label is to change the label of the module ( you should keep this as it is)
Save the changes and then publish and that page/post will show a PDF viewer now.
PDF viewer Link
If you choose the ‘PDF viewer Link’ module, it will create a link with your given text and when someone clicks the link, your selected PDF viewer will open. Follow these Steps:
Select the PDF viewer from the ‘Select PDF’ option.
In the Link Text, put a text which you want to turn into a link
Give the link a class name in the Link Class option if you want to customize the link later
Link target will make sure whether you want to open in a new tab or the same tab.
The later part is the same as the previous ‘PDF viewer Embed’. Follow those or you can keep them as it is also.
PDF Viewer Image
If you choose the ‘PDF Viewer Image’ option it will show an image with a link and when someone clicks that image it will open a PDF viewer. Follow these steps
Select a PDF viewer for the ‘Select PDF’ option
Copy an image link from your WordPress media library and paste it into the ‘Image URL’
Put the alt text in the Alt Text option
Image Alignment can be left, center, or right. Choose what you want.
The other options are the same as in previous modules.
Click save changes and then publish and you are done.
Navigative PDF viewer
In order to use this module, you need to get another Add-on called Navigative – TNC FlipBook – PDF viewer for WordPress Addon . Get this plugin from CodeCanyon. It will open all the toolbar options right into that module. It makes the working process so easy that you can change everything while watching live and in one place. If you use Navigative PDF viewer Addon, it will open all the PDF files dynamically, so you don’t need to create a separate PDF viewer every time. It allows you to display multiple pdf files on a single page with a navigation on the sidebar.
Copy the PDF link and paste it into the ‘PDF Link URL’ field
Width: The default width is 100%. Change it if you want
Height: The default height is set to 800px. You can change it too if you want.
Title: Put an iframe title here.
Jump to Page: Put a number and the PDF will automatically go to that page.
Logo: By default, the logo will be enabled. Select hide if you don’t want to show.
Click Save Changes and it’s done
Toolbar options:
The download option can be changed. It will show by default, you can hide it if you want.
The Print option can be changed in the same way. By default, it will show, you can hide this also if you want.
The fullscreen option is set to default. If you want to hide it you can change this too.
There will be a share button by default. Disable it if you need.
Zoom is set to auto by default. There are various options. Choose according to your need.
Open is by default set to on. You can turn it off.
The next option is the Page nav. You can turn it off or on.
The find button is on by default. Change it to turn it off if you need.
You can show or hide the Current View option
Rotate option can be shown or hide the button if you want
Hand Tool: Show or hide. By default, it is shown
Document Properties: Show or hide. By default, it is shown
Right Toggle Menu: Show or hide. By default, it is shown
Change the Default Zoom as per your need.
Page Mode can be thumbnails, bookmarks, or attachments. Select what you want.
Toggle Left: Show or hide. By default, it is shown
Scroll: Show or hide. By default, it is shown
Spread: Show or hide. By default, it is shown
Default Scroll: Vertical, Horizontal, Wrapped, and flipbook scrolling is available. Choose one.
Default Spread: It can be Odd or Even. Choose anyone.
Select the language that you want to work with. By default it is English.
Then click Save changes and you’re done
Bookshelf - Display PDF viewer
To use this Widget you need an Add-on called Display – TNC FlipBook – PDF viewer for WordPress Addon. This will organize and show all the PDF files as a bookshelf. This looks super amazing. Get this addon from here, DISPLAY – TNC FlipBook – PDF viewer for WordPress Addon.
Here you can select PDF files which will be shown on a bookshelf. You can choose the open type as either PopUp or Link. And, there are 4 types of bookshelf styles available with this Add-on.
Select Viewer: Choose the viewer that you want to show on the bookshelf
Open Type: You can open this as PopUp or Link
Shelf Style: There are 4 types of shelves available. Choose the one you want.
CSS Class: Give a class name to put additional CSS later.
Read this documentation to learn how to work with this Add-on.
In this module, you can either use the list or grid. You can show PDFs by categories or specific viewers. You can show all of them also.
Select Viewer: Choose the viewer that you want to show on the bookshelf
Source By: Show the grid or list by category, viewer, or all.
Choose the Display type to either list or grid. In the grid mode, you can select the number of columns you want to show. And also, you can disable or enable the filtering, searching and sorting functions.
Open Type: You can open this as PopUp or Link
CSS Class: Give a class name to put additional CSS later.
Read this documentation to learn how to work with this Add-on.
Support
ThemeNcode Provides support through the support portal here. We’ve already organized many articles for you to find your solution, so please do a search with your issue first. Then if your issue is not answered anywhere, go ahead and create a support ticket using this link.
#2. Does this plugin conflict with any other plugin?
We haven’t seen any such issues to date. This addon is compatible with all the other plugins. But if you face any issue contact us through our support, and we will solve it for you.
#3. Where can I get this plugin?
Do to Divi – TNC FlipBook – PDF viewer for WordPress Addon landing page and click Buy Now. You need to create an account in the ThemeNcode portal before buying.
#4. Can I use this addon on multiple websites?
It depends on the license that you are purchasing. There are three available options. Please check the pricing plan
#5. How long will I get customer support?
You will get one year of customer support. For further support, you need to upgrade your license.
#6. What is the refund policy?
Divi – TNC FlipBook – PDF viewer for WordPress Addon, is a product of ThemeNcode. Check out the refund policy of ThemeNcode here.
Licensing
Divi – TNC FlipBook – PDF viewer for WordPress Add-on has three available plans. All of them are annual licenses.
Use one 1 site: This license can be used on one website. It has a one-year customer support
Use up to 3 sites: This license can be used on one website. It has a one-year customer support
Use on unlimited sites: This license can be used on one website. It has a one-year customer support
Check out the pricing table for detailed information.
Video Tutorial
Import Demo data
Click on Appearance on your WordPress dashboard and then click Import Demo Data. After that, click on the Import Demo Data button. Wait a while and the demo will be imported on your website.
How to Use Navigative - TNcFlipbook Addon
Navigative – TNcFlipbook Addon is a brilliant solution for you if you have quite a lot of PDF files on your website but you don’t want to create that many pages. Cause if you create a PDF viewer in the general way it will create a page on your website. This Add-on will generate a link that can be used anywhere and it won’t create another page. Doesn’t matter how many PDF Files you have. So how to use this navigation Add-on?
Go to PDF viewer -> Navigative.
Click Upload PDF File or paste the Link of the file
Then you will find a lot of toolbar options. These are options that will come up with the PDF viewer First is iframe width. Put a number with a percent sign. This will be the width of the viewer that will generate with the link
Print: Show or hide
Fullscreen: Show or hide
iframe Height: Put a number that will be in pixel. Ex: 800 px
Zoom: Show or hide
Open: Show or hide
Download: Show or hide
Pagenav: Show or hide
Find: Show or hide
Share: Show or hide
Page Mode: Show or hide
Current view: Show or hide
Logo: Show or hide
Toggle menu: Show or hide
Rotate: Show or hide
Default Zoom: Show or hide
Toggle left: Show or hide
Hand Tool: Show or hide
Jump to Page: Put a number. The PDF viewer will automatically go to that page.
Scroll: Show or hide
Document Properties: Show or hide
iframe title: Put a title here.
Spread: Show or hide
Viewer Language: There are more than 100 languages. Choose the one you want. By default, it is set to English
Default Scroll: There are 4 types of scrolling. Vertical, Horizontal, Wrapped, and Flipbook. Choose the one you like.
Default Spread: It can be odd or even.
After selecting all of those, click Generate Shortcode. And you will get a code. Paste that code anywhere you want and it will open the PDF viewer.
Generate Excerpts
Now you are just one click away from generating excerpts. Just go to the post type that you want to create an excerpt. Let’s take an example of ‘Posts”.
Go to ‘Posts’
Click ‘Edit’ on a previously created post or create a new post.
Click Generate Exceprt From ThemeNcode AI Excerpt in the right sidebar
And you can see your excerpt has been generated.
This plugin is very easy to use but it performs an important task that saves a lot of time and work.
Rate Us
If you like using this Fan Page Widget by ThemeNcode, you can give us a review.
Simply click here and visit the page on wordpress.org and submit a review. You might need to log in to wordpress.org if you are already logged in.
Support
ThemeNcode Provides support through the support portal here. We’ve already organized many articles for you to find your solution, so please do a search with your issue first. Then if your issue is not answered anywhere, go ahead and create a support ticket using this link.
When you are done with the installation of the theme and all required plugins, it’s time to import the demo data so that you can see the site the same as you saw in the live preview. Here is how you can import the demo data.
Step 1: Click on Appearance on your WordPress dashboard Step 2: Click Import Demo Data. Step 3: Click on the Import Demo Data button. Wait a while, and the demo will be imported to your website.
BookShelf
In this section, you can create a new BookShelf and browse through previously created BookShelf. To create a new BookShelf you need to put the following information:
Name: Put the name of your BookShelf. The name is how it appears on your site.
Slug: This part will be shown in the URL. The “slug” is the URL-friendly version of the name. It is usually all lowercase and contains only letters, numbers, and hyphens. So put the text that you want to show in the URL.
Parent BookShelf: If the BookShelf you are creating is a subcategory then select the parent category from here. Let’s say you have created a BookShelf named Books and then a subcategory name Novel. So you can put Books in the Parent BookShelf of the Novel.
Description: Put the description of your BookShelf in this tab. The description is not prominent by default; however, some themes may show it.
Open Type: In this field you can find out how to open your bookshelf. It can be link or popup.
CSS Class: If you want to add custom CSS, you can put your CSS in this field.
After all this click on Add New Bookshelf and you are done.
Partial Content Preview
On the Viewer Edit Page, you will see a meta box named Partial Content Preview. There is an input field where you need to put the number of pages that you want to show as the partial preview for the main PDF. The numbers have to be separated by commas. Then Click on Generate Preview File.
Let’s see an example where a user wants to generate a preview file for the first three pages. ( You can take any pages you want )
Put 1,2,3 in the input field and click Generate Preview File and the preview file will be generated.
Email Settings
Email Sender Settings:
Logo: Put the logo that will show up on emails
Email From Name: This is the name from which the email will come
Email Sender Email: Emails will come from this address.
Admin Email Settings
Admin Email: This email will be used for sending admin notification
Enable/Disable Certain Emails
You can enable or disable the below options:
Admin Email on Quote Request
Admin Email on Quote Comment
Admin Email on Quote Accept
Admin Email on Quote Reject
Customer Email on Quote Request
Customer Email on Quote Comment
Receive and Process Quotes
When a customer clicks the Request a Quote button the product is added to Quote Basket. This is just like the Cart option. Then when they visit the basket page they get a form with their Name, Email, Phone, and Message. After filling in all of this information they send the request.
You will get this request in ‘All Quotes’. When you click on a requested quote, you will see three options.
Status
Customer Data
Products
Status: You can make the status pending, active, accepted, rejected, or canceled.
Customer Data: Here you will get the customer’s name, phone, email, and message that was sent in the form.
Products: There are several files in this option. Product name, variation, variation option, quantity, and unit price. Put the price by which you want to sell the product.
There are some options in the right sidebar as well. You can enable the ‘Send Email to Customer’ button then the customer will be notified through email. Also, you can put some messages in the additional comment field.
After that, click update and the status will be changed to ‘Active’
Shortcodes
Shortcodes are a feature of WordPress that allow you to insert dynamic content or functionality into your posts, pages, and widgets with a simple, user-friendly syntax.There are 2 types of shortcodes available for Display – TNC FlipBook – PDF viewer for WordPress Addon.
This shortcode allows you to display selected PDF viewers using a Grid or List Style. It comes with a few parameters.
source: Where to pull the PDF viewers From, You can choose from all (Uses all PDF viewers), category (Select Categories in next parameter) or select-viewer (Select Viewers in next parameter)
viewer_id: This is the list of comma-separated id’s of the viewer you want to embed.
display_type: Choose between list or grid
category: Comma Separated list of category id’s you want to use posts from
open_type: This parameter defines how the viewers should appear, you can choose between link & popup.
link_target: It is applicable if you’ve used link in open_type parameter. Select _parent for same tab or _blank for new tab
column: Select Number of columns to show maximum. usable values are col-2, col-3, col-4. Applicable for Grid style only
filter: Use 0 to disable, 1 to enable filter. Applicable for Grid style only
sort: Use 0 to disable or 1 to enable sort. Applicable for Grid style only
search: use 0 to disable or 1 to enable search. Applicable for Grid style only
css_class: You can use any css class if you want to apply custom styles to the container.
Select Viewer: Choose the viewer that you want to show on the bookshelf
Source By: Show the grid or list by category, viewer, or all.
Choose the Display type to either list or grid. In the grid mode, you can select the number of columns you want to show. And also, you can disable or enable the filtering, searching and sorting functions.
Open Type: You can open this as PopUp or Link
CSS Class: Give a class name to put additional CSS later.
Read this documentation to learn how to work with this addon.
Homepage Settings
You can choose what’s displayed on the homepage of your site. It can be posted in reverse chronological order (classic blog), or a fixed/static page. To set a static homepage, you first need to create two Pages. One will become the homepage, and the other will be where your posts are displayed.
You can change or remove your homepage title here.
Update and Support
You’ll get all the plugin updates from CodeCanyon. You’ll see a notification in your wp-admin if there’s a new update available. And then you can download the update from the CodeCanyon downloads page.
For any kind of technical assistance regarding Elementor – TNC FlipBook – PDF viewer for WordPress Addon, please go to our HelpDesk and create a ticket.
Note: Please don’t forget to include the purchase code while creating a ticket, otherwise, your ticket may not be replied to.
PDF viewer Image Link
If you choose the ‘PDF viewer Image Link’ option it will show an image with a link and when someone clicks that image it will open a PDF viewer. Follow these steps
Select a PDF viewer for the ‘Select PDF’ option
Click on the ” + ” icon and select the image from Media Library
Put the alt text in the Alt Text option
Link target will make sure whether you want to open in a new tab or the same tab.
Width is by default set to 100%, change this according to your need.
Height is by default set to auto, you can change this too.
Image Alignment can be left, center, or right. Choose what you want.
Put a class in the Image CSS Class field. You can put additional CSS with this class later.
Click save and you are done.
Bookshelf - Display PDF viewer
To use this Widget you need an Add-on called Display – TNC FlipBook – PDF viewer for WordPress Addon. This will organize and show all the PDF files as a bookshelf. This looks super amazing. Get this addon from here, DISPLAY – TNC FlipBook – PDF viewer for WordPress Addon.
Here you can select PDF files which will be shown on a bookshelf. You can choose the open type as either PopUp or Link. And, there are 4 types of bookshelf styles available with this Add-on.
Select Viewer: Choose the viewer that you want to show on the bookshelf
Open Type: You can open this as PopUp or Link
Shelf Style: There are 4 types of shelves available. Choose the one you want.
CSS Class: Give a class name to put additional CSS later.
Read this documentation to learn how to work with this Add-on.
Upgrade to Pro
If you want to show your PDF files as a flipbook with a 3d flipping animation and use a global setting you need to upgrade to the pro version. The Premium version TNC FlipBook –PDF viewer for WordPress will bring a lot of amazing features that are worth the price of the plugin.
First, visit CodeCanyon and search for TNC FlipBook – PDF viewer for WordPress or click here to get this plugin. Then Download the plugin.
Uninstall the free version from your WordPress and upload and install the premium version on your WordPress. Don’t be tense, all your previously uploaded PDF viewers will be intact and work with the premium version.
ThemeNcode Provides support through the support portal here. We’ve already organized many articles for you to find your solution, so please do a search with your issue first. Then if your issue is not answered anywhere, go ahead and create a support ticket using this link.
If you want to use 100% of TNC INFINITY’s features, you will definitely need some plugins. Each will bring different functionality. Here is the list of plugins you need:
Elementor ( page builder)
Contact Form 7
WP Carousel
It is not mandatory to install all plugins, whenever you need certain functionality you need to install this particular plugin. These are all free plugins
Update
There are 3 ways to update TNC FlipBook – PDF viewer for WordPress. We’ll be demonstrating all of those ways here, Let’s start with the easier & efficient one.
Automatic Update
Go to the ‘Plugins’ page on your WordPress dashboard. Find ‘TNC FlipBook – PDF viewer for WordPress’ and you can see there is an option named ‘Enable Auto Update’. Click that and then when an update comes it will automatically update the plugin.
Update From Plugin Menu
TNC FlipBook – PDF viewer for WordPress comes with another automatic update option. What you need to do is, register your copy of the plugin on the TNC FlipBook > Activation & Updates page using your purchase code. You can get the purchase code on the support tab of the CodeCanyon product page. Click here to go to the support tab and find the purchase code.
Once the plugin is registered for updates, you’ll be able to update the plugin from the Plugins page and the Dashboard > Activation & Updates page.
* If your updates fail for some reason. please go to Dashboard > Updates page and click on the check again link. Then try to update the plugin again.
Manual Update (Not Recommended)
This is not a recommended way to update TNC FlipBook – PDF viewer for WordPress. Still, we’re leaving the details here if you need to do a manual update for any reason.
Download the latest version of the plugin from CodeCanyon
Login to your wp-admin and navigate to the Plugins page
Deactivate and Delete the copy of TNC FlipBook – PDF viewer for the WordPress plugin currently installed
Go to Plugins > Add New page
Click on the Upload plugin, choose the file you’ve downloaded, and click on the upload now button.
Once the plugin is installed, click on Activate button to activate the plugin.
That’s it. The plugin is now updated to the latest version.
Bookshelf - Display PDF viewer
To use this Widget you need an addon called Display – TNC FlipBook – PDF viewer for WordPress Addon. This will organize and show all the PDF files as a bookshelf. This looks super amazing. Get this addon from here, Display – TNC FlipBook – PDF viewer for WordPress Addon.
Select Viewer: Choose the viewer that you want to show on the bookshelf
Open Type: You can open this as PopUp or Link
Shelf Style: There are 4 types of shelves available. Choose the one you want.
CSS Class: Give a class name to put additional CSS later.
Read this documentation to learn how to work with this addon.
List of Discontinued Shortcodes
From version 10 TNC FlipBook – PDF Viewer for WordPress comes with a whole new system of creating PDF viewers which made us introduce a new set of shortcodes and discontinue the previous set of shortcodes.
However, Those old shortcodes are not completely removed from the plugin. If you’ve generated those shortcodes previously, these shortcodes will work fine. But we’ve removed the ability to create those discontinued shortcodes from version 10.
Here’s a list of shortcodes you should not use anymore and replaced them with new shortcodes if possible.
Sometimes, you may only want to restrict a specific file type. For example, you may only want to restrict PDF files to keep those protected and use in PDF viewer for WordPress Plugin
On this page, you can set access options for all file types you’ve uploaded to your Media Library. The plugin will check the media library and automatically generate and display the settings for each of the file types you have on your website.
Settings on this page are used when a file doesn’t have access settings at an individual level.
Settings are pretty much the same as Individual File Access Settings.
1. Require Login for this file: Check this if you want files of this file type to be only accessible by Logged in users. Users who are not logged in will get a 404 error when they browse the file URL
2. Restrict By: You can restrict files by Users, User roles, WooCommerce ( if enabled ), and Paid Membership Pro ( if enabled). Select the one that you want to use.
3. Access Type: This setting is related to the next 2 settings (User Roles and Users). This field will tell those fields about what to do with their data. If you choose to allow this here, the roles and users you assign on the next 2 fields will have access to files of this file type. If you choose to disallow here, the roles and users you assign on the next 2 fields won’t have access to files of this file type.
4. Select User Roles: Select the roles that should or should not (based on the access type above) have access to files of this file type
5. Select Users: Search and select the users that should or should not (based on the access type above) have access to files of this file type. You can search by user’s id, name, email, etc.
Once you’re done setting up the restrictions for the file, hit Save Changes and you’re all set! Test any file on your browser and it should have the restrictions applied.
Update and Support
You’ll get all the plugin updates from CodeCanyon. You’ll see a notification in your wp-admin if there’s a new update available. And then you can download the update from the CodeCanyon downloads page.
For any kind of technical assistance regarding the WPBakery – TNC FlipBook – PDF viewer for WordPress Addon, please go to our HelpDesk and create a ticket.
Note: Please don’t forget to include the purchase code while creating a ticket, otherwise, your ticket may not be replied to.
Categories (List/grid)
In this section, you can create a new category and browse through previously created categories and also edit them.
To create a new category you need to put the following information:
Name: Put the name of the category
Slug: This part will be shown in the URL. So put the text that you want to show in the URL
Parent Category: If the category you are creating is a subcategory then select the parent category from here. Let’s say you have created a category named Books and then a category name Novel. So you can put Books in the Parent Category of the Novel
Description: Put the description of this category. The description is not prominent by default; however, some themes may show it.
Change the Permalink Structure
This is a very important step, and if you miss this it might cause a lot of issues on your site. So make sure you change the structure at this stage. It’s an extremely easy task. Simply go to Settings and then Permalinks. Then change the Permalink Structure to the “Post name”. After that, click Save Changes and you’re done.
Update and Support
You’ll get all the plugin updates from CodeCanyon. You’ll see a notification in your wp-admin if there’s a new update available. And then you can download the update from the CodeCanyon downloads page.
For any kind of technical assistance regarding Navigative – TNC FlipBook – PDF viewer for WordPress Addon, please go to our HelpDesk and create a ticket.
Thank you so much for choosing QuoteX. This plugin helps you to receive custom price quote requests from your customers and you can send them a custom price quote and then collaborate over the price.
Get this plugin from CodeCanyon. Simply navigate to QuoteX – WooCommerce Request a Quote page on CodeCanyon and complete your purchase. If you’ve already purchased the plugin, you can continue to the next step.
This documentation is here to show you how you can install and use QuoteX Easily and Efficiently.
For Detailed information and features of the Plugin, Please click here to go to the QuoteX landing page on ThemeNcode.
Installation
Step 1: Download From CodeCanyon
After Purchasing the plugin on CodeCanyon. Go to the Downloads page
Find the Plugin on the list and click on Green Download Button
Save the zip file on your computer
Step 2: Install via WordPress Admin (wp-admin)
Please follow these steps to install via wp-admin
Login as administrator to wp-admin using your username and password
Go to Plugins-> Add New
Click on the Upload Plugin button
Click on Choose File and choose the file you just downloaded from CodeCanyon
Click on Install Now
Click on Activate Plugin once the installation is done
That’s all, and the plugin is installed on your site now!
Setting Up QuoteX
Display Settings
After installing and activating QuoteX successfully you need to set it up.
Got to Quotes -> Settings
Then click ‘Display Setting’
On the Request a Quote Button you need to enable the ‘Request a Quote’ Button. You can show this on all products, selected categories, or individual products
The next option is ‘Exclude Products’. Put the name of the product that you want to exclude.
If you want to hide the ‘Add to Cart’ button enable the option from the ‘Hide Add to Cart Button’. You can hide this from all products, selected categories, or individual products. You can exclude specific products here too.
Next, you can do the same with the Price in the ‘Hide Price’ section. You can hide the rice from all products, selected categories, or individual products.
Misc. Settings
Request a Quote Button Text: Change the name of the button to anything you want. It is set to ‘Request a Quote’ by default.
Require Login to Request Quote?: Here you can choose whether the user must log in or not for requesting quotes.
Quoted Price Expires After: Set an expiration period for the quoted price.
Currency: There is every possible currency. By default, it is set to US Dollars.
Pages
Select Basket Page: Select the page that you want to use as your quote basket. It is separated from the cart. One page is already created for you just set it to ‘Basket’
Select Requests Page: Select the page that you want as your Quote request page. Here users can see the quote requests. One page is already created for you just set it to ‘Quote Request’
Email Settings
Email Sender Settings:
Logo: Put the logo that will show up on emails
Email From Name: This is the name from which the email will come
Email Sender Email: Emails will come from this address.
Admin Email Settings
Admin Email: This email will be used for sending admin notification
Enable/Disable Certain Emails
You can enable or disable the below options:
Admin Email on Quote Request
Admin Email on Quote Comment
Admin Email on Quote Accept
Admin Email on Quote Reject
Customer Email on Quote Request
Customer Email on Quote Comment
Email Content
Admin Notification Email on Quote Request
Subject: Subject for Admin Email on Quote Request. Two shortcodes available
%name%
%id%
Heading: Heading for Admin Email on Quote Request. Two shortcodes available
%name%
%id%
Content: Content for Admin Email on Quote Request. Three Shortcodes available
%name%
%phone%
%message%
You can do the same setting for the below options also:
Admin Notification Email on Quote Comment
Admin Notification Email on Quote Accept
Admin Notification Email on Quote Reject
Customer Notification Email on Quote Request
Customer Notification Email on Quote Comment
Customer Notification Email on Quote Update
Receive and Process Quotes
When a customer clicks the Request a Quote button the product is added to Quote Basket. This is just like the Cart option. Then when they visit the basket page they get a form with their Name, Email, Phone, and Message. After filling in all of this information they send the request.
You will get this request in ‘All Quotes’. When you click on a requested quote, you will see three options.
Status
Customer Data
Products
Status: You can make the status pending, active, accepted, rejected, or canceled.
Customer Data: Here you will get the customer’s name, phone, email, and message that was sent in the form.
Products: There are several files in this option. Product name, variation, variation option, quantity, and unit price. Put the price by which you want to sell the product.
There are some options in the right sidebar as well. You can enable the ‘Send Email to Customer’ button then the customer will be notified through email. Also, you can put some messages in the additional comment field.
After that, click update and the status will be changed to ‘Active’
Customer's View
After you update the request with the price, the customer can see that on my request page. They can visit the website or go through the email that was sent by the admin. They will get three buttons.
Comment: If the customer wants any further info or a change in the price they can comment using this button.
Accept Offer: If they want to buy the price with your given price, they can simply click the ‘Accept Offer’ button and go to checkout then to process the order.
Reject offer: If the customer doesn’t agree with the price quote sent by the admin they can reject the offer by clicking the ‘Reject Offer’ button.
Updates and Support
Updates
Just put in the purchase code that you get from CodeCanyon and you will get automatic updates.
Click here to visit the CodeCanyon product page to get the purchase code
Support
For any kind of technical assistance regarding QuoteX, please go to our HelpDesk and create a ticket.
Regular License: Use, by you or one client, in a single end product which end users are not charged for. The total price includes the item price and a buyer fee.
Extended License: Use, by you or one client, in a single end product which end users can be charged for. The total price includes the item price and a buyer fee.
Rate Us
If you are enjoying using QuoteX – WooCommerce Request a Quote, you can leave us a review. It helps us to improve the product even more. You can submit an additional feature request too.
FAQ
Does it work with catalog mode? Possible to hide “Add to Cart”? Yes, it’s possible to hide the price and add to cart. Checking the issue with Demo now, thank you for letting me know.
Does your plugin work on a WooCommerce Multi Vendor website? Yes, the plugin works with most Multi Vendor websites and plugins used for Multi Vendor Websites. But if you are having any compatibility issues with other plugins, please contact us through the support hub.
Will the plugin auto-compile personal data when a logged-in user requests a quote? Yes, it auto-completes basic user info when the user is logged in. Users can change obviously.
The page “My Requests” is available even for non-logged-in users? No, My requests page is available only for logged-in users
When I buy your plugin, will it still work in ‘Local’?
It will work on local or any other server as well.
Video Tutorial
Change The Permalink Structure
This is a very important step, and if you miss this it might cause a lot of issues on your site. So make sure you change the structure at this stage. It’s an extremely easy task.
Go to Settings then Permalinks.
Change the Permalink Structure to the “Post name”
Click Save Changes, and you’re done.
License
In this section you need to enter your license key for TNC BookShelf Popup Pro license options. After successfully purchasing your copy and you can get your license key from the portal page.
Refund Policy
We have a well-prepared refund policy for our products. Make sure you have read them thoroughly before proceeding with a refund application.
Our support team is always prepared to help you out. If you are having any technical issues we suggest you contact our support immediately.
Refund Policy
We have a well-prepared refund policy for our products. Make sure you have read them thoroughly before proceeding with a refund application.
Our support team is always prepared to help you out. If you are having any technical issues we suggest you contact our support immediately.
Partial Content Settings
In the Viewer Edit page scroll down and after PDF viewer Settings you will find another meta box named Partial Content Settings. It will be used to set the restriction. You can control who can see the full pdf and who will be restricted from here.
Apply Partial Content Settings: Turn this on to set the restrictions
Require Login: There are two options. Default, Yes(This file is restricted), and No( This file is not restricted). Select Yes(This file is restricted) to enable the restriction modes.
Access Type: Here it can either be selected to Allow or Disallow.
Restrict by: There are four different options
Users: If you want to select specific users to give permission to full PDF select from here
Select Users: Put the name of the users who will either be allowed or disallowed depending upon the access type
User Roles: Select the user roles that you want to permit.
Select User Roles: This plugin can work with all the user roles that come up with WordPress. Select any role you want.
Products: The product field works with WooCommere.
Select Products: Select the WooCommerce products here. Visitors will be permitted after buying that specific product
Paid Membership Pro: This function works with Paid Membership Pro Level
Select Paid Membership Pro Level: Select the level that you want to permit or restrict.
Then click update and you are all set. Now only permitted users will see the full PDF and others will see the partial view of the selected pages.
Email Content
Admin Notification Email on Quote Request
Subject: Subject for Admin Email on Quote Request. Two shortcodes available
%name%
%id%
Heading: Heading for Admin Email on Quote Request. Two shortcodes available
%name%
%id%
Content: Content for Admin Email on Quote Request. Three Shortcodes available
%name%
%phone%
%message%
You can do the same setting for the below options also:
Admin Notification Email on Quote Comment
Admin Notification Email on Quote Accept
Admin Notification Email on Quote Reject
Customer Notification Email on Quote Request
Customer Notification Email on Quote Comment
Customer Notification Email on Quote Update
Customer's View
After you update the request with the price, the customer can see that on my request page. They can visit the website or go through the email that was sent by the admin. They will get three buttons.
Comment: If the customer wants any further info or a change in the price they can comment using this button.
Accept Offer: If they want to buy the price with your given price, they can simply click the ‘Accept Offer’ button and go to checkout then to process the order.
Reject offer: If the customer doesn’t agree with the price quote sent by the admin they can reject the offer by clicking the ‘Reject Offer’ button.
Licensing
Mainly there are two types of plans available for OfferPress. Yearly and Lifetime.
Yearly Plan: This is a yearly plan. You will get a 1-year license in this plan. There are three types of annual plans.
1 Site: This license can be used on one site
5 Sites: This license can be used on five sites
20 Sites: This license can be used on 20 sites
Lifetime Plan: This is a ‘pay once’ type of plan. You will get a lifetime license in this plan. There are three types of annual plans.
1 Site: This license can be used on one site
5 Sites: This license can be used on five sites
20 Sites: This license can be used on 20 sites
Check out the pricing table for more detailed information.
Rate Us
If you are enjoying using the PDF viewer by ThemeNcode, you can leave us a review. It helps us to improve the product even more. You can submit an additional feature request, too.
Misc.
Available Filters
dspdfvfw_default_featured_image
This is an image filter that can be used to change the default placeholder image.
Layout
It provides flexible layout options to help you structure and organize the content on your website. TNC INFINITY includes a variety of page templates that offer different layouts and styles. Also provide the option for full-width layouts, where the content spans the entire width of the screen, without sidebars or other elements. Full-width layouts are often used to create impactful landing pages or showcase specific content.
You can customize :
Home Page Layout
Archive Page Layout
Single Page Layout
Single Post Layout
Search Page Layout
Full-width layouts can give your content a spacious and immersive feel. The layout and elements of your website will automatically adjust based on the screen size, ensuring readability and usability across different devices. Depending on the features and capabilities of TNC INFINITY, you may have additional layout options available. These could include options for headers, footers, navigation menus, or specific sections of your website.
In this module, you can either use the list or grid. You can show PDFs by categories or specific viewers. You can show all of them also.
Select Viewer: Choose the viewer that you want to show on the bookshelf
Source By: Show the grid or list by category, viewer, or all.
Choose the Display type to either list or grid. In the grid mode, you can select the number of columns you want to show. And also, you can disable or enable the filtering, searching and sorting functions.
Open Type: You can open this as PopUp or Link
CSS Class: Give a class name to put additional CSS later.
Read this documentation to learn how to work with this Add-on.
Refund Policy
We have a well-prepared refund policy for our products. Make sure you have read them thoroughly before proceeding with a refund application.
Our support team is always prepared to help you out. If you are having any technical issues we suggest you contact our support immediately.
Create pages using elementor
TNC INFINITY comes with a number of pre-defined Elementor template sections. This determines how different types of pages are built on your website. However, before importing the template section, you need to install the Elementor Page Builder plugin. Don’t forget to import the template section after installing Elementor. Use the link below to download the file.
After downloading the template section file, go to Admin Panel > Templates > Import Templates and you will see an option to import templates. This section explores the available element template categories and how they control the layout and presentation of content.
TNC INFINITY provides several default Elementor template sections for different content types. Here are all the sections with screenshots.
1.TNC – About us large card
2.TNC – Call to action
3.TNC – Common page banner
4. TNC – Contact form and map
[Note that] This section is based on the Contact Form 7 plugin. Before using this plugin, install Contact Form 7 and go to Contact > Contact Form. You can now create new contact form or edit existing contact form. Paste the following code into this Contact form tab. If you are using the TNC – Contact Form and Map section, use the contact form shortcode in the shortcode element of the TNC – Contact Form and Map section.
[Note that] This section relies on the WP Carousel plugin. Please install WP Carousel before using this plugin. Then go to WP Carousel > All Carousels. You can now create new carousels or edit existing carousels. Then, if you use the TNC – WP Carousel section, use the WP Carousel shortcode in the TNC – WP Carousel section’s shortcode element.
These default templates ensure consistent styling and layout across different areas of your website.
Add-ons and Integrations
TNC FlipBook – PDF viewer for WordPress comes with a variety of Add-ons and integrations to make working even simpler. With these Add-ons, you can easily show PDF files on using different themes and page builders.
Add-ons:
1. Elementor – TNC FlipBook – PDF viewer for WordPress: This Add-on comes up with 6 widgets for Elementor. If you use Elementor as your page builder this Add-on will save a lot of time and effort for you. Just drag and drop the widgets and show or embed PDF just as you want. The 5 widgets are:
PDF viewer Link
PDF viewer Embed/iFrame
PDF viewer Image Link
Bookshelf – Display PDF viewer
List/Grid – Display PDF viewer
PDF viewer Navigative
2. Display – TNC FlipBook – PDF viewer for WordPress Addon: If you want to organize and display your PDF files or Ebooks as a bookshelf then this is the Add-on for you. It enhances the visual presentation and visitors can easily go through the PDF files also. This Add-on has 3 modes.
Bookshelf
List View
Grid View
3. Divi – TNC FlipBook – PDF viewer for WordPress Addon: Embed and show pdf files using your Divi page builder. This Add-on has six modules.
PDF viewer Link
PDF viewer Embed/iFrame
PDF viewer Image Link
PDF viewer Navigative
Bookshelf – Display PDF viewer
List/Grid – Display PDF viewer
4. WPBakery – TNC FlipBook – PDF viewer for WordPressAddon: Easily display PDF viewers by using WPBakery Page Builder. The purpose of this addon is to make the shortcode creation process of TNC FlipBook – PDF viewer for WordPress.
5. Navigative – TNC FlipBook – PDF viewer for WordPress addon: This is an addon for TNC FlipBook – PDF viewer for WordPress which allows you to display multiple pdf files on a single page with a navigation on the sidebar. This is useful, especially when you have a few pdf files which you want to display using the iframe shortcode but don’t want to create so many pages.
6. WP File Access Manager: WP File Access Manager is a WordPress plugin that allows you to control access for every single file you upload to your WordPress Media Library. It comes with the integration of WooCommerce & Paid Memberships Pro which lets you set up your eCommerce or membership site media restriction management a lot simpler.
Select Viewer: Choose the viewer that you want to show on the bookshelf
Source By: Show the grid or list by category, viewer, or all.
Choose the Display type to either list or grid. In the grid mode, you can select the number of columns you want to show. And also, you can disable or enable the filtering, searching and sorting functions.
Open Type: You can open this as PopUp or Link
CSS Class: Give a class name to put additional CSS later.
Read this documentation to learn how to work with this addon.
Restrict All Uploads
On this page, you can set access options for all the files you’ve uploaded to your Media Library.
Settings on this page are used when a file doesn’t have access settings at an individual level or file type level.
Settings are pretty much the same as other tabs.
1. Require Login for this file: Check this if you want all files to be only accessible by Logged in users. Users who are not logged in will get a 404 error when they browse the file URL
2. Access Type: This setting is related to the next 2 settings (User Roles and Users). This field will tell those fields about what to do with their data. If you choose to allow it here, the roles and users you assign on the next 2 fields will have access to all files. If you choose to disallow here, the roles and users you assign on the next 2 fields won’t have access to all files.
3. Select User Roles: Select the roles that should or should not (based on the access type above) have access to all files
4. Select Users: Search and select the users that should or should not (based on the access type above) have access to all files. You can search by user’s id, name, email, etc.
5. Select WooCommerce Products: Purchasing any of the selected products will allow or disallow access to this file.
6. Select Paid Membership Pro Levels: Users with any of the selected Pmpro levels will be allowed/disallowed.
Once you’re done setting up the restrictions for the file, hit Save Changes and you’re all set! Test any file on your browser and it should have the restrictions applied.
Basic Site Settings
There are some basic settings that you may want to change after installing the Theme.
Changing the site icon and tagline:
Go to Appearance and then customize. After that, write the site title, and tagline that you want. Then click on the change image button and select the image the image that you want.
FAQ
#1. Do I need to install TNC FlipBook – PDF viewer for WordPress first?
#2. Does this plugin conflict with any other plugin?
We haven’t seen any such issues to date. This addon is compatible with all the other plugins. But if you face any issue contact us through our support, and we will solve it for you.
#3. Where can I get this plugin?
Do to Divi – TNC FlipBook – PDF viewer for WordPress Addon landing page and click Buy Now. You need to create an account in the ThemeNcode portal before buying.
#4. Can I use this addon on multiple websites?
It depends on the license that you are purchasing. There are three available options. Please check the pricing plan
#5. How long will I get customer support?
You will get one year of customer support. For further support, you need to upgrade your license.
#6. What is the refund policy?
Divi – TNC FlipBook – PDF viewer for WordPress Addon, is a product of ThemeNcode. Check out the refund policy of ThemeNcode here.
Refund Policy
ThemeNcode has a well-prepared refund policy for the products. Make sure you have read them thoroughly before proceeding with a refund application.
Our support team is always prepared to help you out. If you are having any technical issues we suggest you contact our support immediately.
Customize Settings
There are various customizable options where you can customize the website. I will guide you with every detail. Go to Appearance and then Customize. From there you can change customize everything.
Top Bar: There are two changes that you can make in the top bar.
Social: Put your own social media links here
Address: Put the address of your hospital here
Secondary Topbar: Here you can change the map location and the emergency phone number
Location: Put your Google map location here
Emergency: The helpline of your hospital
Header: Change the basic settings of the header
Book Button: Give the link where you want to let your visitors go from the appointment button
Mobile Logo: Put the logo that you want to show on the mobile
Site Identity: This text will show on the browser
Site Title: Put the title of your website
Tagline: Put the Tagline of your website
Shop: Change the description of your shop from here
Shop Page content: Put the description here for your shop page
Footer: You can add the text of your Footer from here
Footer: Put the text that you want to show at the very end of the footer.
The other settings will be changed from the Page builder. These are the basic customization settings that you can do from the theme customizer.
Refund Policy
At our company, customer satisfaction is our top priority, and we take great pride in delivering high-quality products. To ensure that you have a smooth and hassle-free experience with us, we have meticulously crafted a comprehensive refund policy that safeguards your rights as a valued customer.
Before initiating a refund application, we kindly request that you carefully review and fully understand our refund policy. It contains essential information regarding the eligibility criteria, timeframes, and the process for requesting a refund. Familiarizing yourself with these terms will enable us to process your request efficiently and effectively.
Our dedicated support team is always ready and eager to assist you with any queries or concerns you may have. If you encounter any technical issues or require guidance with our products, we strongly encourage you to get in touch with our support team immediately. They are well-equipped with the knowledge and expertise to address your concerns promptly, ensuring that you can make the most of our products.
Remember, we are here to provide you with the best possible experience, and our support team is just a click or a call away. Whether you need help with installation, troubleshooting, or understanding the features of our products, do not hesitate to reach out to us. Your satisfaction is paramount, and we are committed to going above and beyond to ensure your needs are met.
Integrations
TNC BookShelf Popup Pro works with most themes and plugins available on the market. Here we’ve listed a few major ones it’s compatible with.
TNC FlipBook – PDF Viewer for WordPress
Contact form 7
TNC PDF Viewer
WP Forms
TNC AI Excerpt Generator
Mailchimp
Testimonial Slider
Smart slider 3
Apart from this, many other themes and plugins work perfectly with TNC Bookshelf Popup Pro.
Refund Policy
We have a well-prepared refund policy for our products. Make sure you have read them thoroughly before proceeding with a refund application.
Our support team is always prepared to help you out. If you are having any technical issues we suggest you contact our support immediately.
Refund Policy
We have a well-prepared refund policy for our products. Make sure you have read them thoroughly before proceeding with a refund application.
Our support team is always prepared to help you out. If you are having any technical issues we suggest you contact our support immediately.
Refund Policy
We have a well-prepared refund policy for our products. Make sure you have read them thoroughly before proceeding with a refund application.
Our support team is always prepared to help you out. If you are having any technical issues we suggest you contact our support immediately.
Update and Support
Updates:
If you choose the Annual plan, you will get all the updates within one year; if you choose the lifetime plan, you will get lifetime updates.
Support:
Both plans come up with 1 year of support. For extra support duration, you need to buy a support package.
Thanks for choosing OfferPress. This is a plugin that will make your business on WooCommerce even easier by simplifying the offer link generation process. You can easily create links with various types of offers with a lot of parameters.
To purchase the OfferPress plugin, visit the OfferPress landing page on the ThemeNcode website, select your preferred plan/package, and click on the button to purchase.
You’ll be redirected to our portal to complete your purchase, you can pay with any credit/debit card. Payments are processed securely through the stripe gateway.
After completing the purchase, you’ll get the option to Download your plugin file. Download the plugin to your device and continue to the next section for details on installation.
Installation
Installing Display – PDF viewer for WordPress Addon is very simple just as any other WordPress Plugins. Here are the steps required to install the plugin on your WordPress Website.
Purchase and download OfferPress following the previous section
Once downloaded the plugin, login to your website admin panel
Go to Plugins > Add New Menu
Click on the Upload Plugin button
Click on Choose File
Select the plugin zip file you’ve downloaded on step #1
Click on Install Now button
Once installed, click on Activate button to activate the plugin
That’s it. The plugin is now installed on your WordPress site.
Working Principle
After successfully installing OfferPress on your WordPress website you will get a new menu item on your WordPress Dashboard named ‘Offers’.
All Offers
In this section, you can find all the previously generated offers. You can edit the offer by clicking on the offer. You can view the offer from here also.
Add New Offer
First, go to Offers -> Add New Offer
Basic Settings:
Status: The status can be set to ‘Active’, ‘Disabled’, or ‘Expired’.
Offer Message: In this field, you can put a message which will be displayed above the ‘Avail Offer’ button
Products:
Product: Here you can select the product for the offer. You can change the product from this option.
Quantity: Set the amount of how many products you want to give the offer.
Price: Set the price of the product.
Users:
In this segment, you can see the users that can avail of the offer. There are three categories
All users: Everyone can avail of this kind of offer
Selected Roles: Those users who have the given role can avail of this kind of offer. All of the WordPress user roles are available here
Selected Users: Only the selected users can get this kind of offer.
Limit and Expiration:
Expiration Date: Here you can set the date of expiration. After that date, the offer will not work and the status will be expired.
Max Usage: The maximum number of users that can get this offer. Use -1 for setting the usage to unlimited.
After selecting everything, click update and you will get a link that you can share. By clicking on that link visitors can get the offer.
Updates and Support
This plugin has two types of update and support systems.
Yearly: If you buy the Yearly plan then you will get 1 year of support and after every year you need to renew.
Lifetime: Lifetime support and updates comes with lifetime plans.
We have a well-prepared refund policy for our products. Make sure you have read them thoroughly before proceeding with a refund application.
Our support team is always prepared to help you out. If you are having any technical issues we suggest you contact our support immediately.
Licensing
Mainly there are two types of plans available for OfferPress. Yearly and Lifetime.
Yearly Plan: This is a yearly plan. You will get a 1-year license in this plan. There are three types of annual plans.
1 Site: This license can be used on one site
5 Sites: This license can be used on five sites
20 Sites: This license can be used on 20 sites
Lifetime Plan: This is a ‘pay once’ type of plan. You will get a lifetime license in this plan. There are three types of annual plans.
1 Site: This license can be used on one site
5 Sites: This license can be used on five sites
20 Sites: This license can be used on 20 sites
Check out the pricing table for more detailed information.
Rate Us
If you are enjoying using OfferPress, you can leave us a review. It helps us to improve the product even more. You can submit an additional feature request too.
FAQ
Is there any product limit? There is no product limit at all.
Can I set the Offer expiration time? Yes, you can set the offer expiration time.
Is it possible to share offer links directly from the website? Yes, with this plugin you can share the generated links easily.
Is it conflict with any WooCommerce functionality? No, it works perfectly with WooCommerce
Video Tutorial
Elementor - TNC FlipBook - PDF viewer for WordPress Addon
Elementor – TNC FlipBook – PDF viewer for WordPress Addon helps you to display or embed PDFs easily if you use Elementor Page Builder. It enables TNC FlipBook – PDF viewer for WordPress or TNC PDF viewer (Available on WordPress. org) to work with Elementor.
This documentation is here to show you how you can install and use Elementor – TNC FlipBook – PDF viewer for WordPress Addon easily and efficiently.
For Detailed information and features of the Addon, Please click here to go to CodeCanyon Plugin Page
N.B.: Please note that this is not a standalone plugin. It requires Elementor Builder and TNC FlipBook – PDF viewer for WordPress or TNC PDF viewer (Available on WordPress. org) installed in order to work. The purpose of this addon is to make the shortcode creation process of our plugin TNC FlipBook – PDF viewer for WordPress or TNC PDF viewer. Many users like the easy option of adding and editing shortcodes using the Elementor Builder Widgets. So that’s why we are releasing this addon.
Installation
Step 1: Download from CodeCanyon
After Purchasing the plugin on CodeCanyon. Go to the Downloads page
Find the Plugin on the list and click on Green Download Button
Save the zip file on your computer
Step 2: Install via WordPress Admin (wp-admin)
Please follow these steps to install via wp-admin
Login as administrator to wp-admin using your username and password
Go to Plugins-> Add New
Click on the Upload Plugin button
Click on Choose File and choose the file you just downloaded from CodeCanyon
Click on Install Now
Click on Activate Plugin once the installation is done
That’s all, and the plugin is installed on your site now!
Upload PDF and Create PDF viewer
As this is an Addon of TNC FlipBook – PDF viewer for WordPress or TNC PDF viewer you can’t upload PDFs with this. To upload PDF files and create a PDF viewer you first need to do that with TNC FlipBook – PDF viewer for WordPress or TNC PDF viewer. Follow these steps to create your first PDF viewer and if you are already a user of TNC FlipBook – PDF viewer for WordPress or TNC PDF viewer you can skip this step.
After installing and activating TNC FlipBook – PDF viewer for WordPress or TNC PDF viewer, Navigate to PDF viewer > Add New Menu
Put a title for your PDF viewer, Keep it relevant to your PDF file as it will be used as the viewer title and while embedding using shortcodes.
In the next section under PDF viewer Settings > Basic Settings Upload the PDF file you want to use
Select Page Mode. The default will be fine in most cases.
Default will open Default PDF viewer
Thumbnails will open with displaying page thumbnails on the left side
Bookmarks will open by displaying Bookmarks on the left side
Attachments will open by displaying attachments on the left side
Default Zoom: You can set your preferred default zoom level for this PDF viewer on this input
Default Scrolling Mode: You can set your default scrolling mode here. Vertical, horizontal, wrapped or Flip (Only available in TNC FlipBook).
Default Spread: Set your preferred default spread here.
Viewer Language: Select your preferred viewer language here.
Jump to page: Enter a page number here if you want to open/jump to a specific page.
Now, go to Toolbar Elements Tab
The first option here is to Use Global options, It’s enabled by default. If you need to hide any specific toolbar elements like download, print, and others, you can disable this option and a list of toolbar elements will appear to enable or disable. I am not going through all the toolbar items here as all those are self-explanatory.
The next tab is the Appearance
We have a use global setting option here as well. Disable the global option only if you want to have a different theme/color setting for this specific viewer. Not going through the details here as well, you’ll understand by titles easily.
The next Tab is Privacy/Security
You don’t have to do anything on this tab. If you purchase WP File Access Manager, you’ll be able to manage the restriction settings from Media > File Access Manager Menu.
Once you’re done with all the settings, click on Publish button on the right sidebar
Widgets
You can embed PDF or display it as a link right from your Elementor page builder if you use this Add-on. In order to use this Addon First you need to go to the page/post on your WordPress website where you want to show the PDF. If you want to show PDF on a new page/post create a new page/post. After locating the page/post, press ‘Edit with Elementor’.
On the Elementor page builder search for pdf and you will find 5 widgets.
PDF viewer Embed
If you choose the PDF viewer Embed widget it will show the PDF that you select right onto that page/post. Follow the next steps
Select the PDF viewer you want to show from ‘Select PDF’
Width is by default set to 100%. Change it if you want otherwise leave it as it is.
Height is by default set to 800. You can change it too if you want
Put a title in the iframe title option
PDF viewer Link
If you choose the ‘PDF viewer Link’ widget, it will create a link with your given text and when someone clicks the link, your selected PDF viewer will open. Follow these Steps:
Select the PDF viewer from the ‘Select PDF’ option.
In the Link Text, put a text which you want to turn into a link
Give the link a class name in the Link Class option if you want to customize the link later
Link target will make sure whether you want to open in a new tab or the same tab.
PDF viewer Image Link
If you choose the ‘PDF viewer Image’ option it will show an image with a link and when someone clicks that image it will open a PDF viewer. Follow these steps
Select a PDF viewer for the ‘Select PDF’ option
Copy an image link from your WordPress media library and paste it into the ‘Image URL’
Put the alt text in the Alt Text option
Image Alignment can be left, center, or right. Choose what you want.
The other options are the same as in previous modules.
Click save changes and then publish and you are done.
Bookshelf - PDF viewer
To use this Widget you need an addon called Display – TNC FlipBook – PDF viewer for WordPress Addon. This will organize and show all the PDF files as a bookshelf. This looks super amazing. Get this addon from here, Display – TNC FlipBook – PDF viewer for WordPress Addon.
Select Viewer: Choose the viewer that you want to show on the bookshelf
Open Type: You can open this as PopUp or Link
Shelf Style: There are 4 types of shelves available. Choose the one you want.
CSS Class: Give a class name to put additional CSS later.
Read this documentation to learn how to work with this addon.
Select Viewer: Choose the viewer that you want to show on the bookshelf
Source By: Show the grid or list by category, viewer, or all.
Choose the Display type to either list or grid. In the grid mode, you can select the number of columns you want to show. And also, you can disable or enable the filtering, searching and sorting functions.
Open Type: You can open this as PopUp or Link
CSS Class: Give a class name to put additional CSS later.
Read this documentation to learn how to work with this addon.
Copy the PDF link and paste it into the ‘PDF Link URL’ field
Width: The default width is 100%. Change it if you want
Height: The default height is set to 800px. You can change it too if you want.
Title: Put an iframe title here.
Jump to Page: Put a number and the PDF will automatically go to that page.
Logo: By default, the logo will be enabled. Select hide if you don’t want to show.
Click Save Changes and it’s done
Toolbar options:
The download option can be changed. It will show by default, you can hide it if you want.
The Print option can be changed in the same way. By default, it will show, you can hide this also if you want.
The fullscreen option is set to default. If you want to hide it you can change this too.
There will be a share button by default. Disable it if you need.
Zoom is set to auto by default. There are various options. Choose according to your need.
Open is by default set to on. You can turn it off.
The next option is the Page nav. You can turn it off or on.
The find button is on by default. Change it to turn it off if you need.
You can show or hide the Current View option
Rotate option can be shown or hide the button if you want
Hand Tool: Show or hide. By default, it is shown
Document Properties: Show or hide. By default, it is shown
Right Toggle Menu: Show or hide. By default, it is shown
Change the Default Zoom as per your need.
Page Mode can be thumbnails, bookmarks, or attachments. Select what you want.
Toggle Left: Show or hide. By default, it is shown
Scroll: Show or hide. By default, it is shown
Spread: Show or hide. By default, it is shown
Default Scroll: Vertical, Horizontal, Wrapped, and flipbook scrolling is available. Choose one.
Default Spread: It can be Odd or Even. Choose anyone.
Select the language that you want to work with. By default it is English.
Then click Save changes and you’re done
Update and Support
You’ll get all the plugin updates from CodeCanyon. You’ll see a notification in your wp-admin if there’s a new update available. And then you can download the update from the CodeCanyon downloads page.
For any kind of technical assistance regarding Elementor – TNC FlipBook – PDF viewer for WordPress Addon, please go to our HelpDesk and create a ticket.
Regular License: Use, by you or one client, in a single end product which end users are not charged for. The total price includes the item price and a buyer fee.
Extended License: Use, by you or one client, in a single end product which end users can be charged for. The total price includes the item price and a buyer fee.
Rate Us
If you are enjoying using the Elementor – TNC FlipBook – PDF viewer for WordPress Addon, you can leave us a review. It helps us to improve the product even more. You can submit an additional feature request too.
Rate Us
If you are enjoying using OfferPress, you can leave us a review. It helps us to improve the product even more. You can submit an additional feature request too.
Blog Page
This section useful if you select “TNC Infinity Blog Page” for your page template. You can display different category on different section using this template.
You can choose different category for Featured, Popular Post and Image Gallery section.
FAQ
Do I need to install TNC FlipBook – PDF viewer for WordPress first? This add-on is not standalone. You must have TNC FlipBook – PDF viewer for WordPress (Available on CodeCanyon) or PDF viewer by ThemeNcode (Available on WordPress.org) and Avada Page Builder before getting this addon.
Does this plugin conflict with any other plugin? We haven’t seen any such issues to date. This add-on is compatible with all the other plugins. But if you face any issue contact us through our support, and we will solve it for you.
Can I use this addon on multiple websites? No. You can use this add-on on one site with a single license. To use it on other websites, you need to get another license.
How long will I get customer support? You will get one year of customer support. For further support, you need to upgrade your license.
What is the refund policy? Avada – TNC FlipBook – PDF viewer for WordPress Addon is a product of ThemeNcode. Check out the refund policy of ThemeNcode here.
FAQ
Q: Can I customize the colors and fonts in TNC INFINITY?
A: Yes, you can customize the colors and fonts in TNC INFINITY. Navigate to Appearance > Customize to access the theme customization options. Look for sections such as “Colors” where you can modify the colors and fonts according to your preferences.
Q: How can I add a custom menu to my website?
A: To add a custom menu in TNC INFINITY follow these steps:
Log in to your WordPress admin panel.
Navigate to Appearance > Menus.
Create a new menu and add the desired links or pages to it.
Assign the menu to a specific location such as the primary menu or footer menu.
Save the menu to apply the changes.
Q: Does TNC INFINITY support plugins?
A: Yes, TNC INFINITY is designed to be compatible with a wide range of WordPress plugins. You can enhance the functionality of your website by installing and activating plugins. However, please note that the compatibility of specific plugins may vary, so it’s recommended to test plugins with TNC INFINITY
Q: Can I import multiple templates into my theme?
A: Yes, you can import multiple templates into your WordPress theme, depending on the available options and requirements of your theme or plugins. Some themes may allow you to import multiple templates at once, while others may require you to import them individually. Consult the documentation or support resources specific to your theme for instructions on importing multiple templates.
Q: Can I modify an imported template after importing it?
A: Yes, after importing a template, you can customize and modify it to suit your specific needs. Depending on the template type, you can often edit the template settings, content, and design elements to achieve the desired look and functionality. However, keep in mind that modifying certain aspects of a template may require advanced knowledge of HTML, CSS, or PHP. Take caution when making changes and always keep a backup of your original template files.
Support
ThemeNcode provides support through the support portal. We’ve already organized many articles for you to find your solution, so please do a search with your issue first. Then if your issue is not answered anywhere, go ahead and create a support ticket using this link.
This shortcode will embed the PDF viewer in a page or post. Go to WordPress default editor and then search for PDF viewer block. Then there will be the following options:
Select PDF viewer to embed: Search with the name of the viewer and select the viewer that you want to show. Width: Select the width of the viewer. Height: Select the height of the viewer. iFrame Title: Put the title of the iframe here Jump to page: Put a number and the viewer will start from that number of page.
After that click Insert PDF viewer
Link to a PDF viewer:
Select Viewer to Link to: Search with the name of the viewer and select the viewer that you want to show. Link Text: Put the text which will show as the link. Link CSS Class: Put a name of a class so that you can add additional CSS later. Link Target: Choose between same tab or new tab to open the link. Jump to page: Put a number and the viewer will start from that number of page.
After that click Insert PDF viewer
Help/About
The help/About page contains lots of information about the plugin, documentation, support, and other useful information. Go ahead and have a look at the page to see what’s there!
These settings pages that come with the WP File Access manager are available to admins only. However, in some cases, you may want to allow other user roles to be able to access this setting page and work on restrictions.
To Do that the plugin has a filter, You need to put the following Lines on your active Theme’s functions.php file:
function your_prefix_update_wfam_capability(){
	return 'edit_others_posts'; // For complete list of capabilities, please head over to: https://wordpress.org/support/article/roles-and-capabilities/
}
add_filter( 'wfam_required_capability_for_admin_pages', 'your_prefix_update_wfam_capability', 10 );
You can create as many agent profiles as you want. All you need to do is just put the information about the agents, and the page will automatically be organized. There are the following fields:
Basic Info:
Description Paragraph
Designation
Phone Number:
Email
Listing Property Link
Contact
Social Profile:
Facebook
Twitter
LinkedIn
Youtube
Licensing
These plans are available for ‘AI Excerpt Generator By ThemeNcode’. You can check this from the pricing table too.
1 Site: This license can be used on one site
3 Site: This license can be used on three site
20 Site: This license can be used on 20 site
Managing Doctors and Departments
There are specific pages for doctors and departments. These pages are predesigned, and all you need to do is just to change the contents, and you can create these pages easily. Just go to your WordPress dashboard, and there you will find the doctor option. Under the Doctor Tab, there are three sub-items.
Doctor: Here, you will find all the profiles of previous doctors, and you can edit or delete a doctor’s profile from this tab.
Add Doctors: To add a new doctor to the list, click on add doctor and fill in the following fields.
Department
Degree
Mail
Phone
Location
Schedule Patients
Dr About
Areas of Expertise:
Education and Training:
Professional Achievements:
Patient-Centered Approach:
Booking Button Text
Booking Button URL
Select Doctor’s Service
Profile Button Text
Select Doctor Profile PDF
Departments: Create or edit departments from this tab. Put the name, slug, parent department and description in order to create or edit the departments.
Refund Policy
We have a well-prepared refund policy for our products. Make sure you have read them thoroughly before proceeding with a refund application.
Our support team is always prepared to help you out. If you are having any technical issues we suggest you contact our support immediately.
Refund Policy
We have a well-prepared refund policy for our products. Make sure you have read them thoroughly before proceeding with a refund application.
Our support team is always prepared to help you out. If you are having any technical issues we suggest you contact our support immediately.
Regular License: Use, by you or one client, in a single end product which end users are not charged for. The total price includes the item price and a buyer fee.
Extended License: Use, by you or one client, in a single end product which end users can be charged for. The total price includes the item price and a buyer fee.
Regular License: Use, by you or one client, in a single end product which end users are not charged for. The total price includes the item price and a buyer fee.
Extended License: Use, by you or one client, in a single end product which end users can be charged for. The total price includes the item price and a buyer fee.
Regular License: Use, by you or one client, in a single end product which end users are not charged for. The total price includes the item price and a buyer fee.
Extended License: Use, by you or one client, in a single end product which end users can be charged for. The total price includes the item price and a buyer fee.
Rate Us
If you are enjoying using the Elementor – TNC FlipBook – PDF viewer for WordPress Addon, you can leave us a review. It helps us to improve the product even more. You can submit an additional feature request too.
Rate Us
If you are enjoying using the WPBakery – TNC FlipBook – PDF viewer for WordPress Addon, you can leave us a review.It helps us to improve the product even more. You can submit an additional feature request too.
Rate Us
If you are enjoying using the Navigative – TNC FlipBook – PDF viewer for WordPress Addon, you can leave us a review.It helps us to improve the product even more. You can submit an additional feature request too.
FAQ
Is there any product limit? There is no product limit at all.
Can I set the Offer expiration time? Yes, you can set the offer expiration time.
Is it possible to share offer links directly from the website? Yes, with this plugin you can share the generated links easily.
Is it conflict with any WooCommerce functionality? No, it works perfectly with WooCommerce
Log in to your WordPress dashboard and go to Plugins -> Add New
Click Upload Plugin and then click Install Now
After installing click Activate
Install from WordPress Dashboard
Log into your WordPress dashboard and go to Plugins -> Add New
Search for TNC PDF viewer
Click Install now
After the installation is done, click Activate and you’re done.
Creating The First PDF viewer
After installing and activating the TNC PDF viewer, Navigate to PDF viewer > Add New Menu
Put a title for your PDF viewer, Keep it relevant to your PDF file as it will be used as the viewer title and while embedding using shortcodes.
In the next section under PDF viewer Settings > Basic Settings Upload the PDF file you want to use
Select Page Mode. The default will be fine in most cases.
Default will open Default PDF viewer
Thumbnails will open with displaying page thumbnails on the left side
Bookmarks will open by displaying Bookmarks on the left side
Attachments will open by displaying attachments on the left side
Default Zoom: You can set your preferred default zoom level for this PDF viewer on this input
Default Scrolling Mode: You can set your default scrolling mode here. Vertical, horizontal, wrapped or Flip.
Default Spread: Set your preferred default spread here.
Viewer Language: Select your preferred viewer language here.
Now, go to Toolbar Elements Tab
The first option is called Global options, It’s enabled only on the Premium version. Suppose you need to hide any specific toolbar elements like download, print, etc. In that case, you can disable this option and a list of toolbar elements will appear to enable or disable it. I am not going through all the toolbar items here as all those are self-explanatory.
The next tab is the Appearance
We have a use global setting option here as well but it only can be accessed in the Premium Version. Disable the global option only if you want to have a different theme/color setting for this specific viewer. Not going through the details here as well, you’ll understand by titles easily.
The next Tab is Privacy/Security
You don’t have to do anything on this tab. If you purchase WP File Access Manager, you’ll be able to manage the restriction settings from Media > File Access Manager Menu.
Once you’re done with all the settings, click on Publish button on the right sidebar
Now, you can share the link to this viewer with anyone.
Inserting PDF viewer in Posts/Pages
In the last chapter, you’ve created your first PDF viewer, Now it’s time to insert the viewer on any of your posts or pages on your WordPress Website. This chapter is useful only if you’re using the default WordPress Gutenberg Block Editor or Classic Editor.
If you’re using any page builders like Elementor, Divi, or WPBakery Page Builder, we have addons for those page builders. Please check the Add-ons and integrations section in that case.
Go to Add or Edit any page or posts
If you’re using Gutenberg Block Editor, click on Add Block icon
Search for PDF viewer Block
Click on Add PDF viewer Button
Select Embed a PDF viewer if you want to embed a PDF viewer using iFrame on the page you’re editing.
On Select Viewer to Embed, Search & select by the title of the PDF viewer you’ve created and want to embed on this page.
Set width, and height, jump to page & iframe_title parameters of your choice & click on insert PDF viewer.
All these settings are for the iframe that will be embedded on the page.
Now, Publish or update the page & then view the page to see PDF viewer embed there.
Select Link to a PDF viewer if you want to insert a link on the page that will open the PDF viewer when clicked.
On Select Viewer to Link to, Search & select by the title of the PDF viewer you’ve created and want to link from this page.
Set Link Text, Target, jump to page and CSS class of your choice & click on Insert PDF viewer
Now, Publish or update the page & then view the page to see PDF viewer link there.
If you’re using Classic Editor, Click on ADD PDF viewer button just above the editor
Select Embed a PDF viewer if you want to embed a PDF viewer using iFrame on the page you’re editing.
On Select Viewer to Embed, Search & select by the title of the PDF viewer you’ve created and want to embed on this page.
Set width, and height, jump to page & iframe_title parameters of your choice & click on insert PDF viewer.
All these settings are for the iframe that will be embedded on the page.
Now, Publish or update the page & then view the page to see PDF viewer embed there.
Select Link to a PDF viewer if you want to insert a link on the page that will open the PDF viewer when clicked.
On Select Viewer to Link to, Search & select by the title of the PDF viewer you’ve created and want to link from this page.
Set Link Text, Target, jump to page and CSS class of your choice & click on Insert PDF viewer
Now, Publish or update the page & then view the page to see PDF viewer link there.
Add-ons and Integrations
TNC PDF viewer comes with a variety of Addons and integrations to make working even simpler. With these Add-ons, you can easily show PDF files on using different themes and page builders.
Add-ons:
1. Elementor – TNC FlipBook – PDF viewer for WordPress: This Addon comes up with 6 widgets for Elementor. If you use Elementor as your page builder this Addon will save a lot of time and effort for you. Just drag and drop the widgets and show or embed PDF just as you want. The 6 widgets are:
PDF viewer Link
PDF viewer Embed/iFrame
PDF viewer Image Link
Bookshelf – Display PDF viewer
List/Grid – Display PDF viewer
PDF viewer Navigative
2. Display – TNC FlipBook – PDF viewer for WordPress Addon: If you want to organize and display your PDF files or Ebooks as a bookshelf then this is the Add-on for you. It enhances the visual presentation and visitors can easily go through the PDF files also. This Add-on has 3 modes.
Bookshelf
List View
Grid View
3. Divi – TNC FlipBook – PDF viewer for WordPress Addon: Embed and show pdf files using your Divi page builder. This Add-on has six modules.
PDF viewer Link
PDF viewer Embed/iFrame
PDF viewer Image Link
PDF viewer Navigative
Bookshelf – Display PDF viewer
List/Grid – Display PDF viewer
4. WPBakery – TNC FlipBook – PDF viewer for WordPressAddon: Easily display PDF viewers by using WPBakery Page Builder. The purpose of this addon is to make the shortcode creation process of TNC PDF viewer and TNC FlipBook – PDF viewer for WordPress.
5. Navigative – TNC FlipBook – PDF viewer for WordPress addon: This is an addon for TNC FlipBook – PDF viewer for WordPress and TNC PDF viewer which allows you to display multiple pdf files on a single page with a navigation on the sidebar. This is useful, especially when you have a few pdf files which you want to display using the iframe shortcode but don’t want to create so many pages.
6. WP File Access Manager: WP File Access Manager is a WordPress plugin that allows you to control access for every single file you upload to your WordPress Media Library. It comes with the integration of WooCommerce & Paid Memberships Pro which lets you set up your eCommerce or membership site media restriction management a lot simpler.
Upgrade to Pro
If you want to show your PDF files as a flipbook with a 3d flipping animation and use a global setting you need to upgrade to the pro version. The Premium version TNC FlipBook –PDF viewer for WordPress will bring a lot of amazing features that are worth the price of the plugin.
First, visit CodeCanyon and search for TNC FlipBook – PDF viewer for WordPress or click here to get this plugin. Then Download the plugin.
Uninstall the free version from your WordPress and upload and install the premium version on your WordPress. Don’t be tense, all your previously uploaded PDF viewers will be intact and work with the premium version.
If you are enjoying using the PDF viewer by ThemeNcode, you can leave us a review. It helps us to improve the product even more. You can submit an additional feature request, too.
Shortcodes
Embed a PDF viewer:
This shortcode will embed the PDF viewer in a page or post. Go to WordPress default editor and then search for PDF viewer block. Then there will be the following options:
Select PDF viewer to embed: Search with the name of the viewer and select the viewer that you want to show. Width: Select the width of the viewer. Height: Select the height of the viewer. iFrame Title: Put the title of the iframe here Jump to page: Put a number and the viewer will start from that number of page.
After that click Insert PDF viewer
Link to a PDF viewer:
Select Viewer to Link to: Search with the name of the viewer and select the viewer that you want to show. Link Text: Put the text which will show as the link. Link CSS Class: Put a name of a class so that you can add additional CSS later. Link Target: Choose between same tab or new tab to open the link. Jump to page: Put a number and the viewer will start from that number of page.
After that click Insert PDF viewer
Customize Single Page
In this section you will select the social icon to display on any post.
Regular License: Use, by you or one client, in a single end product which end users are not charged for. The total price includes the item price and a buyer fee.
Extended License: Use, by you or one client, in a single end product which end users can be charged for. The total price includes the item price and a buyer fee.
Conclusion
In conclusion, this documentation has provided you with a comprehensive guide on various aspects of TNC INFINITY. We have covered the essential topics, including getting started, theme options, theme customization, menu setup, widgets, layout, category ID, footer customization, Additional CSS, and frequently asked questions (FAQs).
By following the instructions and guidelines presented in this documentation, you should now have a solid understanding of how to use and customize TNC INFINITY to suit your needs. Whether you are a beginner or have experience with WordPress, this documentation aims to assist you in maximizing the potential of your website.
Remember to always refer to the theme’s specific documentation and consult the theme developer for any additional guidance or support. WordPress is a dynamic platform, and updates or changes may occur over time, so staying informed about the latest developments is crucial.
We hope that this documentation has empowered you to create a visually appealing and functional website with TNC INFINITY. If you encounter any issues or have further questions, please do not hesitate to seek assistance. Happy website building!
Updates and Support?
Updates?
You’ll get all the plugin updates from CodeCanyon. You’ll see a notification in your wp-admin if there’s a new update available. And then you can download the update from the CodeCanyon downloads page.
Note: Please don’t forget to include the purchase code while creating a ticket, otherwise, your ticket may not be replied to.
Refund Policy
We have a well-prepared refund policy for our products. Make sure you have read them thoroughly before proceeding with a refund application.
Our support team is always prepared to help you out. If you are having any technical issues we suggest you contact our support immediately.
List Your Properties
If you want to list properties, this is just for that. Under this tab, you will find the two options:
All Properties: Here, you will see all your previously created properties, and you can edit or delete them.
Add New: You can add new properties by clicking add new. It has many fields where you just need to put information and your property page will be created.
Refund Policy
At our company, customer satisfaction is our top priority, and we take great pride in delivering high-quality products. To ensure that you have a smooth and hassle-free experience with us, we have meticulously crafted a comprehensive refund policy that safeguards your rights as a valued customer.
Before initiating a refund application, we kindly request that you carefully review and fully understand our refund policy. It contains essential information regarding the eligibility criteria, timeframes, and the process for requesting a refund. Familiarizing yourself with these terms will enable us to process your request efficiently and effectively.
Our dedicated support team is always ready and eager to assist you with any queries or concerns you may have. If you encounter any technical issues or require guidance with our products, we strongly encourage you to get in touch with our support team immediately. They are well-equipped with the knowledge and expertise to address your concerns promptly, ensuring that you can make the most of our products.
Remember, we are here to provide you with the best possible experience, and our support team is just a click or a call away. Whether you need help with installation, troubleshooting, or understanding the features of our products, do not hesitate to reach out to us. Your satisfaction is paramount, and we are committed to going above and beyond to ensure your needs are met.
FAQ
Which Version of Chat GPT is used by this plugin?
AI Excerpt Generator By ThemeNcode uses OpenAI’s GPT-3 language model.
Does this plugin conflict with any WordPress functionality?
We still haven’t found any issues working with this plugin. If you found any problem please contact our support.
Is it reads the posts automatically?
Yes, it reads and generates excerpts automatically.
In the gallery pages you can see there are photos showing as a gallery. You can select or change the pictures from the photo gallery tab on your WordPress dashboard. Under the photo gallery tab you will find the following items
Gallery Items: Here, you will see all the previously created galleries. You can edit or delete them from here. Click on upload a new image to upload the images or select images from the library to choose from the previously uploaded images. Also, you can delete or edit the uploaded image by simply hovering over the images. After that, click Publish to publish the gallery. Add New: Create a new gallery by clicking Add New. Click on upload new images to upload the images or select images from the library to choose from the previously uploaded images. After that, just publish to create the gallery. Documentation: If you want to learn in detail about how to use this Photo Gallery, then read the documentation.
Licensing
Mainly there are two types of plans available for Preview – TNC FlipBook – PDF viewer for WordPress Addon. Annual and Lifetime.
Annual Plan: This is a yearly plan. You will get a 1-year license in this plan. There are three types of Annual plans.
1 Site: This license can be used on one site
3 Sites: This license can be used on three sites
100 Sites: This license can be used on 100 sites
Lifetime Plan: This is a ‘pay once’ type of plan. You will get a lifetime license in this plan. There are three types of Lifetime plans.
1 Site: This license can be used on one site
3 Sites: This license can be used on three sites
5 Sites: This license can be used on 5 sites
Check out the pricing table for more detailed information.
Regular License: Use, by you or one client, in a single end product which end users are not charged for. The total price includes the item price and a buyer fee.
Extended License: Use, by you or one client, in a single end product which end users can be charged for. The total price includes the item price and a buyer fee.
Licensing
Divi – TNC FlipBook – PDF viewer for WordPress Add-on has three available plans. All of them are annual licenses.
Use one 1 site: This license can be used on one website. It has a one-year customer support
Use up to 3 sites: This license can be used on one website. It has a one-year customer support
Use on unlimited sites: This license can be used on one website. It has a one-year customer support
Check out the pricing table for detailed information.
Updates and Support
Updates:
Stay at the forefront of technology advancements by choosing our annual plan, which offers an affordable and flexible subscription, giving you access to all the updates, enhancements and exciting new features released during the year. Benefit from the latest improvements. On the other hand, if you prefer the Lifetime Plan, you will enjoy the unparalleled benefits of not only enjoying our current cutting-edge products, but also all future updates and innovations.
Support:
Both plans, Annual and lifetime, provide 1 year of dedicated support to assist you with any inquiries or technical concerns you may encounter while using our product. This ensures a smooth and satisfying experience throughout the designated time frame.
For those seeking additional support beyond the initial 1-year period, we offer the option to purchase a supplementary support package. This extension ensures that you continue to receive expert assistance.
If you are enjoying using QuoteX – WooCommerce Request a Quote, you can leave us a review. It helps us to improve the product even more. You can submit an additional feature request too.
TNC Infinity Settings
TNC INFINITY provides a set of settings that allow you to configure various aspects of your theme’s functionality, appearance, and behavior. In this section, we will explore the available settings.
You will get the option to display featured images in blog posts.
Display featured images in single posts.
You can also select page title background image
You can change your primary and heading font of your site.
These are the basic general settings available in TNC INFINITY. Explore the options provided by your theme and customize them to align with your brand, design preferences, and website requirements. Remember to save your changes after customizing the general settings to apply them to your website.
Newsletter
You can show or hide your newsletter of your site.
You can change Subheading, Heading, Button Text and Button URL here.
Video Tutorial
Rate Us
If you are enjoying using the Avada – TNC FlipBook – PDF viewer for WordPress Addon, you can leave us a review. It helps us to improve the product even more. You can submit an additional feature request too.
Refund Policy
We have a well-prepared refund policy for our products. Make sure you have read them thoroughly before proceeding with a refund application.
Our support team is always prepared to help you out. If you are having any technical issues we suggest you contact our support immediately.
Rate Us
If you are enjoying using AI Excerpt Generator By ThemeNcode, you can leave us a review. It helps us to improve the product even more. You can submit an additional feature request too.
Managing Appointments
There is a booking system enabled on this Website. Booking can be done from the doctors, department, and appointment pages. In the BookingPress tab, you can see the following terms:
Dashboard: Here you can see all the data about booking, revenue, dates, etc
Calendar: In this tab, you can set an appointment by you
Appointments: Under the appointments tab, you can see all the previously made appointments by clients. You can search and filter in various ways, such as clients’ names, dates, services, statuses, IDs, etc
Payments: Here, you can see the payments by transaction date, clients’ name or services
Customers: Here, you can search the history of previous customers
Services: This is the most important tab where you can add new services or edit previous services. There are four parametres. Name, category, duration and price.
Notification: From this tab, you can notify admin or clients through email.
Customization: Customize the forms or form settings from here according to your need
Settings: In the settings tab, you need to personalize it with your own information.
Regular License: Use, by you or one client, in a single end product which end users are not charged for. The total price includes the item price and a buyer fee.
Extended License: Use, by you or one client, in a single end product which end users can be charged for. The total price includes the item price and a buyer fee.
Video Tutorial
Video Tutorial
Read Aloud / Listen to Flipbook Feature of TNC FlipBook
Listen to Flipbook (Transcribe) feature in TNC FlipBook allows users to listen to the content of their PDF files. It actively reads your PDF files aloud and converts static text into audible content. This innovative feature supports many languages and voices. You can listen in your preferred language. You can also customize the voice. It provides the ability to listen to documents in the language of your choice and customize the audio output as per your needs. Whether you’re multitasking, learning a new language, or looking for improved accessibility, Transcribe offers a convenient and efficient solution.
Transcribe makes PDFs more useful. It converts text to speech. This makes information easier to access. It’s helpful when reading is difficult. For example, use it while traveling. Use it while working. It’s also good for visual impairments. Choose your language. Choose your voice. Transcribe gives you a personalized experience. Whenever this feature reads your PDF, it will highlight each line and automatically flip to the next page and continue reading.
Key Elements
Multiple PDF Languages: Listen to PDFs in a wide range of languages. (See Supported Languages section)
Default Model: You can choose from different voice options within each language, and customize tone, pronunciation, and speed. A total of 43 voices are available.
Default Speed: You can select the default speed of the voice, and make it slow fast, or original. The user may be able to choose it based on the visibility settings below.
Default Pitch: You can select the default pitch of the voice, the user may be able to choose it based on the visibility settings below.
Visibility Settings: You can select which controls you want your readers to have for the Transcribe feature.
Voice/Model Selection: You can show or hide the ability to change voice/model for readers.
Speed Control: You can show or hide the ability to change speed for readers.
Pitch Control: You can display or hide the ability to change pitch for readers.
Visibility Settings For Mobile Screen:
Voice/Model Selection: You can show or hide the ability to change voice/model for readers.
Speed Control: You can show or hide the ability to change speed for readers.
Pitch Control: You can display or hide the ability to change pitch for readers.
How to Use Transcribe
Active Transcribe: Enable or Disable the Transcribe feature for this FlipBook
Open PDF: Open your PDF file in TNC FlipBook.
Access Transcribe: Click on the “headphones icon” to start listening.
Select Language: Choose your desired language.
Select Voice: Select your preferred voice.
Start Playback: Click “Read”
Adjust Settings: Use playback controls (Read, Pause, Resume, Stop)
Stop Playback: Click “Stop.”
Supported Languages
English
Italian
Swedish
French
Malay
German
Hebrew
Indonesian
Bulgarian
Spanish
Finnish
Portuguese
Dutch
Japanese
Romanian
Thai
Croatian
Slovak
Hindi
Ukrainian
Chinese
Vietnamese
Greek
Russian
Catalan
Norwegian Bokmål
Danish
Hungarian
Turkish
Korean
Polish
Czech
System Requirements
TNC FlipBook – PDF viewer for WordPress (latest version recommended)
Speakers or headphones on your device
Troubleshooting
No Sound:
Check if your speakers or headphones are properly connected and turned on.
Ensure the volume is turned on your computer.
Check if the correct audio output device is selected on your computer.
Playback Issues:
If you select another voice while reading, it will give you an error message (Already reading. Please pause or stop first) Before selecting another voice or language or anything, you need to stop reading first.
Whenever someone turns the page without stopping, it will not play the next page, you must stop and then turn the new page to read the page.
Check your internet connection if required for certain voices.
Tips for Best Experience
For best listening, use headphones or speakers in a quiet environment.
Experiment with different voices and speeds to find the settings that work best for you
Simplify PDF and avoid images, it can’t read image text inside PDF. Avoid complicated PDF formatting.
Support & Contact Information
For any questions or support regarding the Transcribe feature, please contact with ThemeNcode support portal. You can also create a ticket by emailing [email protected]
FAQ
Does it work with catalog mode? Possible to hide “Add to Cart”? Yes, it’s possible to hide the price and add to cart. Checking the issue with Demo now, thank you for letting me know.
Does your plugin work on a WooCommerce Multi Vendor website? Yes, the plugin works with most Multi Vendor websites and plugins used for Multi Vendor Websites. But if you are having any compatibility issues with other plugins, please contact us through the support hub.
Will the plugin auto-compile personal data when a logged-in user requests a quote? Yes, it auto-completes basic user info when the user is logged in. Users can change obviously.
The page “My Requests” is available even for non-logged-in users? No, My requests page is available only for logged-in users
When I buy your plugin, will it still work in ‘Local’?
It will work on local or any other server as well.
Footer
The footer section of your website appears at the bottom of each page and typically contains important information, links, and additional content. In this section, we will explore how to customize the footer in TNC INFINITY and make it suit your website’s needs.
You can customize and choose colors for:
Top Footer background
Top Footer padding
Copyright Footer background
Copyright Footer padding
Change the color of the social icon
You can set your preferred social URL like Facebook, Twitter, Vimeo, Instagram, Pinterest, Youtube
WPBakery - TNC FlipBook - PDF viewer for WordPress Addon
Thank you so much for choosing WPBakery – TNC FlipBook – PDF viewer for WordPress Addon. This addon makes the shortcode creation process easier for TNC FlipBook – PDF viewer for WordPress.
Get this plugin from CodeCanyon. Simply navigate to WPBakery – TNC FlipBook – PDF viewer for WordPress Addon page on CodeCanyon and complete your purchase. If you’ve already purchased the plugin, you can continue to the next step.
N.B.: Please note that this is not a standalone plugin. It requires both WPBakery Page Builder and TNC FlipBook – PDF viewer for WordPress installed in order to work. The purpose of this addon is to make the shortcode creation process of our plugin TNC FlipBook – PDF viewer for WordPress. Many users like the easy option of adding and editing shortcodes using the WPBakery Builder Elements. So that’s why we are releasing this addon.
Installation
Step 1: Download From CodeCanyon
After Purchasing the plugin on CodeCanyon. Go to the Downloads page
Find the Plugin on the list and click on Green Download Button
Save the zip file on your computer
Step 2: Install via WordPress Admin (wp-admin)
Please follow these steps to install via wp-admin
Login as administrator to wp-admin using your username and password
Go to Plugins-> Add New
Click on the Upload Plugin button
Click on Choose File and choose the file you just downloaded from CodeCanyon
Click on Install Now
Click on Activate Plugin once the installation is done
That’s all, and the plugin is installed on your site now!
Upload PDF and Create PDF viewer
As this is an addon of TNC FlipBook – PDF viewer for WordPress you can’t upload PDFs with this. To upload PDF files and create a PDF viewer you first need to do that with TNC FlipBook – PDF viewer for WordPress. Follow these steps to create your first PDF viewer and if you are already a user of TNC FlipBook – PDF viewer for WordPress you can skip this step.
After installing and activating TNC FlipBook – PDF viewer for WordPress, Navigate to PDF viewer > Add New Menu
Put a title for your PDF viewer, Keep it relevant to your PDF file as it will be used as the viewer title and while embedding using shortcodes.
In the next section under PDF viewer Settings > Basic Settings Upload the PDF file you want to use
Select Page Mode. The default will be fine in most cases.
Default will open Default PDF viewer
Thumbnails will open with displaying page thumbnails on the left side
Bookmarks will open by displaying Bookmarks on the left side
Attachments will open by displaying attachments on the left side
Default Zoom: You can set your preferred default zoom level for this PDF viewer on this input
Default Scrolling Mode: You can set your default scrolling mode here. Vertical, horizontal, wrapped or Flip.
Default Spread: Set your preferred default spread here.
Viewer Language: Select your preferred viewer language here.
Jump to page: Enter a page number here if you want to open/jump to a specific page.
Now, go to Toolbar Elements Tab
The first option here is to Use Global options, It’s enabled by default. If you need to hide any specific toolbar elements like download, print and others, you can disable this option and a list of toolbar elements will appear to enable or disable. I am not going through all the toolbar items here as all those are self-explanatory.
The next tab is the Appearance
We have a use global setting option here as well. Disable the global option only if you want to have a different theme/color setting for this specific viewer. Not going through the details here as well, you’ll understand by titles easily.
The next Tab is Privacy/Security
You don’t have to do anything on this tab. If you purchase WP File Access Manager, you’ll be able to manage the restriction settings from Media > File Access Manager Menu.
Once you’re done with all the settings, click on Publish button on the right sidebar
WPBakery Elements
PDF viewer Link
If you choose the ‘PDF viewer Link’ element, It will show a text with a link on that specific page/post. When visitors will click the link it will open the selected PDF viewer.
Select PDF: The first field is to select the PDF viewer. Search for the desired PDF viewer and select that.
Link Class: Set a class name if you want to edit it later with additional CSS
Link Text: Put the text which will be turned into the hyperlink
Link Target: The PDF viewer can be opened in the same tab or a new tab. Select it from the link target
Click Save Changes and you’re done.
PDF viewer Embed
If you choose ‘PDF viewer Embed’ it will embed the PDF into that specific page/post and visitors can read directly while visiting that page.
Select PDF viewer: The first field is to select the PDF viewer. Search for the desired PDF viewer and select that.
Width: The default width is 100%. Change it if you want
Height: The default height is set to 800px. You can change it too if you want.
Title: Put an iframe title here.
Click Save Changes and it’s done
PDF viewer Image
This element will show an image and when the image is clicked it will open a PDF viewer.
Select PDF viewer: The first field is to select the PDF viewer. Search for the desired PDF viewer and select that.
Image URL: Search for the image from the media library to show
Alt Text: Put an alt text for the image
Image Link Target: It can be opened in the same tab or a new tab
Image Width: Put the width of the image. By default, it is set to 100%
Image Height: By default, it is set to auto.
Image Alignment: Align the image to the left, right, or center.
Copy the PDF link and paste it into the ‘PDF Link URL’ field
Width: The default width is 100%. Change it if you want
Height: The default height is set to 800px. You can change it too if you want.
Title: Put an iframe title here.
Jump to Page: Put a number and the PDF will automatically go to that page.
Logo: By default, the logo will be enabled. Select hide if you don’t want to show.
Click Save Changes and it’s done
Toolbar options:
The download option can be changed. It will show by default, you can hide it if you want.
The Print option can be changed in the same way. By default, it will show, you can hide this also if you want.
The fullscreen option is set to default. If you want to hide it you can change this too.
There will be a share button by default. Disable it if you need.
Zoom is set to auto by default. There are various options. Choose according to your need.
Open is by default set to on. You can turn it off.
The next option is the Page nav. You can turn it off or on.
The find button is on by default. Change it to turn it off if you need.
You can show or hide the Current View option
Rotate option can be shown or hide the button if you want
Hand Tool: Show or hide. By default, it is shown
Document Properties: Show or hide. By default, it is shown
Right Toggle Menu: Show or hide. By default, it is shown
Change the Default Zoom as per your need.
Page Mode can be thumbnails, bookmarks, or attachments. Select what you want.
Toggle Left: Show or hide. By default, it is shown
Scroll: Show or hide. By default, it is shown
Spread: Show or hide. By default, it is shown
Default Scroll: Vertical, Horizontal, Wrapped, and flipbook scrolling is available. Choose one.
Default Spread: It can be Odd or Even. Choose anyone.
Select the language that you want to work with. By default it is English.
Then click Save changes and you’re done
Bookshelf - Display PDF viewer
To use this Widget you need an addon called Display – TNC FlipBook – PDF viewer for WordPress Addon. This will organize and show all the PDF files as a bookshelf. This looks super amazing. Get this addon from here, Display – TNC FlipBook – PDF viewer for WordPress Addon.
Select Viewer: Choose the viewer that you want to show on the bookshelf
Open Type: You can open this as PopUp or Link
Shelf Style: There are 4 types of shelves available. Choose the one you want.
CSS Class: Give a class name to put additional CSS later.
Read this documentation to learn how to work with this addon.
Select Viewer: Choose the viewer that you want to show on the bookshelf
Source By: Show the grid or list by category, viewer, or all.
Choose the Display type to either list or grid. In the grid mode, you can select the number of columns you want to show. And also, you can disable or enable the filtering, searching and sorting functions.
Open Type: You can open this as PopUp or Link
CSS Class: Give a class name to put additional CSS later.
Read this documentation to learn how to work with this addon.
Update and Support
You’ll get all the plugin updates from CodeCanyon. You’ll see a notification in your wp-admin if there’s a new update available. And then you can download the update from the CodeCanyon downloads page.
For any kind of technical assistance regarding the WPBakery – TNC FlipBook – PDF viewer for WordPress Addon, please go to our HelpDesk and create a ticket.
Regular License: Use, by you or one client, in a single end product which end users are not charged for. The total price includes the item price and a buyer fee.
Extended License: Use, by you or one client, in a single end product which end users can be charged for. The total price includes the item price and a buyer fee.
Rate Us
If you are enjoying using the WPBakery – TNC FlipBook – PDF viewer for WordPress Addon, you can leave us a review.It helps us to improve the product even more. You can submit an additional feature request too.
FAQ
Will this plugin work with WooCommerce Products?
Yes, it will. You can showcase your WooCommerce Products on a unique bookshelf.
Does this plugin work with every WordPress version?
Yes, this plugin can work with every WordPress version.
Can I show FlipBook on Bookshelf?
Yes, you can show any embedded item on Bookshelf.
Does this plugin conflict with any other plugin?
Until now, we haven’t found any issues with any other plugin. If you find any problems please contact our support hub.
Product Filter
The product filter will allow the option to filter between your products. You can select the type of fields you need to show, and based on those, your visitors can filter the products. If you don’t want to change or add anything, you can simply import the previously created one that you got with the Theme file.
If you want to create a new filter you need to fill the following fields:
Form Title
Layout
Empty Fields
Product Sorting
Product Count
Out of Stock
Pagination
Pagination Option
Products Per Page
Toggle Field Groups
Reset Button
Reset Label
Scroll To Result
Logical Relationship Between Taxonomies
Result Page Template
No Products Found Message
Variations Display
At the end of the list you can put the filtering options.
Regular License: Use, by you or one client, in a single end product which end users are not charged for. The total price includes the item price and a buyer fee.
Extended License: Use, by you or one client, in a single end product which end users can be charged for. The total price includes the item price and a buyer fee.
Additional CSS
TNC INFINITY allows you to add custom CSS code without modifying the theme files directly. This feature, known as Additional CSS, provides a convenient way to customize the appearance and styles of your website. In this section, we will explore how to use Additional CSS in TNC INFINITY.
To add Additional CSS code to your website:
In the Additional CSS section, you will see a text editor or a field where you can enter your custom CSS code.
Write or paste your CSS code into the provided area.
Ensure that your code is valid and properly formatted.
Preview the changes in the live preview pane to see how the CSS affects your website’s appearance.
Save the changes to apply the custom CSS to your website.
FAQ
Failed to Fetch Error Message – An error occurred while loading the PDF
We’ve received many support requests with this error message and that’s why this article is here. It includes a video as well, so you can understand it easily.
This error comes up when you have a mismatch in your file URL & website URL structure.
For example, your site may use URLs like: http://www.example.com or https://www.example.com or https://example.com or http://example.com
There’s no issue with any format, you can use any structure of URL but what you need to make sure of is the file URL you provide while creating the shortcode must have the same URL structure. Don’t use a different URL structure. Here is a video tutorial for you.
404 error on viewer pages
PDF viewer for WordPress creates 2 pages called ThemeNcode PDF viewer and ThemeNcode PDF viewer SC when you install the plugin. You may get a 404 error if these pages are deleted somehow.
To solve this: Please go to your plugins page, Deactivate PDF viewer for the WordPress plugin and activate it again. That should solve the issue.
How Can I use pdf files from external websites/URLs?
How can I change/customize WP File Access Manager Error Message on PDF viewer?
This question comes a lot about changing or customizing the error message when a user doesn’t have access to a specific PDF file. The default message Appears as:
SORRY
You do not have permission to view this file, please contact us if you think this was by a mistake.
Go To Homepage
I am going to show you a quick workaround for changing this text. You’ll need to install a free plugin for this. So, Here are the steps:
Search and install a plugin called Gettext to override translations & activate the plugin. Direct link here.
Go to Plugins > Gettext override translations
Add the text overrides on this page and save settings.
The image below provides more specific details on exactly which string you should use to replace.
This should change the text for you.
Here’s an example:
I hope it helps.
Previews/Next Navigation arrows are not showing on the left/right side of the PDF viewer
If you see the Previous & next icons on the left and right side of PDF viewer, it’s mostly caused by lazyload functionality. What you need to do is Disable Lazyload for viewer pages to get it displaying properly.
Conclusion
That’s all you need to know about the usage of the WP File Access Manager Plugin. Please feel free to let us know by support ticket if you have any questions or ideas to improve the things we provide.
Your input is important to us and we care about every single input from you.
Navigative is an addon for TNC FlipBook – PDF viewer for WordPress that allows you to display multiple pdf files on a single page with a navigation on the sidebar. This is useful, especially when you have a few pdf files which you want to display using the iframe shortcode but don’t want to create so many pages. You can use this addon with TNC PDF viewer (Available on WordPress.org) too.
For Detailed information and features of the Add-on, Please click here to go to CodeCanyon Plugin Page
To get started you need to Purchase this Add-on for only $25 from Codecanyon. Click Here to Purchase Navigative – TNC FlipBook – PDF viewer for WordPress Addon If you’ve already purchased the plugin, you can continue to the next step.
Installation
Step 1: Download from CodeCanyon
After Purchasing the plugin on CodeCanyon. Go to the Downloads page
Find the Plugin on the list and click on Green Download Button
Save the zip file on your computer
Step 2: Install via WordPress Admin (wp-admin)
Please follow these steps to install via wp-admin
Login as administrator to wp-admin using your username and password
Go to Plugins-> Add New
Click on the Upload Plugin button
Click on Choose File and choose the file you just downloaded from CodeCanyon
Click on Install Now
Click on Activate Plugin once the installation is done
That’s all, and the plugin is installed on your site now!
Upload PDF and Create PDF viewer
As this is an addon of TNC FlipBook – PDF viewer for WordPress you can’t upload PDFs with this. To upload PDF files and create a PDF viewer you first need to do that with TNC FlipBook – PDF viewer for WordPress. Follow these steps to create your first PDF viewer and if you are already a user of TNC FlipBook – PDF viewer for WordPress you can skip this step.
After installing and activating TNC FlipBook – PDF viewer for WordPress, Navigate to PDF viewer > Add New Menu
Put a title for your PDF viewer, Keep it relevant to your PDF file as it will be used as the viewer title and while embedding using shortcodes.
In the next section under PDF viewer Settings > Basic Settings Upload the PDF file you want to use
Select Page Mode. The default will be fine in most cases.
Default will open Default PDF viewer
Thumbnails will open with displaying page thumbnails on the left side
Bookmarks will open by displaying Bookmarks on the left side
Attachments will open by displaying attachments on the left side
Default Zoom: You can set your preferred default zoom level for this PDF viewer on this input
Default Scrolling Mode: You can set your default scrolling mode here. Vertical, horizontal, wrapped or Flip.
Default Spread: Set your preferred default spread here.
Viewer Language: Select your preferred viewer language here.
Jump to page: Enter a page number here if you want to open/jump to a specific page.
Now, go to Toolbar Elements Tab
The first option here is to Use Global options, It’s enabled by default. If you need to hide any specific toolbar elements like download, print and others, you can disable this option and a list of toolbar elements will appear to enable or disable. I am not going through all the toolbar items here as all those are self-explanatory.
The next tab is the Appearance
We have a use global setting option here as well. Disable the global option only if you want to have a different theme/color setting for this specific viewer. Not going through the details here as well, you’ll understand by titles easily.
The next Tab is Privacy/Security
You don’t have to do anything on this tab. If you purchase WP File Access Manager, you’ll be able to manage the restriction settings from Media > File Access Manager Menu.
Once you’re done with all the settings, click on Publish button on the right sidebar
How to Use Navigative - TNcFlipbook Addon
Navigative – TNcFlipbook Addon is a brilliant solution for you if you have quite a lot of PDF files on your website but you don’t want to create that many pages. Cause if you create a PDF viewer in the general way it will create a page on your website. This Add-on will generate a link that can be used anywhere and it won’t create another page. Doesn’t matter how many PDF Files you have. So how to use this navigation Add-on?
Go to PDF viewer -> Navigative.
Click Upload PDF File or paste the Link of the file
Then you will find a lot of toolbar options. These are options that will come up with the PDF viewer First is iframe width. Put a number with a percent sign. This will be the width of the viewer that will generate with the link
Print: Show or hide
Fullscreen: Show or hide
iframe Height: Put a number that will be in pixel. Ex: 800 px
Zoom: Show or hide
Open: Show or hide
Download: Show or hide
Pagenav: Show or hide
Find: Show or hide
Share: Show or hide
Page Mode: Show or hide
Current view: Show or hide
Logo: Show or hide
Toggle menu: Show or hide
Rotate: Show or hide
Default Zoom: Show or hide
Toggle left: Show or hide
Hand Tool: Show or hide
Jump to Page: Put a number. The PDF viewer will automatically go to that page.
Scroll: Show or hide
Document Properties: Show or hide
iframe title: Put a title here.
Spread: Show or hide
Viewer Language: There are more than 100 languages. Choose the one you want. By default, it is set to English
Default Scroll: There are 4 types of scrolling. Vertical, Horizontal, Wrapped, and Flipbook. Choose the one you like.
Default Spread: It can be odd or even.
After selecting all of those, click Generate Shortcode. And you will get a code. Paste that code anywhere you want and it will open the PDF viewer.
Update and Support
You’ll get all the plugin updates from CodeCanyon. You’ll see a notification in your wp-admin if there’s a new update available. And then you can download the update from the CodeCanyon downloads page.
For any kind of technical assistance regarding Navigative – TNC FlipBook – PDF viewer for WordPress Addon, please go to our HelpDesk and create a ticket.
Regular License: Use, by you or one client, in a single end product which end users are not charged for. The total price includes the item price and a buyer fee.
Extended License: Use, by you or one client, in a single end product which end users can be charged for. The total price includes the item price and a buyer fee.
Rate Us
If you are enjoying using the Navigative – TNC FlipBook – PDF viewer for WordPress Addon, you can leave us a review.It helps us to improve the product even more. You can submit an additional feature request too.
Video Tutorial
Elementor Custom Widgets
There are five custom widgets that you will get with this theme. They are:
Classic Testimonial – TNC Hospital – You can see this slider on the classic testimonial page.
Modern Testimonial – TNC Hospital – You can see this slider on the modern testimonial page.
Breadcrumb – TNC Hospital – This widget shows the breadcrumb of that page.
Image Box – TNC Hospital – You can see this widget on the home page under the banner slider. The sub-section of Our Mission and Our Vision is created using this widget.
Slider – TNC Hospital – You can see the slider in the banner section of the homepage. Change the slider according to your needs.
You can use this slider on any page of your website, too.
Video Tutorial
Hooks & Filters
This document lists the custom WordPress hooks available in the TNC FlipBook – PDF viewer for WordPress plugin along with usage examples.
Facebook Fan Page widget comes with a widget that you can use on any widget area. You can set the Facebook Page URL, Width, Height, and other options. Pretty simple to use.
The best part of this plugin is you don’t have to create any Facebook application. Just install the plugin, put in your page URL, and nothing more…!
Installation
The installation process of the Fan Page Widget is very simple. It is just like installing any other plugin.
Click here to go to the Fan Page Widget page on WordPress.org.
Click Download and the plugin zip will be downloaded
Now log in to your WordPress dashboard
Go to Plugins -> Add New
Upload the zip file on your WordPress website.
Click Install and then Activate the plugin
Or you can search from your WordPress dashboard.
Go to Plugins -> Add New
Search Fan page widget by ThemeNcode
Click Install and then activate the plugin
How to Show the Widget
Using the Fan page widget by ThemeNcode is really easy and simple. You just need a few clicks of the mouse and it will be ready. Follow these steps:
Go to Appearance -> Widget
You can add this anywhere whether that is in the sidebar or the footer.
Click on the plus icon
Search Facebook Fan Page Widget
Click on the Facebook Fan Page Widget
Title: Put any text that you want to show as the title.
Facebook Page Url: Put the link of the Facebook page that you want to show.
Width: The default width is set to 340 px. You can change it, just write the pixel you want.
Height: The default height is set to 500px. You can change it too.
Show Friends Faces: Select yes or no to show or hide Friends’ faces
Hide Cover?: Select yes or no to show or hide the cover picture of the Facebook page
Show Posts?: Select yes or no. If you select yes it will show a post with a scrolling bar and if you select no it won’t show any posts.
Then click update.
You can now see there is a Facebook fan page widget in the sidebar or footer where you selected. A Follow page button will automatically appear on that.
Rate Us
If you like using this Fan Page Widget by ThemeNcode, you can give us a review.
Simply click here and visit the page on wordpress.org and submit a review. You might need to log in to wordpress.org if you are already logged in.
Rate Us
If you are enjoying using TNC Bookshelf Popup Pro, you can leave us a review. It helps us to improve the product even more. You can submit an additional feature request too.
Rate Us
If you are enjoying using the WP File Access Manager, you can leave us a review. It helps us to improve the product even more. You can submit an additional feature request too.
Support System
ThemeNcode always ensures that the support is fast and effective. If you are facing any kind of issues regarding the TNC Hospital theme, you can contact the support-hub anytime. Your issue will be handled by the support team with great precision and care.
Avada - TNC FlipBook - PDF viewer for WordPress Addon
After completing the purchase, you’ll get the option to Download your plugin file. Download the plugin to your device and continue to the next section for details on installation.
If you already have this plugin, you should proceed to the next step. For more detailed information about the plugin and its features, you should check out the “Avada – TNC FlipBook – PDF viewer for WordPress Addon” landing page.
N.B.: Please note that this is not a standalone plugin. It requires both Avada Builder and TNC FlipBook – PDF viewer for WordPress or TNC PDF viewer (Available on WordPress.org) installed in order to work.
Installation
Before you can use this plugin, you’ll need TNC FlipBook – PDF viewer for WordPress and Avada Builder installed on your WordPress site. So, Please install these two first if you don’t have them already. When you are done with this proceed to the next step.
Once downloaded the plugin, login to your website admin panel
Go to Plugins > Add New Menu
Click on the Upload Plugin button
Click on Choose File
Select the plugin zip file you’ve downloaded on step #1
Click on the Install Now button
Once installed, click on Activate button to activate the plugin
That’s it. The plugin is now installed on your WordPress site.
Upload PDF and Create FlipBook
As this is an Add-on of TNC FlipBook – PDF viewer for WordPress you can’t upload PDFs without this. To upload PDF files and create a FlipBook you first need to do that with TNC FlipBook – PDF viewer for WordPress. Follow these steps to create your first FlipBook and if you are already a user of TNC FlipBook – PDF viewer for WordPress you can skip this step.
After installing and activating TNC FlipBook – PDF viewer for WordPress, Navigate to FlipBook > Add New Menu
Put a title for your FlipBook, Keep it relevant to your PDF file as it will be used as the FlipBook title and while embedding using shortcodes.
In the next section under FlipBook Settings > Basic Settings Upload the PDF file you want to use
Select Page Mode. The default will be fine in most cases.
Default will open Default FlipBook
Thumbnails will open with displaying page thumbnails on the left side
Bookmarks will open by displaying Bookmarks on the left side
Attachments will open by displaying attachments on the left side
Default Zoom: You can set your preferred default zoom level for this PDF viewer on this input
Default Scrolling Mode: You can set your default scrolling mode here. Vertical, horizontal, wrapped or Flip.
Default Spread: Set your preferred default spread here.
Viewer Language: Select your preferred viewer language here.
Jump to page: Enter a page number here if you want to open/jump to a specific page.
Now, go to Toolbar Elements Tab
The first option here is to Use Global options, It’s enabled by default. If you need to hide any specific toolbar elements like download, print and others, you can disable this option and a list of toolbar elements will appear to enable or disable. I am not going through all the toolbar items here as all those are self-explanatory.
The next tab is the Appearance
We have a use global setting option here as well. Disable the global option only if you want to have a different theme/color setting for this specific viewer. Not going through the details here as well, you’ll understand by titles easily.
The next Tab is Privacy/Security
You don’t have to do anything on this tab. If you purchase WP File Access Manager, you’ll be able to manage the restriction settings from Media > File Access Manager Menu.
Once you’re done with all the settings, click on Publish button on the right sidebar
Elements
You can embed PDF or display it as a link right from your Avada builder (Live Builder) if you use this Add-on. In order to use this Addon First you need to go to the page/post on your WordPress website where you want to show the PDF. If you want to show PDF on a new page/post create a new page/post. After locating the page/post, press ‘Live Builder’.
On the Live builder search for pdf and you will find 5 elements.
Bookshelf - Display PDF viewer
To use this Widget you need an addon called “Display – TNC FlipBook – PDF viewer for WordPress Addon”. This will organize and show all the PDF files as a bookshelf. This looks super amazing. Get this addon from here, Display – TNC FlipBook – PDF viewer for WordPress Addon.
Read this documentation to learn how to work with this addon.
Read this documentation to learn how to work with this addon.
PDF viewer Link
If you choose the ‘PDF viewer Link’ module, it will create a link with your given text and when someone clicks the link, your selected PDF viewer will open. Follow these Steps:
Select the PDF viewer from the ‘Select PDF’ option.
Give the link a class name in the Link Class option if you want to customize the link later
In the Link Text, put a text which you want to turn into a link
Link target will make sure whether you want to open in a new tab or the same tab.
Click save and you’re done.
PDF viewer Embed
If you choose the PDF viewer Embed module it will show the PDF that you select right onto that page/post. Follow the next steps
Select the PDF viewer you want to show from ‘Select PDF’
Width is by default set to 100%. Change it if you want otherwise leave it as it is.
Height is by default set to 800. You can change it too if you want
Put a title in the iframe title option
Save the changes and then save and that page/post will show a PDF viewer now.
PDF viewer Image Link
If you choose the ‘PDF viewer Image Link’ option it will show an image with a link and when someone clicks that image it will open a PDF viewer. Follow these steps
Select a PDF viewer for the ‘Select PDF’ option
Click on the ” + ” icon and select the image from Media Library
Put the alt text in the Alt Text option
Link target will make sure whether you want to open in a new tab or the same tab.
Width is by default set to 100%, change this according to your need.
Height is by default set to auto, you can change this too.
Image Alignment can be left, center, or right. Choose what you want.
Put a class in the Image CSS Class field. You can put additional CSS with this class later.
Click save and you are done.
Support
ThemeNcode Provides support through the support portal here. We’ve already organized many articles for you to find your solution, so please do a search with your issue first. Then if your issue is not answered anywhere, go ahead and create a support ticket using this link.
We have a well-prepared refund policy for our products. Make sure you have read them thoroughly before proceeding with a refund application.
Our support team is always prepared to help you out. If you are having any technical issues we suggest you contact our support immediately.
FAQ
Do I need to install TNC FlipBook – PDF viewer for WordPress first? This add-on is not standalone. You must have TNC FlipBook – PDF viewer for WordPress (Available on CodeCanyon) or PDF viewer by ThemeNcode (Available on WordPress.org) and Avada Page Builder before getting this addon.
Does this plugin conflict with any other plugin? We haven’t seen any such issues to date. This add-on is compatible with all the other plugins. But if you face any issue contact us through our support, and we will solve it for you.
Can I use this addon on multiple websites? No. You can use this add-on on one site with a single license. To use it on other websites, you need to get another license.
How long will I get customer support? You will get one year of customer support. For further support, you need to upgrade your license.
What is the refund policy? Avada – TNC FlipBook – PDF viewer for WordPress Addon is a product of ThemeNcode. Check out the refund policy of ThemeNcode here.
Regular License: Use, by you or one client, in a single end product which end users are not charged for. The total price includes the item price and a buyer fee.
Extended License: Use, by you or one client, in a single end product which end users can be charged for. The total price includes the item price and a buyer fee.
Rate Us
If you are enjoying using the Avada – TNC FlipBook – PDF viewer for WordPress Addon, you can leave us a review. It helps us to improve the product even more. You can submit an additional feature request too.
Thanks for choosing AI Excerpt Generator By ThemeNcode. This is a plugin that generates excerpts with the help of Chat GPT AI. You can quickly get the excerpt or summary of your posts, pages, and many other post types.
To purchase the AI Excerpt Generator By ThemeNcode plugin, visit the plugin landing page on the ThemeNcode website, select your preferred plan/package, and click on the button to purchase.
You’ll be redirected to our portal to complete your purchase, you can pay with any credit/debit card. Payments are processed securely through the stripe gateway.
After completing the purchase, you’ll get the option to Download your plugin file. Download the plugin to your device and continue to the next section for details on installation.
Installation
Installing AI Excerpt Generator Plugin is as simple as any other WordPress plugin. Here are the steps required to install the plugin on your WordPress Website.
Purchase and download the plugin by following the previous section
Once downloaded the plugin, login to your website’s admin panel
Go to Plugins > Add New Menu
Click on the Upload Plugin button
Click on Choose File
Select the plugin zip file you’ve downloaded on step #1
Click on the Install Now button
Once installed, click on Activate button to activate the plugin
That’s it. The plugin is now installed on your WordPress website.
Plugin Settings
After installing, now it’s time to set up the plugin. The process is quite easy and straightforward. In order to set up the AI Excerpt Generator By ThemeNcode go to Settings -> ThemeNcode AI Excerpt.
Get the OpenAI API key
In the ThemeNcode Ai Excerpt page, you will first find a field named “OpenAI API Key”. You need to put your API key here. There is a link below which will take you to your API Key. Follow the steps below:
Click on the link
If you already have an OpenAI account login to that or create a new account
You will see a page for API Keys. Click ‘Create new secret key’. It will give you a secret key.
Copy the secret key
Paste the secret key in the ThemeNcode AI Excerpt settings OpenAI API Key field and you are done
Enable on Post Types
This plugin can work on various post types. Here you can select which post types you need to work with. Just select those post types that you want to create excerpts with this plugin.
Select Model
There are 4 different primary OpenAI models or engines. You can choose anyone from there.
Maximum Token
The GPT family of models process text using tokens, which are common sequences of characters found in the text. A helpful rule of thumb is that one token generally corresponds to ~4 characters of text for common English text. This translates to roughly ¾ of a word (so 100 tokens ~= 75 words). By default, it is set to 60. You can change this according to your need.
After completing these steps just click ‘Save Changes’ and you’re done.
Generate Excerpts
Now you are just one click away from generating excerpts. Just go to the post type that you want to create an excerpt. Let’s take an example of ‘Posts”.
Go to ‘Posts’
Click ‘Edit’ on a previously created post or create a new post.
Click Generate Exceprt From ThemeNcode AI Excerpt in the right sidebar
And you can see your excerpt has been generated.
This plugin is very easy to use but it performs an important task that saves a lot of time and work.
Updates and Support
This plugin offers lifetime updates and one year of support system.
If you are enjoying using AI Excerpt Generator By ThemeNcode, you can leave us a review. It helps us to improve the product even more. You can submit an additional feature request too.
Licensing
Mainly there are two types of plans available for Display – TNC FlipBook – PDF viewer for WordPress Addon. Annual and Lifetime.
Annual Plan: This is a yearly plan. You will get a 1-year license in this plan. There are three types of annual plans.
1 Site: This license can be used on one site
3 Sites: This license can be used on three sites
100 Sites: This license can be used on 100 sites
Lifetime Plan: This is a ‘pay once’ type of plan. You will get a lifetime license in this plan. There are three types of annual plans.
1 Site: This license can be used on one site
3 Sites: This license can be used on three sites
5 Sites: This license can be used on 5 sites
Check out the pricing table for more detailed information.
Rate us
If you are enjoying using the TNC FlipBook – PDF viewer for WordPress plugin, you can leave us a review. It helps us to improve the product even more. You can submit an additional feature request too.
FAQ
What is the refund policy? WP File Access Manager is a product of ThemeNCode. Check out the refund policy of ThemeNCode. What payment method do you accept? This plugin is sold on CodeCanyon. You can use PayPal, Skrill (for non-US customers only), and credit cards (Visa or Mastercard), to make purchases Can I integrate the plugin with woo-commerce to add my own payment gateway? Yes. It comes with the integration of WooCommerce. Any file size limit? Any file type? There is no file size limit. It works with 30+ file types. Where can I ask a question about an item I want to purchase? Ask any queries through our support hub. Here is the link https://themencode.support-hub.io/ Can I use the plugin with WooCommerce? Yes. You can use this plugin with WooCommerce. It comes with the integration of WooCommerce Does this plugin support multisite? No. It only works on single WordPress installations.
Welcome to ThemeNcode. First of all, thank you for choosing TNC Bookshelf Popup Pro. This plugin will enhance your website design. You can organize your website elements such as images, image galleries, videos, PDFs, WooCommerce products, as well as embedding elements, pages, posts and many other in Bookshelf style. This plugin has grid/list options as well as search, sort and filter options.
To purchase the TNC Bookshelf Popup Pro plugin, visit the portal page on the ThemeNcode website. After that select your preferred plan/package. Mainly there are two types of plans available for TNC Bookshelf Popup Pro, Annual and Lifetime. Check out the pricing table for more detailed information. After selecting your purchase plan, click on the button to purchase. You can pay with any credit/debit card. Payments are processed securely through the Stripe gateway.
After completing the purchase, you’ll get the option to Download your plugin file. Download the plugin to your device and continue to the next section for details on installation.
Installation
Installing TNC Bookshelf Popup Pro is very simple just like any other WordPress plugin. Here are the steps required to install the plugin on your WordPress Website.
Follow the previous section to purchase and download TNC Bookshelf Popup Pro
Once downloaded the plugin, login to your website admin panel
Go to Plugins > Add New Menu
Click on the Upload Plugin button
Click on Choose File
Select the plugin zip file you’ve downloaded on step #1
Click on the Install Now button
Once installed, click on Activate button to activate the plugin
That’s it. The plugin is now installed on your WordPress website
After that you will get a new tab called TNC Bookshelf Popup Pro in your WordPress dashboard.
Shelf Items
This is the first section of TNC Bookshelf Popup Pro. In this section you can display all your items or you can create new shelf items here.
Add Shelf Item
To show items on a bookshelf first you need to add shelf items and later while embedding you can use them with a bookshelf. Follow the process to add shelf items.
From the Bookshelf tab, go to Add New Item on your WordPress Dashboard.
Set Featured Image: This is the image that will be shown on the bookshelf.
Item Content
Content to display: In this field, select the type of item you want to share. The following options are available:
Single Image
Image Gallery
Add to Youtube Video
Add Vimeo Video
Add Maps or any other Embedded items
Shortcode
Custom title and text
Any post or page
WooCommerce Product
TNC FlipBook / PDF Viewer
-> Single Image: If you select the Single Image option then you will get another field to upload an image. This image will be opened as a popup or in a new tab when someone will click the feature image on the bookshelf.
-> Image Gallery: Selecting an image gallery will enable the option to add a gallery. If you already have galleries created you can select that or you can choose multiple images and create a new gallery to show.
-> Add to Youtube Video: Youtube video will ask for the youtube video link in the next field. So when someone clicks the feature image that is on the bookshelf as an item this video will be played.
-> Add Vimeo Video: Same as youtube video. It will ask for a Vimeo video link.
-> Add Maps or any other Embedded items:
Put the link of a map or any other embedded items on this field.
Select size: It can be set to either full screen or custom width and height.
Full Screen: If you choose full screen then the next field will be selected fullscreen. It can be either true or false. Select true to show as fullscreen and false otherwise.
Custom width and height: If you choose this option then two more fields of Iframe width and height will come up. Put a number according to your need.
->Shortcode: The shortcode is usually provided by the plugin developer, and it’s a specific identifier for a particular functionality or feature of the plugin. For example, a plugin that adds a contact form to your site might provide a shortcode. When you place shortcodes in a post or page and view it on the front-end of your website.
Here is our list of shortcodes:
Bookshelf Shortcode[bstnc-book-shelf]
List / Grid Shortcode[bstnc-list-grid]
Popup [bstnc-popup]
Bookshelf Posts [bstnc-posts]
Bookshelf Shortcode [bstnc-book-shelf]
This shortcode allows you to display selected shelf items using a BookShelf Style. It comes with a few parameters.
viewer_id: This is the list of comma-separated id’s of the viewer you want to embed. Use maximum 5 id’s or each shelf
open_type: This parameter defines how the viewers should appear, you can choose between link & popup.
shelf_type: Style of Shelf, currently applicable values are style-1, style-2, style-3, style-4
css_class: You can use any css class if you want to apply custom styles to the shelf.
This shortcode allows you to display selected shelf items in a Grid or List Style. It comes with a few parameters.
For Grid View:
Source by: Where to pull the PDF viewers From, You can choose from all (Uses all PDF viewers), category (Select Categories in next parameter) or select-viewer (Select Viewers in next parameter)
display_type: Select grid here.
open_type: This parameter defines how the viewers should appear, you can choose between a link & popup.
column: Select the number of columns to show the maximum. usable values are col-2, col-3, col-4. Applicable for Grid style only
filter: Use 0 to disable, 1 to enable the filter. Applicable for Grid style only
sort: Use 0 to disable or 1 to enable sort. Applicable for Grid style only
search: use 0 to disable or 1 to enable search. Applicable for Grid style only
css_class: You can use any CSS class if you want to apply custom styles to the container.
Source by: Where to pull the PDF viewers From, You can choose from all (Uses all PDF viewers), category (Select Categories in next parameter) or select-viewer (Select Viewers in next parameter)
display_type: Select list here
open_type: This parameter defines how the viewers should appear, you can choose between a link & popup.
css_class: You can use any CSS class if you want to apply custom styles to the container.
This Shortcode allows you to post filtered content and Shelf settings. It comes with a few parameters.
Post_Types: In this case you can select your post type from here by searching at least 3 characters. This is the list of comma-separated id’s you want to embed.
Author: You can choose your author in this field.
Category: You can choose your category in this field.
Tag: You can choose and select tag in this field.
Taxonomy: You can attach taxonomy and terms to this field.
Status: Here you can set your post status like ( Publish, Pending, Draft, Auto draft, Future )
Sort By: You can sort by ID, Title, Date, None, Type, Rand, Comment Count, Menu Order, Modified, Name, Author, Relevance. And also select your order Ascending or Descending.
Custom_Field (post meta): This is a custom field where you can set your Meta Key, Meta Value and Meta Compare.
Pagination: Here you can On/Off your pagination, and you can indicate your posts per page.
Shelf_Settings: In this section you can select Open Type(Popup/Link), Select Shelf items, Shelf type(Wood Style 1,2 or Glass style 1,2) and CSS Class
-> Custom Title and Text: If you select this type there will be two more fields.
Title: Put the title which will be shown when someone clicks this item on the bookshelf.
Text: This is like the description under the heading
-> Any page or Post: Here you can show any page or type of post as an item on the bookshelf. These options will come up when you select this type of item:
Select content: Here you can select any page or post from your WordPress
Select size: It can be set to either full screen or custom width and height.
Full Screen: If you choose full screen then the next field will be selected fullscreen. Select true to show as fullscreen and false otherwise.
Custom width and height: If you choose this option then two more fields of Iframe width and height will come up. Put a number according to your need.
-> WooCommerce Product: You can display your WooCommerce product post if you select this field. For this first you need to select your content and after that you need to select your post size, full screen or you can select your custom screen size.
-> TNC FlipBook / PDF Viewer: For this case, first you need to install and activate the TNC FlipBook – PDF viewer for WordPress plugin and then you need to create the flipbook. So after installing TNC Flipbook, you need to create a flipbook first. To create a flipbook, go to your WordPress dashboard and you will see a tab called TNC FlipBook. Click Add New and set a title. Then upload the PDF of your choice and click select. Insert the PDF file into your TNC Flipbook and you’re done! Now you can use this PDF as a flipbook on your website. Now it can be displayed or embedded in a post or page. You can search for the name and embed it when you create your FlipBook.
List View Excerpt:
This is only applicable to the Bookshelf list view shortcodes. Put a summary or short description of that specific item. This text will come under the title if you show items with list view mode.
BookShelf
In this section, you can create a new BookShelf and browse through previously created BookShelf. To create a new BookShelf you need to put the following information:
Name: Put the name of your BookShelf. The name is how it appears on your site.
Slug: This part will be shown in the URL. The “slug” is the URL-friendly version of the name. It is usually all lowercase and contains only letters, numbers, and hyphens. So put the text that you want to show in the URL.
Parent BookShelf: If the BookShelf you are creating is a subcategory then select the parent category from here. Let’s say you have created a BookShelf named Books and then a subcategory name Novel. So you can put Books in the Parent BookShelf of the Novel.
Description: Put the description of your BookShelf in this tab. The description is not prominent by default; however, some themes may show it.
Open Type: In this field you can find out how to open your bookshelf. It can be link or popup.
CSS Class: If you want to add custom CSS, you can put your CSS in this field.
After all this click on Add New Bookshelf and you are done.
Categories (List/grid)
In this section, you can create a new category and browse through previously created categories and also edit them.
To create a new category you need to put the following information:
Name: Put the name of the category
Slug: This part will be shown in the URL. So put the text that you want to show in the URL
Parent Category: If the category you are creating is a subcategory then select the parent category from here. Let’s say you have created a category named Books and then a category name Novel. So you can put Books in the Parent Category of the Novel
Description: Put the description of this category. The description is not prominent by default; however, some themes may show it.
License
In this section you need to enter your license key for TNC BookShelf Popup Pro license options. After successfully purchasing your copy and you can get your license key from the portal page.
Integrations
TNC BookShelf Popup Pro works with most themes and plugins available on the market. Here we’ve listed a few major ones it’s compatible with.
TNC FlipBook – PDF Viewer for WordPress
Contact form 7
TNC PDF Viewer
WP Forms
TNC AI Excerpt Generator
Mailchimp
Testimonial Slider
Smart slider 3
Apart from this, many other themes and plugins work perfectly with TNC Bookshelf Popup Pro.
Help & Support
Updates:
If you choose the Annual plan, you will get all the updates within one year; if you choose the lifetime plan, you will get lifetime updates.
Support:
Both plans come up with 1 year of support. For extra support duration, you need to buy a support package.
We have a well-prepared refund policy for our products. Make sure you have read them thoroughly before proceeding with a refund application.
Our support team is always prepared to help you out. If you are having any technical issues we suggest you contact our support immediately.
FAQ
Will this plugin work with WooCommerce Products?
Yes, it will. You can showcase your WooCommerce Products on a unique bookshelf.
Does this plugin work with every WordPress version?
Yes, this plugin can work with every WordPress version.
Can I show FlipBook on Bookshelf?
Yes, you can show any embedded item on Bookshelf.
Does this plugin conflict with any other plugin?
Until now, we haven’t found any issues with any other plugin. If you find any problems please contact our support hub.
Rate Us
If you are enjoying using TNC Bookshelf Popup Pro, you can leave us a review. It helps us to improve the product even more. You can submit an additional feature request too.
FAQ
How long will I get customer support?
You will get 1 year of support if you choose the annual plan and lifetime support with the lifetime plan. Check the pricing table for more details.
What is the refund policy?
We have a very well-prepared refund policy. Check this out.
Can I use it without a TNC FlipBook- PDF viewer for WordPress?
No, this is an Add-on of TNC FlipBook – PDF viewer for WordPress. You need to install TNC FlipBook – PDF viewer for WordPress first.
Why can’t I show anything on the Bookshelf?
Make sure you have featured images on all the PDF viewer pages to show them on the Bookshelf.
Does this plugin work with Page Builders?
Yes, it has widgets for almost all the page builders like Elementor, Divi, WPBakery, Avada etc.
Using TNC FlipBook - PDF viewer for WordPress with Oxygen Builder
A few days ago, we introduced integration with Oxygen Builder which needed some work to set it up. From version 10.9.2 TNC FlipBook – PDF viewer for WordPress comes with a way better integration with Oxygen Builder. There are two different methods to work with Oxygen Builder.
You can now use the default way of creating FlipBook (PDF viewer > Add New) with Oxygen Builder. To use the integration, you just need to enable the integration of Oxygen Builder from TNC FlipBook > Global Settings > Advanced Tab.
Once you enable Oxygen Builder Integration following the process above, you can start creating FlipBook from TNC FlipBook > Add New Menu. Once published, you can visit the viewer normally. This is the first method of creating a FlipBook using TNC FlipBook – PDF viewer for WordPress with Oxygen builder.
Method 2: Using Shortcodes
Additionally. you can still use the previous method of inserting shortcodes. here are shortcodes you can use.
TNC FlipBook – PDF viewer for WordPress 10.9.0 comes with 2 extra shortcodes to make it compatible with Oxygen Builder or any other builders that get rid of page templates. In this article, you’ll get the list of those 2 shortcodes with the parameters. You just need to copy the shortcodes, replace the file URL and paste them on any of your pages or posts to have the viewer display there.
file: This is where you’ll provide the URL to the pdf file that will be opened with FlipBook. Make sure you use the direct URL to the pdf file ending in .pdf, otherwise it will not work. Also, make sure the pdf files are hosted under the same domain.
class: You can use a custom CSS class for the generated link. Basically, this class is used for styling. for example, if you want the link to be a button and you’re using the bootstrap CSS framework, you can use the following in this field: btn btn-default
text: This is the text that will appear as a link. Please make sure to fill this field, as it will display nothing on the front end if you keep this field empty.
target: Link Target, Select how you want the link to open, in the same tab or in a new tab.
download: Select if you want to show the Download button in the toolbar.
print: Select if you want to show the Print button in the toolbar.
fullscreen: Select if you want to show the Fullscreen button in the toolbar.
Share: Select if you want to show the Share button in the toolbar.
zoom: Select if you want to show the Zoom option in the toolbar.
open: Select if you want to show the Open button in the toolbar.
logo: Select if you want to show the Logo button in the toolbar.
pagenav : Select if you want to show the Pagenav button in the toolbar.
find: Select if you want to show the Find button in the toolbar.
page: Enter the page number if you want to send the user to a specific page on opening of the file.
default_zoom: Select the Default Zoom here
pagemode : If you select Thumbs as pagemode, the left bar will be opened with page thumbnails and if you choose bookmarks, the left bar will be opened with the list of bookmarks. It is not recommended to use as it may not work smoothly on smaller screen sizes. We’ve added it just because it might be helpful for some users.
language: Select the language you want to use
current_view: Select if you want to show the Current View button in the toolbar.
rotate: Select if you want to show Rotate View button in the toolbar.
handtool: Select if you want to show the Hand Tool button in the toolbar.
doc_prop: Select if you want to show the Document Properties button in the toolbar.
toggle_menu: Select if you want to show the Toggle Menu button in the toolbar.
toggle_left: Select if you want to show the Toggle Left button in the toolbar.
scroll: Select if you want to show Scroll options in the toolbar.
spread: Select if you want to show Spread options in the toolbar.
default_scroll: Default Scroll Method, Use 1 for Vertical scrolling, Use 2 for Horizontal Scrolling, and use 3 for Flip Book
default_spread: Default Spread Mode, options: 1 for No Spread, 2 for Odd Spreads, 3 for Even Spreads
Output:
You can see there is a link with the text “Open PDF”. When someone clicks the link a PDF file will open. The text can be changed to anything from the shortcode.
file: This is where you’ll provide the URL to the pdf file that will be opened with FlipBook. Make sure you use the direct URL to the pdf file ending in .pdf, otherwise, it will not work. Also, make sure the pdf files are hosted under the same domain.
width: Specify the Width of iFrame in pixels here. For example, you can use 600
height: Specify the height of iFrame in Pixels here. For Example, you can use 800
download: Select if you want to show the Download button in the toolbar.
print: Select if you want to show the Print button in the toolbar.
fullscreen: Select if you want to show the Fullscreen button in the toolbar.
Share: Select if you want to show the Share button in the toolbar.
zoom: Select if you want to show the Zoom option in the toolbar.
open: Select if you want to show the Open button in the toolbar.
logo: Select if you want to show the Logo button in the toolbar. The logo will not be displayed if theiFrame width is small. But will display when users go to fullscreen mode.
pagenav: Select if you want to show the Pagenav button in the toolbar.
find: Select if you want to show the Find button in the toolbar.
page: Enter the page number if you want to send the user to a specific page on opening of the file.
default_zoom: Select the Default Zoom here
pagemode: If you select Thumbs as pagemode, the left bar will be opened with page thumbnails and if you choose bookmarks, the left bar will be opened with the list of bookmarks. It is not recommended to use as it may not work smoothly on smaller screen sizes. We’ve added it just because it might be helpful for some users.
language: Select the language you want to use
current_view: Select if you want to show the Current View button in the toolbar.
rotate: Select if you want to show Rotate View button in the toolbar.
handtool: Select if you want to show the Hand Tool button in the toolbar.
doc_prop: Select if you want to show the Document Properties button in the toolbar.
toggle_menu: Select if you want to show the Toggle Menu button in the toolbar.
toggle_left: Select if you want to show the Toggle Left button in the toolbar.
scroll: Select if you want to show Scroll options in the toolbar.
spread: Select if you want to show Spread options in the toolbar.
iframe_title: Title of the iFrame tag
default_scroll: Default Scroll Method, Use 1 for Vertical scrolling, Use 2 for Horizontal Scrolling and use 3 for Flip Book
default_spread: Default Spread Mode, options: 1 for No Spread, 2 for Odd Spreads, 3 for Even Spreads
Output:
By using this shortcode, one can directly embed and show a PDF file with a FlipBook on a page or post. Change the shortcode as you need and the viewer will be changed according to it also.
Troubleshoot
TNC FlipBook – PDF viewer for WordPress – Flipbook Conflict with Divi Theme
First of all, thanks for choosing Preview – TNC FlipBook – PDF viewer for WordPress Addon. This documentation is to demonstrate everything about this addon. Right from buying the addon to using it efficiently.
To get started, you need to buy this from the landing page on the ThemeNcode website, Preview – TNC FlipBook – PDF viewer for WordPress Addon. There are various plans available for you at this moment. Select your plan and click ‘Buy Now’.
You’ll be redirected to our portal to complete your purchase, you can pay with any credit/debit card. Payments are processed securely through the Stripe gateway.
After completing the purchase, you’ll get the option to Download your plugin file. Download the plugin to your device and continue to the next section for details on installation.
N.B.: Please note that this is not a standalone plugin. It requires TNC FlipBook – PDF viewer for WordPress or TNC PDF viewer installed in order to work. The purpose of this addon is to show a few selected pages of a PDF file and put restrictions so that only the permitted users can get access to the full PDF.
Installation
Installing Preview – TNC FlipBook – PDF viewer for WordPress Addon is very simple just like any other WordPress Plugins. Here are the steps required to install the plugin on your WordPress Website.
Purchase and download Preview – TNC FlipBook – PDF viewer for WordPress Addon following the previous section
Once downloaded the plugin, login to your website admin panel
Go to Plugins > Add New Menu
Click on the Upload Plugin button
Click on Choose File
Select the plugin zip file you’ve downloaded on step #1
Click on the Install Now button
Once installed, click on Activate button to activate the plugin
That’s it. The plugin is now installed on your WordPress site.
Upload PDF and Create FlipBook
As this is an Add-on of TNC FlipBook – PDF viewer for WordPress you can’t upload PDFs without this. To upload PDF files and create a FlipBook you first need to do that with TNC FlipBook – PDF viewer for WordPress. Follow these steps to create your first FlipBook and if you are already a user of TNC FlipBook – PDF viewer for WordPress you can skip this step.
After installing and activating TNC FlipBook – PDF viewer for WordPress, Navigate to TNC FlipBook > Add New Menu
Put a title for your FlipBook, Keep it relevant to your PDF file as it will be used as the viewer title and while embedding using shortcodes.
In the next section under FlipBook Settings > Basic Settings Upload the PDF file you want to use
Select Page Mode. The default will be fine in most cases.
Default will open Default FlipBook
Thumbnails will open with displaying page thumbnails on the left side
Bookmarks will open by displaying Bookmarks on the left side
Attachments will open by displaying attachments on the left side
Default Zoom: You can set your preferred default zoom level for this PDF viewer on this input
Default Scrolling Mode: You can set your default scrolling mode here. Vertical, horizontal, wrapped or Flip.
Default Spread: Set your preferred default spread here.
Viewer Language: Select your preferred viewer language here.
Jump to page: Enter a page number here if you want to open/jump to a specific page.
Now, go to Toolbar Elements Tab
The first option here is to Use Global options, It’s enabled by default. If you need to hide any specific toolbar elements like download, print and others, you can disable this option and a list of toolbar elements will appear to enable or disable. I am not going through all the toolbar items here as all those are self-explanatory.
The next tab is the Appearance
We have a use global setting option here as well. Disable the global option only if you want to have a different theme/color setting for this specific viewer. Not going through the details here as well, you’ll understand by titles easily.
The next Tab is Privacy/Security
You don’t have to do anything on this tab. If you purchase WP File Access Manager, you’ll be able to manage the restriction settings from Media > File Access Manager Menu.
Once you’re done with all the settings, click on Publish button on the right sidebar
Partial Content Preview
On the Viewer Edit Page, you will see a meta box named Partial Content Preview. There is an input field where you need to put the number of pages that you want to show as the partial preview for the main PDF. The numbers have to be separated by commas. Then Click on Generate Preview File.
Let’s see an example where a user wants to generate a preview file for the first three pages. ( You can take any pages you want )
Put 1,2,3 in the input field and click Generate Preview File and the preview file will be generated.
Partial Content Settings
In the Viewer Edit page scroll down and after PDF viewer Settings you will find another meta box named Partial Content Settings. It will be used to set the restriction. You can control who can see the full pdf and who will be restricted from here.
Apply Partial Content Settings: Turn this on to set the restrictions
Require Login: There are two options. Default, Yes(This file is restricted), and No( This file is not restricted). Select Yes(This file is restricted) to enable the restriction modes.
Access Type: Here it can either be selected to Allow or Disallow.
Restrict by: There are four different options
Users: If you want to select specific users to give permission to full PDF select from here
Select Users: Put the name of the users who will either be allowed or disallowed depending upon the access type
User Roles: Select the user roles that you want to permit.
Select User Roles: This plugin can work with all the user roles that come up with WordPress. Select any role you want.
Products: The product field works with WooCommere.
Select Products: Select the WooCommerce products here. Visitors will be permitted after buying that specific product
Paid Membership Pro: This function works with Paid Membership Pro Level
Select Paid Membership Pro Level: Select the level that you want to permit or restrict.
Then click update and you are all set. Now only permitted users will see the full PDF and others will see the partial view of the selected pages.
Update and Support
Updates:
If you choose the Annual plan, you will get all the updates within one year; if you choose the lifetime plan, you will get lifetime updates.
Support:
Both plans come up with 1 year of support. For extra support duration, you need to buy a support package.
Welcome to TNC INFINITY, a powerful and versatile WordPress theme designed to help you create stunning websites with ease. This guide will walk you through the installation process and provide an overview of the theme’s key features, allowing you to quickly get up and running.
Installation
Before you begin, make sure you have a working WordPress installation. If you don’t have WordPress installed, follow these steps:
Download the latest version of WordPress from wordpress.org and follow the installation instructions provided.
Once WordPress is installed and running, you’re ready to install the TNC INFINITY theme.
There are two ways to install the theme:
Automatic Installation
Log in to your WordPress admin panel.
Navigate to Appearance > Themes.
Click on the Add New button at the top of the page.
In the search field, enter “Theme Name.”
Locate the TNC INFINITY theme and click the Install button.
After installation, click the Activate button to activate the theme.
Manual Installation
Download the TNC INFINITY theme from our website or the marketplace where you purchased it.
Extract the downloaded ZIP file to your computer.
Using an FTP client, connect to your web server and navigate to the /wp-content/themes/ directory.
Upload the extracted theme folder to the /themes/ directory.
Log in to your WordPress admin panel.
Navigate to Appearance > Themes.
You should see the TNC INFINITY theme listed. Click the Activate button to activate the theme.
Congratulations! You have successfully installed and activated the TNC INFINITY theme.
Theme Setup
Once the theme is activated, it’s time to set it up to match your preferences. Here are a few steps to get you started:
Navigate to Appearance > Customize to access the theme customization options.
Explore the various sections and settings available, including site identity, colors, typography, header, footer, and more. Customize these settings to reflect your brand and design preferences.
Save your changes by clicking the Publish button at the top of the customizer.
To set up menus, go to Appearance > Menus. Create a new menu and assign it to the desired locations within your theme.
Create and assign a static front page to define your homepage layout. You can do this under Settings > Reading.
Take some time to familiarize yourself with the theme’s settings and options. Refer to the corresponding sections in this documentation for detailed explanations and instructions.
That’s it! You are now ready to start building your website with the TNC INFINITY theme. If you need further assistance or have any questions, refer to the other sections of this documentation or reach out to our support team.
Theme Customization
TNC INFINITY offers extensive customization options to help you personalize your website’s appearance and tailor it to your specific needs. In this section, we will explore the different ways you can customize your theme, including colors, fonts, layouts, and more.
Customizer
The easiest way to customize your theme is through the WordPress Customizer. The Customizer provides a live preview of your changes, allowing you to see how they will affect your website in real-time. To access the Customizer:
1. Log in to your WordPress admin panel.
2. Navigate to Appearance > Customize.
Site Identity
The Site Identity section allows you to set your website’s title, tagline, and logo. Here, you can:
Update your website’s title and tagline.
Upload a custom logo or use text-based branding.
Set a site icon (favicon) that appears in the browser tab.
Colors
The Colors and Background sections enable you to customize the color scheme and background of your website. In these sections, you can customize the color of specific elements like:
Header Background
Site Title
Site Tagline
Navbar Top Menu
Dropdown Menu with Background
Active Menu
Hamburger Icon
Font Color
Body Color
Link Color and many more.
Menus
TNC INFINITY allows you to create and customize menus to navigate your website’s content efficiently. You can create and manage menus, assign them to different locations, and customize their appearance.
Widgets
TNC INFINITY supports the use of widgets to add various functionality and content to your website’s sidebars, footers, and other widgets areas. Widget areas, also known as sidebars, are specific regions of your website where you can place widgets. TNC INFINITY typically includes several predefined widget areas, such as:
Sidebar: The primary sidebar typically displayed on the side of your blog or pages.
Footer: The footer area typically displayed at the bottom of your website.
Homepage Settings
You can choose what’s displayed on the homepage of your site. It can be posted in reverse chronological order (classic blog), or a fixed/static page. To set a static homepage, you first need to create two Pages. One will become the homepage, and the other will be where your posts are displayed.
You can change or remove your homepage title here.
Layout
It provides flexible layout options to help you structure and organize the content on your website. TNC INFINITY includes a variety of page templates that offer different layouts and styles. Also provide the option for full-width layouts, where the content spans the entire width of the screen, without sidebars or other elements. Full-width layouts are often used to create impactful landing pages or showcase specific content.
You can customize :
Home Page Layout
Archive Page Layout
Single Page Layout
Single Post Layout
Search Page Layout
Full-width layouts can give your content a spacious and immersive feel. The layout and elements of your website will automatically adjust based on the screen size, ensuring readability and usability across different devices. Depending on the features and capabilities of TNC INFINITY, you may have additional layout options available. These could include options for headers, footers, navigation menus, or specific sections of your website.
Blog Page
This section useful if you select “TNC Infinity Blog Page” for your page template. You can display different category on different section using this template.
You can choose different category for Featured, Popular Post and Image Gallery section.
Customize Single Page
In this section you will select the social icon to display on any post.
TNC Infinity Settings
TNC INFINITY provides a set of settings that allow you to configure various aspects of your theme’s functionality, appearance, and behavior. In this section, we will explore the available settings.
General
You will Select the default featured image.
You will get the option to display featured images in blog posts.
Display featured images in single posts.
You can also select page title background image
You can change your primary and heading font of your site.
These are the basic general settings available in TNC INFINITY. Explore the options provided by your theme and customize them to align with your brand, design preferences, and website requirements. Remember to save your changes after customizing the general settings to apply them to your website.
Newsletter
You can show or hide your newsletter of your site.
You can change Subheading, Heading, Button Text and Button URL here.
Footer
The footer section of your website appears at the bottom of each page and typically contains important information, links, and additional content. In this section, we will explore how to customize the footer in TNC INFINITY and make it suit your website’s needs.
You can customize and choose colors for:
Top Footer background
Top Footer padding
Copyright Footer background
Copyright Footer padding
Change the color of the social icon
You can set your preferred social URL like Facebook, Twitter, Vimeo, Instagram, Pinterest, Youtube
Additional CSS
TNC INFINITY allows you to add custom CSS code without modifying the theme files directly. This feature, known as Additional CSS, provides a convenient way to customize the appearance and styles of your website. In this section, we will explore how to use Additional CSS in TNC INFINITY.
To add Additional CSS code to your website:
In the Additional CSS section, you will see a text editor or a field where you can enter your custom CSS code.
Write or paste your CSS code into the provided area.
Ensure that your code is valid and properly formatted.
Preview the changes in the live preview pane to see how the CSS affects your website’s appearance.
Save the changes to apply the custom CSS to your website.
Single Post
In single post setting you can show or hide social icon of your single post.
Required Plugins
If you want to use 100% of TNC INFINITY’s features, you will definitely need some plugins. Each will bring different functionality. Here is the list of plugins you need:
Elementor ( page builder)
Contact Form 7
WP Carousel
It is not mandatory to install all plugins, whenever you need certain functionality you need to install this particular plugin. These are all free plugins
Create pages using elementor
TNC INFINITY comes with a number of pre-defined Elementor template sections. This determines how different types of pages are built on your website. However, before importing the template section, you need to install the Elementor Page Builder plugin. Don’t forget to import the template section after installing Elementor. Use the link below to download the file.
After downloading the template section file, go to Admin Panel > Templates > Import Templates and you will see an option to import templates. This section explores the available element template categories and how they control the layout and presentation of content.
TNC INFINITY provides several default Elementor template sections for different content types. Here are all the sections with screenshots.
1.TNC – About us large card
2.TNC – Call to action
3.TNC – Common page banner
4. TNC – Contact form and map
[Note that] This section is based on the Contact Form 7 plugin. Before using this plugin, install Contact Form 7 and go to Contact > Contact Form. You can now create new contact form or edit existing contact form. Paste the following code into this Contact form tab. If you are using the TNC – Contact Form and Map section, use the contact form shortcode in the shortcode element of the TNC – Contact Form and Map section.
[Note that] This section relies on the WP Carousel plugin. Please install WP Carousel before using this plugin. Then go to WP Carousel > All Carousels. You can now create new carousels or edit existing carousels. Then, if you use the TNC – WP Carousel section, use the WP Carousel shortcode in the TNC – WP Carousel section’s shortcode element.
These default templates ensure consistent styling and layout across different areas of your website.
FAQ
Q: Can I customize the colors and fonts in TNC INFINITY?
A: Yes, you can customize the colors and fonts in TNC INFINITY. Navigate to Appearance > Customize to access the theme customization options. Look for sections such as “Colors” where you can modify the colors and fonts according to your preferences.
Q: How can I add a custom menu to my website?
A: To add a custom menu in TNC INFINITY follow these steps:
Log in to your WordPress admin panel.
Navigate to Appearance > Menus.
Create a new menu and add the desired links or pages to it.
Assign the menu to a specific location such as the primary menu or footer menu.
Save the menu to apply the changes.
Q: Does TNC INFINITY support plugins?
A: Yes, TNC INFINITY is designed to be compatible with a wide range of WordPress plugins. You can enhance the functionality of your website by installing and activating plugins. However, please note that the compatibility of specific plugins may vary, so it’s recommended to test plugins with TNC INFINITY
Q: Can I import multiple templates into my theme?
A: Yes, you can import multiple templates into your WordPress theme, depending on the available options and requirements of your theme or plugins. Some themes may allow you to import multiple templates at once, while others may require you to import them individually. Consult the documentation or support resources specific to your theme for instructions on importing multiple templates.
Q: Can I modify an imported template after importing it?
A: Yes, after importing a template, you can customize and modify it to suit your specific needs. Depending on the template type, you can often edit the template settings, content, and design elements to achieve the desired look and functionality. However, keep in mind that modifying certain aspects of a template may require advanced knowledge of HTML, CSS, or PHP. Take caution when making changes and always keep a backup of your original template files.
Conclusion
In conclusion, this documentation has provided you with a comprehensive guide on various aspects of TNC INFINITY. We have covered the essential topics, including getting started, theme options, theme customization, menu setup, widgets, layout, category ID, footer customization, Additional CSS, and frequently asked questions (FAQs).
By following the instructions and guidelines presented in this documentation, you should now have a solid understanding of how to use and customize TNC INFINITY to suit your needs. Whether you are a beginner or have experience with WordPress, this documentation aims to assist you in maximizing the potential of your website.
Remember to always refer to the theme’s specific documentation and consult the theme developer for any additional guidance or support. WordPress is a dynamic platform, and updates or changes may occur over time, so staying informed about the latest developments is crucial.
We hope that this documentation has empowered you to create a visually appealing and functional website with TNC INFINITY. If you encounter any issues or have further questions, please do not hesitate to seek assistance. Happy website building!
Shortcodes included with TNC FlipBook - PDF viewer for WordPress version 11.1 and newer
We had a bunch of shortcodes included with older versions of TNC FlipBook – PDF viewer for WordPress. But we’ve streamlined the shortcodes and lowered the number of shortcodes to only 3 from version 11.1 .
However, the previously generated shortcodes will still work, but there’s no way to create those old shortcodes now.
Here are the new shortcodes that come with TNC FlipBook – PDF Viewer for WordPress version 11.1 :
1. [pvfw-embed]
This shortcode allows you to embed already created FlipBook (Using TNC FlipBook > Add New menu) on any post or page. It comes with a few parameters.
viewer_id: This is the id of the viewer you want to embed.
width: This is the width of the iframe that will be embedded on the page.
height: This is the height of the iframe that will be embedded on the page.
[pvfw-link] shortcode allows you to insert a link to an already created FlipBook (Using TNC FlipBook > Add New menu). It comes with a few parameters.
viewer_id: This is the id of the viewer you want to link to.
text: The anchor text that will be used as a link.
class: you can add a CSS class here to the link.
target: Defines the target of the link. Put _blank if you want to open the link in a new tab or use _parent if you want to open the link on the same tab.
[pvfw-image-link] shortcode allows you to insert a link to an already created FlipBook (TNC FlipBook > Add New menu) with an image. It comes with a few parameters.
viewer_id: This is the id of the viewer you want to link to.
upload Image: The anchor text that will be used as a link.
alt_text: You can set ALT Text from here.
link target: defines the target of the link. Put _blank if you want to open the link in a new tab or use _parent if you want to open the link on the same tab.
width: Image width
height: Image Height.
css class: you can add a CSS class here to the link.
image alignment: Image alignment (values: inherit, left, center, right)
From version 10 TNC FlipBook – PDF Viewer for WordPress comes with a whole new system of creating PDF viewers which made us introduce a new set of shortcodes and discontinue the previous set of shortcodes.
However, Those old shortcodes are not completely removed from the plugin. If you’ve generated those shortcodes previously, these shortcodes will work fine. But we’ve removed the ability to create those discontinued shortcodes from version 10.
Here’s a list of shortcodes you should not use anymore and replaced them with new shortcodes if possible.
Thank you for choosing Hospital Child Theme – Divi. A perfect website for hospitals, healthcare foundations, medical institutions, and so on. In this documentation, you can learn how to use this theme and build your website with a step-by-step process.
Before proceeding I am assuming that you have already bought the Hospital Child Theme – TNC from the Elegant Themes Marketplace. If you haven’t please visit the Hospital Child Theme – TNC page on Elegant Themes Marketplace and click on Buy This Item. After that create an account if you don’t have one and complete your purchasing process. After that download the file.
Extract The Downloaded File
After downloading the file you need to extract the zip file and you will get the following files:
Theme File: This is the main file of the child theme
Theme Builder layout: This file contains the templates for the Divi Theme Builder
WooCommerce File: It has the shop, cart, account, and product page files
License.txt file
How to use
After extracting follow the process below to use the child theme.
Upload the child theme on your website:
Go to Appearance -> Themes
Click on Add new
Upload Hospital Child Theme – TNC
Click Activate
Install Required Plugins
After activating the child you will get a message to install the required plugins
Click Begin installing plugins
Select all and from the bulk settings select install and then install the required plugins. All the plugins are free and required to make this theme functional. So make sure you install all of them properly.
After installing, go to plugins and activate the installed plugins
Import demo data
Go to the Appearance tab -> Import Demo data
Click on Import demo data and the process will automatically start
Change the Menu
Go to Appearance and then Menus
Select the Primary menu
Click save
Change the Permalink structure
Go to Settings -> permalinks
Select “Post name” as the permalink structure
Click save settings
Change the Reading settings:
Go to Settings -> Reading
From “Your homepage displays” select “A static page”
Select Home as the Homepage
Select Blog as the Posts page
Import templates in Theme Builder
Go to Divi -> Theme Builder
At the top right corner, you will see a portability option (up and down arrow). Click on that.
Portability Popup will come up
Go to the Import tab
Select the Theme Builder layout file that you got while downloading the file
Click Import Divi Builder Templates
Select the WooCommerce Pages
Go to WooCommerce -> Settings
Then go to Products
Select Shop as the Shop Page. You need to select the shop page that comes with the child theme, not the previously generated one.
Then go to Advanced
Select the Cart Page, Checkout Page, and My Account Page. You need to select the pages that come with the child theme, no the previously generated one.
Click Save Changes
Import Product Filters
Go to Product Filters
Click on Import
Select the product file and your products will be uploaded
Clear Static CSS File Generation
Go to Divi -> Theme Options
Then from the builder tab go to Advanced
Click clear beside Static CSS File Generation field
Thank you for choosing TNC Cryptique Divi Child Theme. A perfect website for Crypto enthusiasts, Crypto bloggers, Crypto-related businesses, and so on. In this documentation, you can learn how to use this theme and build your website with a step-by-step process.
Before proceeding I am assuming that you have already bought the TNC Cryptique Divi Child Theme from the Elegant Themes Marketplace. If you haven’t please visit the TNC Cryptique Divi Child Theme page on Elegant Themes Marketplace and click on Buy This Item. After that create an account if you don’t have one and complete your purchasing process. After that download the file.
Extract the Downloaded File
After downloading the file you need to extract the zip file and you will get the following files:
Theme File: This is the main file of the child theme
Theme Builder layout: This file contains the templates for the Divi Theme Builder
WooCommerce File: It has the shop, cart, account, and product page files
License.txt file
How to use
After extracting follow the process below to use the child theme.
Upload the child theme on your website:
Go to Appearance -> Themes
Click on Add new
Upload TNC Cryptique Divi Child Theme
Click Activate
Install Required Plugins
After activating the child you will get a message to install the required plugins
Click Begin installing plugins
Select all and from the bulk settings select install and then install the required plugins. All the plugins are free and required to make this theme functional. So make sure you install all of them properly.
After installing, go to plugins and activate the installed plugins
Import demo data
Go to the Appearance tab -> Import Demo data
Click on Import demo data and the process will automatically start
Change the Menu
Go to Appearance and then Menus
Select the Primary menu
Click save
Change the Permalink structure
Go to Settings -> permalinks
Select “Post name” as the permalink structure
Click save settings
Change the Reading settings:
Go to Settings -> Reading
From “Your homepage displays” select “A static page”
Select Home as the Homepage
Select Blog as the Posts page
Import templates in Theme Builder
Go to Divi -> Theme Builder
At the top right corner, you will see a portability option (up and down arrow). Click on that.
Portability Popup will come up
Go to the Import tab
Select the Theme Builder layout file that you got while downloading the file. It’s in the demo-data folder. And, the file name is tnc-cryptique-divi-theme-builder.json
Click Import Divi Builder Templates
Select the WooCommerce Pages
Go to WooCommerce -> Settings
Then go to Products
Select Shop as the Shop Page. You need to select the shop page that comes with the child theme, not the previously generated one.
Then go to Advanced
Select the Cart Page, Checkout Page, and My Account Page. You need to select the pages that come with the child theme, no the previously generated one.
Click Save Changes
Import Product Filters
Go to Product Filters
Click on Import
Select the product file and your products will be uploaded
Clear Static CSS File Generation
Go to Divi -> Theme Options
Then from the builder tab go to Advanced
Click clear beside the Static CSS File Generation field
Thank you for choosing TNC Lawyer Divi Child Theme. A perfect website for lawyers, advocates, attorneys, law firms, and so on. In this documentation, you can learn how to use this theme and build your website with a step-by-step process.
Before proceeding I am assuming that you have already bought the TNC Lawyer Divi Child Theme from the Elegant Themes Marketplace. If you haven’t please visit the TNC Cryptique Divi Child Theme page on Elegant Themes Marketplace and click on Buy This Item. After that create an account if you don’t have one and complete your purchasing process. After that download the file.
Extract the Downloaded File
Theme File: This is the main file of the child theme
Theme Builder layout: This file contains the templates for the Divi Theme Builder
License.txt file
How to Use
After extracting follow the process below to use the child theme.
Upload the child theme on your website:
Go to Appearance -> Themes
Click on Add new
Upload TNC Cryptique Divi Child Theme
Click Activate
Install Required Plugins
After activating the child you will get a message to install the required plugins
Click Begin installing plugins
Select all and from the bulk settings select install and then install the required plugins. All the plugins are free and required to make this theme functional. So make sure you install all of them properly.
After installing, go to plugins and activate the installed plugins
Import demo data
Go to the Appearance tab -> Import Demo data
Click on Import demo data and the process will automatically start
Change the Menu
Go to Appearance and then Menus
Select the Primary menu
Click save
Change the Permalink structure
Go to Settings -> permalinks
Select “Post name” as the permalink structure
Click save settings
Change the Reading settings:
Go to Settings -> Reading
From “Your homepage displays” select “A static page”
Select Home as the Homepage
Select Blog as the Posts page
Import templates in Theme Builder
Go to Divi -> Theme Builder
At the top right corner, you will see a portability option (up and down arrow). Click on that.
Portability Popup will come up
Go to the Import tab
Select the Theme Builder layout file that you got while downloading the file
Click Import Divi Builder Templates
Clear Static CSS File Generation
Go to Divi -> Theme Options
Then from the builder tab go to Advanced
Click clear beside the Static CSS File Generation field
First of all, thanks for choosing TNC Residane. This documentation will help you in using the theme properly. Please read the whole documentation before using this theme and if you have any confusion feel free to contact us through our support hub.
Before installing, please make sure the following things:
You should have at least WordPress version 5.5 installed. Newer versions will work perfectly.
PHP version should be 5.4 or greater.
WordPress memory limit should be at least 128 MB
Installing the Theme
The installation process is really simple and straightforward. Follow the steps:
Step 1: Log in to your WordPress Dashboard Step 2: Go to Appearance and then Themes Step 3: Click on Add new and then click Upload theme Step 4: Select TNC Residane from your device and then upload the theme Step 5: Click Install and then activate the theme
Now, TNC Residane is successfully installed and activated on your WordPress website.
Install Required Plugins
When the installation is done, you will see a notice. This theme requires four plugins to work perfectly. They are:
Elementor – Pages are created using Elementor
One Click Demo Import – To import the demo contents
Contact Form 7 – Forms are created using this plugin
TNC Residane Elements – It is important to use several elements related to this theme
Import Demo data
Click on Appearance on your WordPress dashboard and then click Import Demo Data. After that, click on the Import Demo Data button. Wait a while and the demo will be imported on your website.
Change the Permalink Structure
This is a very important step, and if you miss this it might cause a lot of issues on your site. So make sure you change the structure at this stage. It’s an extremely easy task. Simply go to Settings and then Permalinks. Then change the Permalink Structure to the “Post name”. After that, click Save Changes and you’re done.
Basic Site Settings
There are some basic settings that you may want to change after installing the Theme.
Changing the site icon and tagline:
Go to Appearance and then customize. After that, write the site title, and tagline that you want. Then click on the change image button and select the image the image that you want.
Agents
You can create as many agent profiles as you want. All you need to do is just put the information about the agents, and the page will automatically be organized. There are the following fields:
Basic Info:
Description Paragraph
Designation
Phone Number:
Email
Listing Property Link
Contact
Social Profile:
Facebook
Twitter
LinkedIn
Youtube
List Your Properties
If you want to list properties, this is just for that. Under this tab, you will find the two options:
All Properties: Here, you will see all your previously created properties, and you can edit or delete them.
Add New: You can add new properties by clicking add new. It has many fields where you just need to put information and your property page will be created.
First of all, thanks for choosing TNC Hospital. This documentation will help you in using the theme properly. Please read the whole documentation before using this theme, and if you have any confusion, feel free to contact us through our support hub.
Before installing, please make sure the following things:
You should have at least WordPress version 5.5 installed. Newer versions will work perfectly.
PHP version should be 5.4 or greater.
WordPress memory limit should be at least 128 MB
Installing The Theme
The installation process is really simple and straightforward. Follow the steps:
Step 1: Log in to your WordPress Dashboard Step 2: Go to Appearance and then Themes Step 3: Click on Add new and then click Upload theme Step 4: Select TNC Hospital from your device and then upload the theme Step 5: Click Install and then activate the theme
Now, TNC Hospital is successfully installed and activated on your WordPress website.
Install Required Plugins
When the installation is done, you will see a notice. This theme requires four plugins to work perfectly. They are:
Elementor – Pages are created using Elementor
One Click Demo Import – To import the demo contents
Contact Form 7 – Forms are created using this plugin
TNC Hospital Elements – It is important to use several elements related to this theme
Photo Gallery Builder – This plugin helps you to showcase photos as a masonry gallery.
Themify – WooCommerce Product Filter – Filter between WooCommerce Products
WooCommerce – This is essential if you want to have products and make your website an e-commerce site.
BookingPress Appointment Booking – It will let your visitors book appointments directly on your website for the doctors.
Steps to follow:
Click on Begin installing plugins
Select all the plugins
From the Bulk Action, choose Install
Click Apply
After installing the required plugins, get back to the previous page.
Select all the plugins, and choose Activate from the Bulk action
Click Apply again and you’re done.
Import Demo Data
When you are done with the installation of the theme and all required plugins, it’s time to import the demo data so that you can see the site the same as you saw in the live preview. Here is how you can import the demo data.
Step 1: Click on Appearance on your WordPress dashboard Step 2: Click Import Demo Data. Step 3: Click on the Import Demo Data button. Wait a while, and the demo will be imported to your website.
Change The Permalink Structure
This is a very important step, and if you miss this it might cause a lot of issues on your site. So make sure you change the structure at this stage. It’s an extremely easy task.
Go to Settings then Permalinks.
Change the Permalink Structure to the “Post name”
Click Save Changes, and you’re done.
Customize Settings
There are various customizable options where you can customize the website. I will guide you with every detail. Go to Appearance and then Customize. From there you can change customize everything.
Top Bar: There are two changes that you can make in the top bar.
Social: Put your own social media links here
Address: Put the address of your hospital here
Secondary Topbar: Here you can change the map location and the emergency phone number
Location: Put your Google map location here
Emergency: The helpline of your hospital
Header: Change the basic settings of the header
Book Button: Give the link where you want to let your visitors go from the appointment button
Mobile Logo: Put the logo that you want to show on the mobile
Site Identity: This text will show on the browser
Site Title: Put the title of your website
Tagline: Put the Tagline of your website
Shop: Change the description of your shop from here
Shop Page content: Put the description here for your shop page
Footer: You can add the text of your Footer from here
Footer: Put the text that you want to show at the very end of the footer.
The other settings will be changed from the Page builder. These are the basic customization settings that you can do from the theme customizer.
Managing Doctors and Departments
There are specific pages for doctors and departments. These pages are predesigned, and all you need to do is just to change the contents, and you can create these pages easily. Just go to your WordPress dashboard, and there you will find the doctor option. Under the Doctor Tab, there are three sub-items.
Doctor: Here, you will find all the profiles of previous doctors, and you can edit or delete a doctor’s profile from this tab.
Add Doctors: To add a new doctor to the list, click on add doctor and fill in the following fields.
Department
Degree
Mail
Phone
Location
Schedule Patients
Dr About
Areas of Expertise:
Education and Training:
Professional Achievements:
Patient-Centered Approach:
Booking Button Text
Booking Button URL
Select Doctor’s Service
Profile Button Text
Select Doctor Profile PDF
Departments: Create or edit departments from this tab. Put the name, slug, parent department and description in order to create or edit the departments.
Photo Gallery
In the gallery pages you can see there are photos showing as a gallery. You can select or change the pictures from the photo gallery tab on your WordPress dashboard. Under the photo gallery tab you will find the following items
Gallery Items: Here, you will see all the previously created galleries. You can edit or delete them from here. Click on upload a new image to upload the images or select images from the library to choose from the previously uploaded images. Also, you can delete or edit the uploaded image by simply hovering over the images. After that, click Publish to publish the gallery. Add New: Create a new gallery by clicking Add New. Click on upload new images to upload the images or select images from the library to choose from the previously uploaded images. After that, just publish to create the gallery. Documentation: If you want to learn in detail about how to use this Photo Gallery, then read the documentation.
Managing Appointments
There is a booking system enabled on this Website. Booking can be done from the doctors, department, and appointment pages. In the BookingPress tab, you can see the following terms:
Dashboard: Here you can see all the data about booking, revenue, dates, etc
Calendar: In this tab, you can set an appointment by you
Appointments: Under the appointments tab, you can see all the previously made appointments by clients. You can search and filter in various ways, such as clients’ names, dates, services, statuses, IDs, etc
Payments: Here, you can see the payments by transaction date, clients’ name or services
Customers: Here, you can search the history of previous customers
Services: This is the most important tab where you can add new services or edit previous services. There are four parametres. Name, category, duration and price.
Notification: From this tab, you can notify admin or clients through email.
Customization: Customize the forms or form settings from here according to your need
Settings: In the settings tab, you need to personalize it with your own information.
Product Filter
The product filter will allow the option to filter between your products. You can select the type of fields you need to show, and based on those, your visitors can filter the products. If you don’t want to change or add anything, you can simply import the previously created one that you got with the Theme file.
If you want to create a new filter you need to fill the following fields:
Form Title
Layout
Empty Fields
Product Sorting
Product Count
Out of Stock
Pagination
Pagination Option
Products Per Page
Toggle Field Groups
Reset Button
Reset Label
Scroll To Result
Logical Relationship Between Taxonomies
Result Page Template
No Products Found Message
Variations Display
At the end of the list you can put the filtering options.
Elementor Custom Widgets
There are five custom widgets that you will get with this theme. They are:
Classic Testimonial – TNC Hospital – You can see this slider on the classic testimonial page.
Modern Testimonial – TNC Hospital – You can see this slider on the modern testimonial page.
Breadcrumb – TNC Hospital – This widget shows the breadcrumb of that page.
Image Box – TNC Hospital – You can see this widget on the home page under the banner slider. The sub-section of Our Mission and Our Vision is created using this widget.
Slider – TNC Hospital – You can see the slider in the banner section of the homepage. Change the slider according to your needs.
You can use this slider on any page of your website, too.
Support System
ThemeNcode always ensures that the support is fast and effective. If you are facing any kind of issues regarding the TNC Hospital theme, you can contact the support-hub anytime. Your issue will be handled by the support team with great precision and care.